Tekton 与 Argo CD 结合实现 GitOps
Serverless · 第 20 篇
来源课程笔记整理优化;插图已迁入博客静态目录。
Tekton自动化流水线 与 Argo CD 结合实现 GitOps
一、实现方式介绍
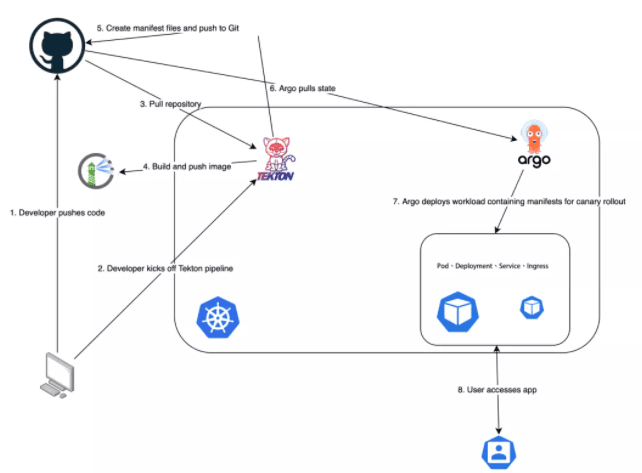
前面我们使用 Tekton 完成了应用的 CI/CD 流程,但是 CD 是在 Tekton 的任务中去完成的,可控性不强,因此现在我们使用 GitOps 的方式来改造我们的流水线,将 CD 部分使用 Argo CD 来完成,以实现应用部署及应用部署回滚的可控性。
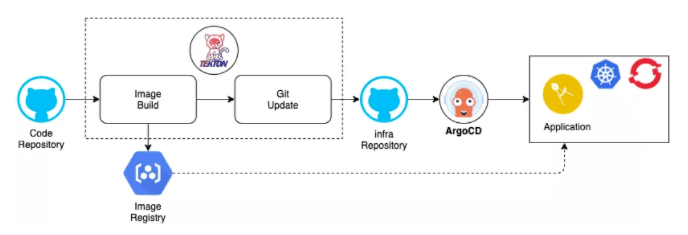
回顾下前面的 Tekton 自动化流水线项目流程,整个流水线包括 clone源代码(Clone)、单元测试(Test)、源码构建(Build)、容器镜像构建及推送(docker)、应用部署(deploy)、应用部署回滚(rollback) 几个部分的任务,最后的 应用部署(deploy)和应用部署回滚(rollback) 属于 CD 部分,这部分可替换为 Argo CD 来部署及回滚操作。
二、资源准备
2.1 源代码仓库准备
2.1.1 项目源代码
项目下面为项目源代码
[root@gitlab ~]# ls
tekton-argo-kubemsb-helm helm Charts包所在目录[root@gitlab tekton-argo-kubemsb-demo]# ls
Dockerfile go.mod go.sum main.go README.md2.1.2 项目源代码仓库
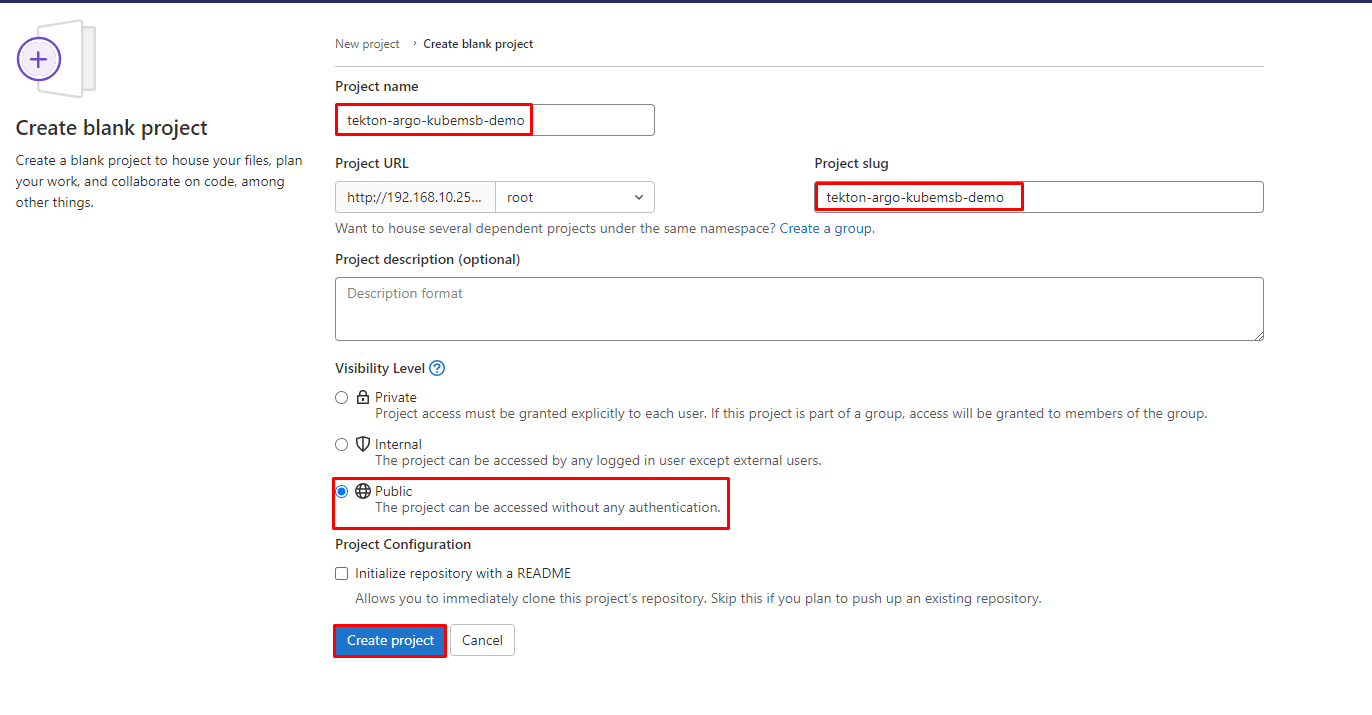
初始化本地代码工作区
[root@gitlab tekton-argo-kubemsb-demo]# git init
初始化空的 Git 版本库于 /root/tekton-argo-kubemsb-demo/.git/

添加远程代码仓库
[root@gitlab tekton-argo-kubemsb-demo]# git remote add origin http://192.168.10.250/root/tekton-argo-kubemsb-demo.git

提交项目代码到暂存区
[root@gitlab tekton-argo-kubemsb-demo]# git add .

提交项目代码到本地代码仓库
[root@gitlab tekton-argo-kubemsb-demo]# git commit -m "first commit"
[master(根提交) aa21416] first commit
 5 files changed, 94 insertions(+)
 create mode 100644 Dockerfile
 create mode 100644 README.md
 create mode 100644 go.mod
 create mode 100644 go.sum
 create mode 100644 main.go

提交项目代码到远程代码仓库
[root@gitlab tekton-argo-kubemsb-demo]# git push -u origin master
Username for 'http://192.168.10.250': root gitlab用户名
Password for 'http://root@192.168.10.250':  gitlab密码
Counting objects: 7, done.
Delta compression using up to 2 threads.
Compressing objects: 100% (6/6), done.
Writing objects: 100% (7/7), 2.62 KiB | 0 bytes/s, done.
Total 7 (delta 0), reused 0 (delta 0)
To http://192.168.10.250/root/tekton-argo-kubemsb-demo.git
 * [new branch]      master -> master
分支 master 设置为跟踪来自 origin 的远程分支 master。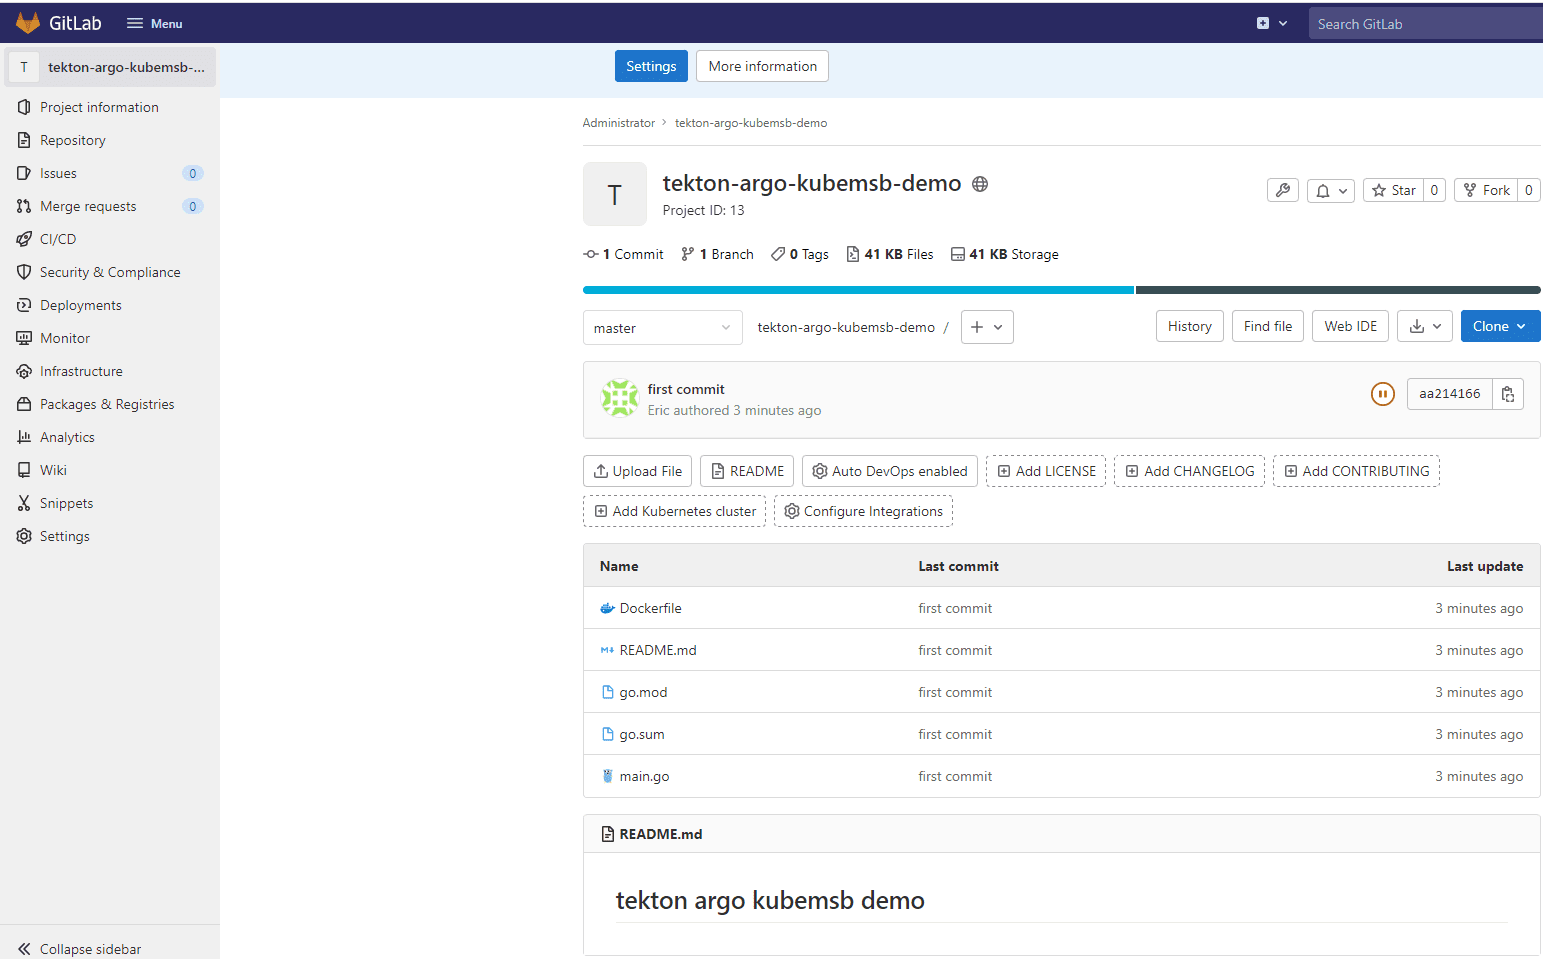
2.1.3 设置项目代码仓库webhook
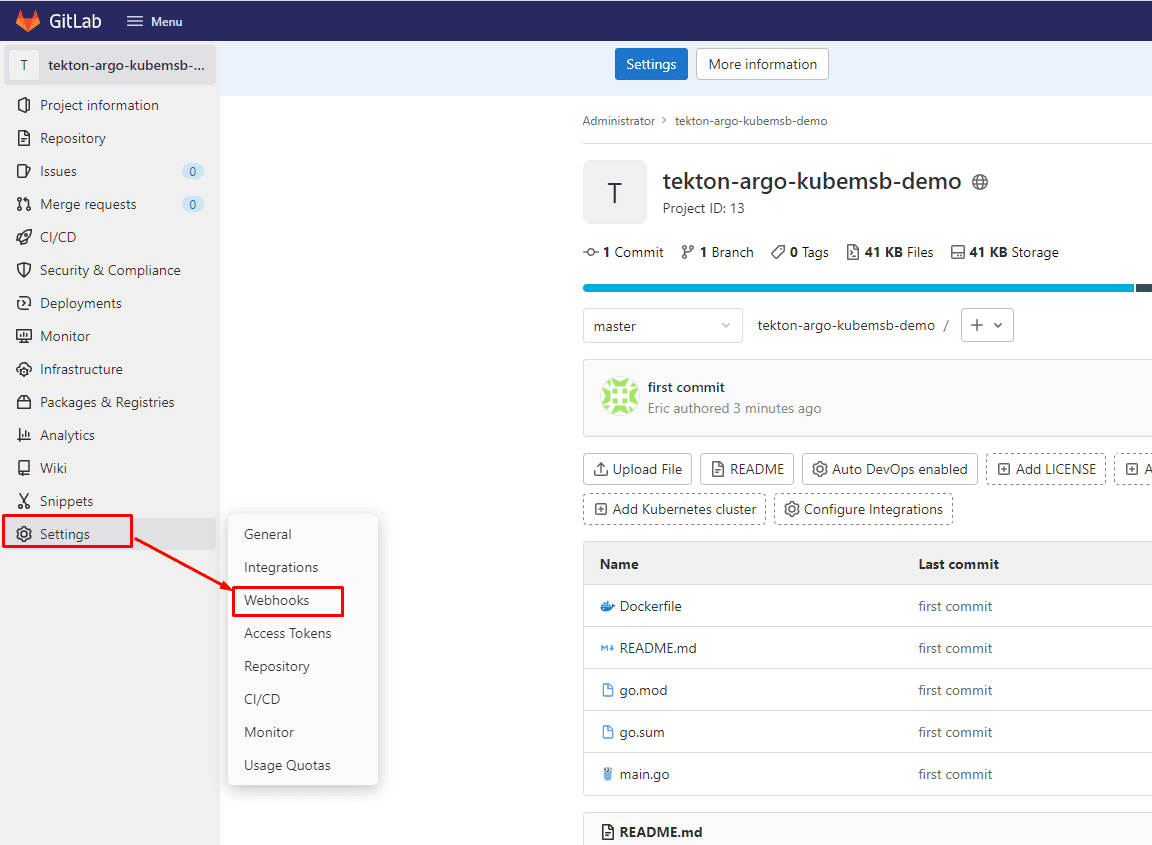
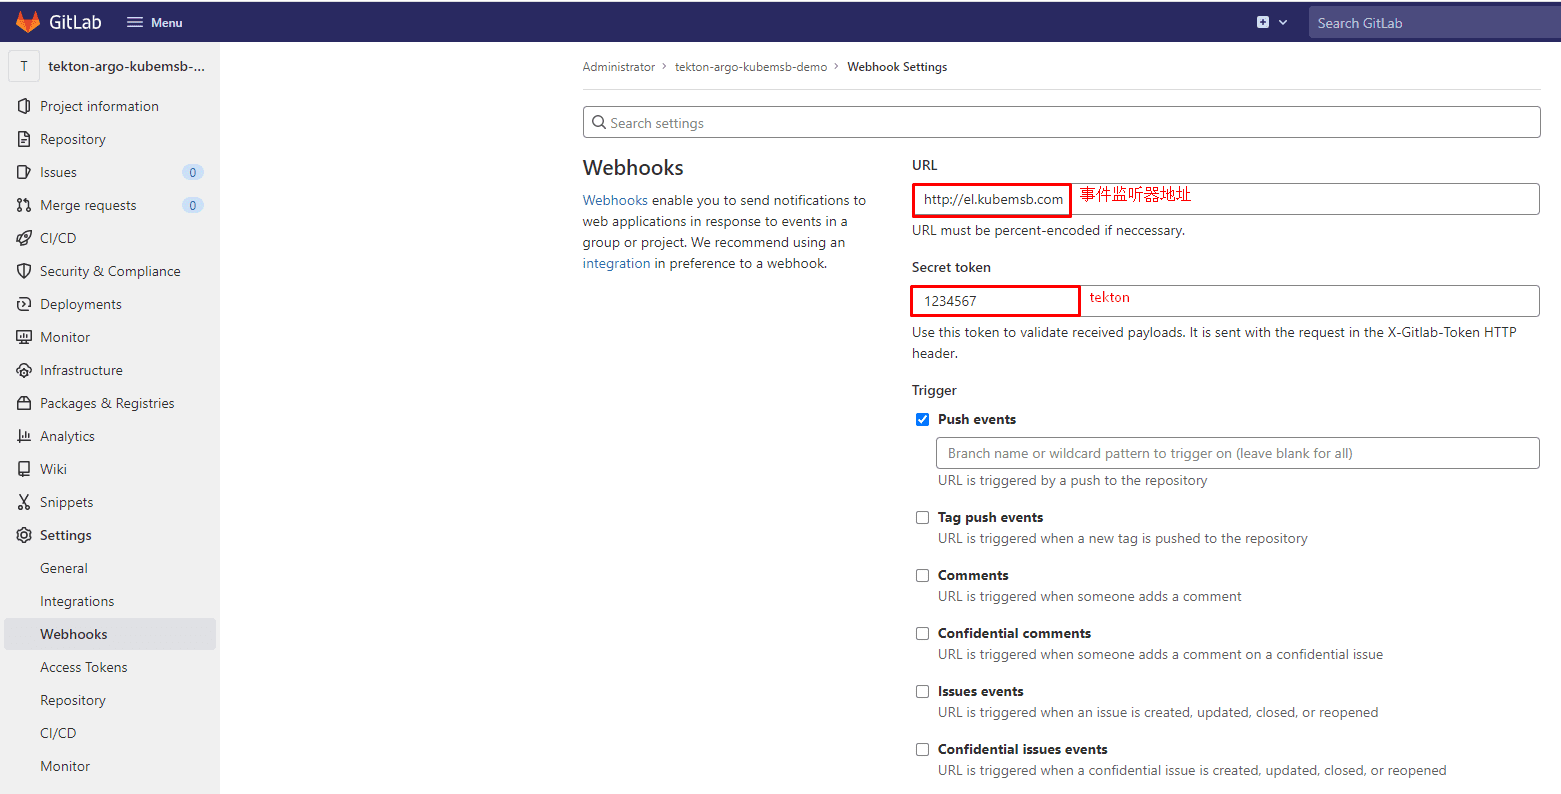

2.2 Helm Charts模板文件资源准备
2.2.1 Helm Chart模板文件
将项目
http://192.168.10.250/root/tekton-pipeline-kubemsb-demo.git仓库中的 Helm Chart 模板单独提取出来放到一个独立的仓库中http://192.168.10.250/root/tekton-argo-kubemsb-helm.git,项目中只有用于应用部署的 Helm Chart 模板。
[root@gitlab ~]# ls
tekton-argo-kubemsb-helm helm Charts包所在目录[root@gitlab ~]# cd tekton-argo-kubemsb-helm/
[root@gitlab tekton-argo-kubemsb-helm]# ls
helm
[root@gitlab tekton-argo-kubemsb-helm]# ls helm
Chart.yaml my-values.yaml templates values.yaml2.2.1 Helm Chart模板文件仓库
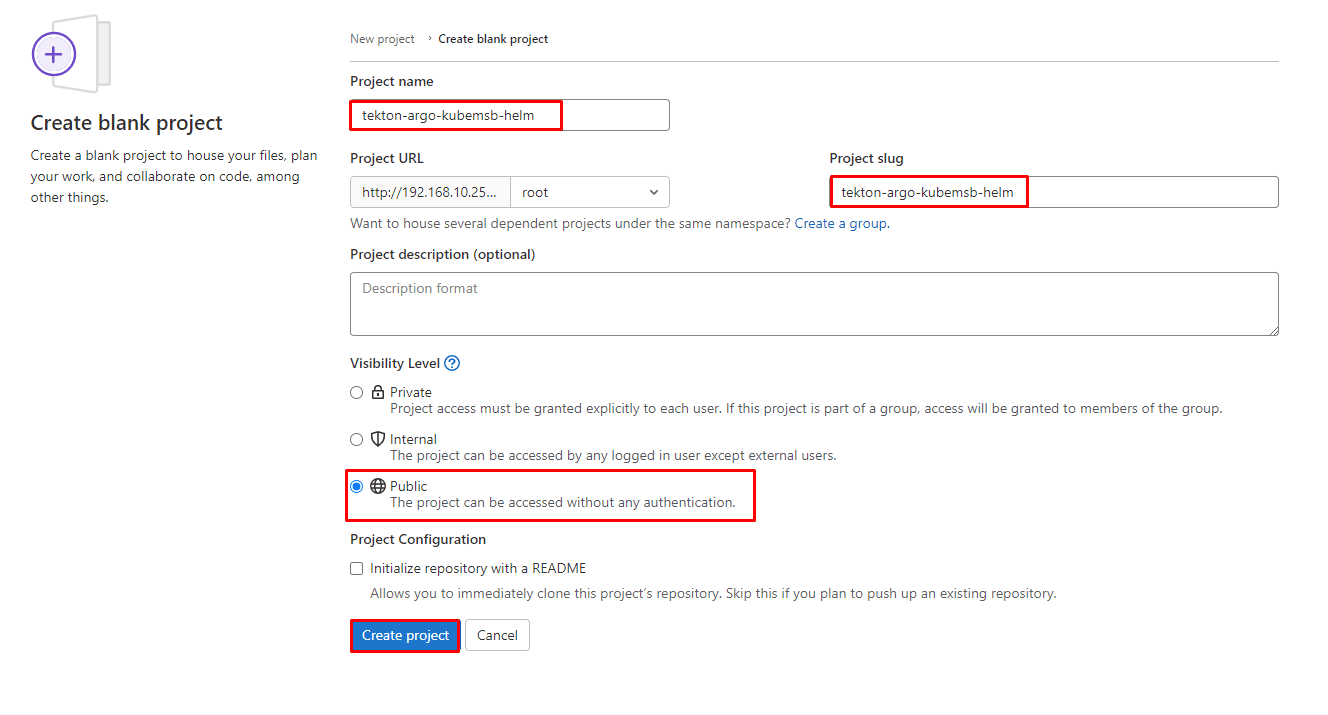
查看当前目录下子目录
[root@gitlab tekton-argo-kubemsb-helm]# ls
helm

初始化Helm Charts模板仓库
[root@gitlab tekton-argo-kubemsb-helm]# git init
初始化空的 Git 版本库于 /root/tekton-argo-kubemsb-helm/.git/

初始化Helm Charts模板远程仓库
[root@gitlab tekton-argo-kubemsb-helm]# git remote add origin http://192.168.10.250/root/tekton-argo-kubemsb-helm.git

提交Helm Charts模板文件到暂存区
[root@gitlab tekton-argo-kubemsb-helm]# git add .

提交Helm Charts模板文件到本地仓库
[root@gitlab tekton-argo-kubemsb-helm]# git commit -m "first commit"
[master(根提交) 9a2b660] first commit
 9 files changed, 256 insertions(+)
 create mode 100644 helm/.helmignore
 create mode 100644 helm/Chart.yaml
 create mode 100644 helm/my-values.yaml
 create mode 100644 helm/templates/NOTES.txt
 create mode 100644 helm/templates/_helpers.tpl
 create mode 100644 helm/templates/deployment.yaml
 create mode 100644 helm/templates/ingress.yaml
 create mode 100644 helm/templates/service.yaml
 create mode 100644 helm/values.yaml

 提交Helm Charts模板文件到远程仓库
[root@gitlab tekton-argo-kubemsb-helm]# git push -u origin master
Username for 'http://192.168.10.250': root gitlab用户名
Password for 'http://root@192.168.10.250':  gitlab密码
Counting objects: 13, done.
Delta compression using up to 2 threads.
Compressing objects: 100% (12/12), done.
Writing objects: 100% (13/13), 3.65 KiB | 0 bytes/s, done.
Total 13 (delta 0), reused 0 (delta 0)
To http://192.168.10.250/root/tekton-argo-kubemsb-helm.git
 * [new branch]      master -> master
分支 master 设置为跟踪来自 origin 的远程分支 master。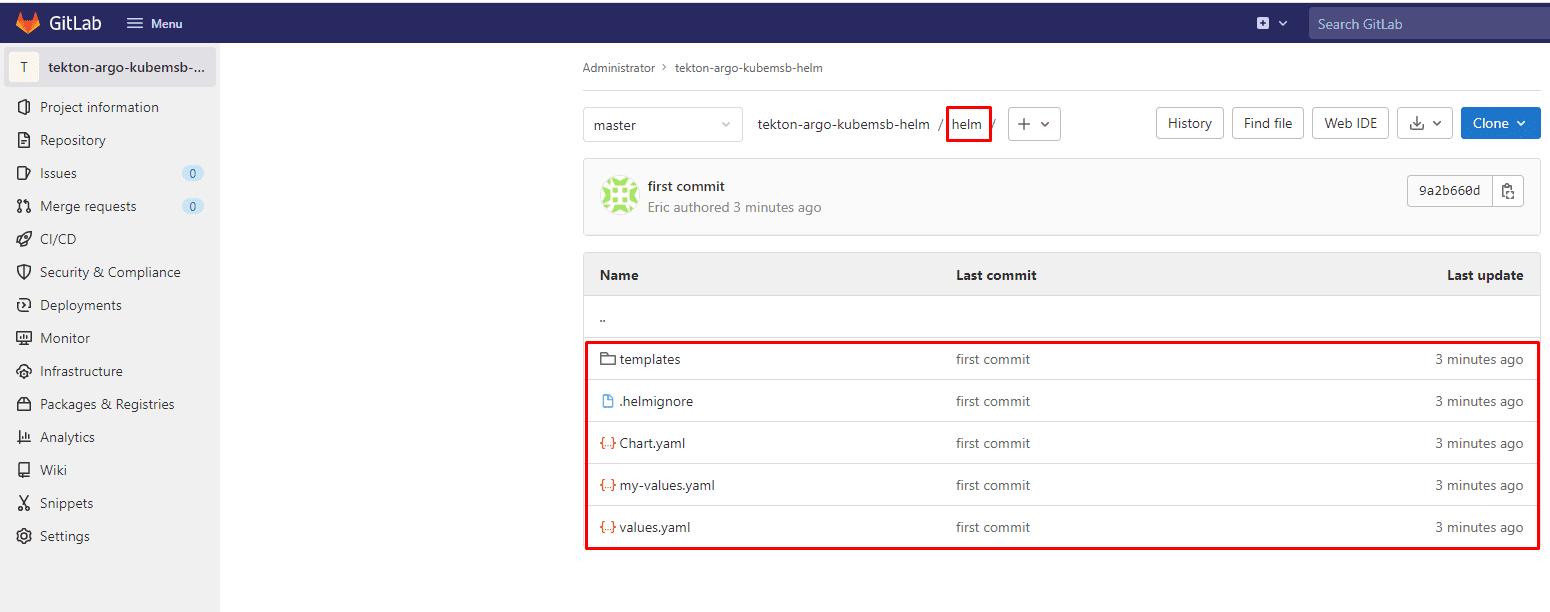
2.3 Tekton自动化流水线task资源清单文件准备
2.3.1 Clone源代码task
# cat task-clone.yaml
apiVersion: tekton.dev/v1beta1
kind: Task
metadata:
  name: git-clone
spec:
  workspaces:
    - name: output
      description: The git repo will be cloned onto the volume backing this Workspace.
    - name: basic-auth
      optional: true
      description: |
        A Workspace containing a .gitconfig and .git-credentials file. These
        will be copied to the user's home before any git commands are run. Any
        other files in this Workspace are ignored. It is strongly recommended
        to use ssh-directory over basic-auth whenever possible and to bind a
        Secret to this Workspace over other volume types.
  params:
    - name: url
      description: Repository URL to clone from.
      type: string
    - name: revision
      description: Revision to checkout. (branch, tag, sha, ref, etc...)
      type: string
      default: ""
    - name: refspec
      description: Refspec to fetch before checking out revision.
      default: ""
    - name: submodules
      description: Initialize and fetch git submodules.
      type: string
      default: "true"
    - name: depth
      description: Perform a shallow clone, fetching only the most recent N commits.
      type: string
      default: "1"
    - name: sslVerify
      description: Set the `http.sslVerify` global git config. Setting this to `false` is not advised unless you are sure that you trust your git remote.
      type: string
      default: "true"
    - name: subdirectory
      description: Subdirectory inside the `output` Workspace to clone the repo into.
      type: string
      default: ""
    - name: sparseCheckoutDirectories
      description: Define the directory patterns to match or exclude when performing a sparse checkout.
      type: string
      default: ""
    - name: deleteExisting
      description: Clean out the contents of the destination directory if it already exists before cloning.
      type: string
      default: "true"
    - name: verbose
      description: Log the commands that are executed during `git-clone`'s operation.
      type: string
      default: "true"
    - name: gitInitImage
      description: The image providing the git-init binary that this Task runs.
      type: string
      default: "www.kubemsb.com/tekton/tekton-git-init:v0.24.1"
    - name: userHome
      description: |
        Absolute path to the user's home directory. Set this explicitly if you are running the image as a non-root user or have overridden
        the gitInitImage param with an image containing custom user configuration.
      type: string
      default: "/root"
  results:
    - name: commit
      description: The precise commit SHA that was fetched by this Task.
    - name: url
      description: The precise URL that was fetched by this Task.
  steps:
    - name: clone
      image: "$(params.gitInitImage)"
      env:
      - name: HOME
        value: "$(params.userHome)"
      - name: PARAM_URL
        value: $(params.url)
      - name: PARAM_REVISION
        value: $(params.revision)
      - name: PARAM_REFSPEC
        value: $(params.refspec)
      - name: PARAM_SUBMODULES
        value: $(params.submodules)
      - name: PARAM_DEPTH
        value: $(params.depth)
      - name: PARAM_SSL_VERIFY
        value: $(params.sslVerify)
      - name: PARAM_SUBDIRECTORY
        value: $(params.subdirectory)
      - name: PARAM_DELETE_EXISTING
        value: $(params.deleteExisting)
      - name: PARAM_VERBOSE
        value: $(params.verbose)
      - name: PARAM_SPARSE_CHECKOUT_DIRECTORIES
        value: $(params.sparseCheckoutDirectories)
      - name: PARAM_USER_HOME
        value: $(params.userHome)
      - name: WORKSPACE_OUTPUT_PATH
        value: $(workspaces.output.path)
      - name: WORKSPACE_BASIC_AUTH_DIRECTORY_BOUND
        value: $(workspaces.basic-auth.bound)
      - name: WORKSPACE_BASIC_AUTH_DIRECTORY_PATH
        value: $(workspaces.basic-auth.path)
      script: |
        #!/usr/bin/env sh
        set -eu

        if [ "${PARAM_VERBOSE}" = "true" ] ; then
          set -x
        fi

        if [ "${WORKSPACE_BASIC_AUTH_DIRECTORY_BOUND}" = "true" ] ; then
          cp "${WORKSPACE_BASIC_AUTH_DIRECTORY_PATH}/.git-credentials" "${PARAM_USER_HOME}/.git-credentials"
          cp "${WORKSPACE_BASIC_AUTH_DIRECTORY_PATH}/.gitconfig" "${PARAM_USER_HOME}/.gitconfig"
          chmod 400 "${PARAM_USER_HOME}/.git-credentials"
          chmod 400 "${PARAM_USER_HOME}/.gitconfig"
        fi

        CHECKOUT_DIR="${WORKSPACE_OUTPUT_PATH}/${PARAM_SUBDIRECTORY}"

        cleandir() {
          # Delete any existing contents of the repo directory if it exists.
          #
          # We don't just "rm -rf ${CHECKOUT_DIR}" because ${CHECKOUT_DIR} might be "/"
          # or the root of a mounted volume.
          if [ -d "${CHECKOUT_DIR}" ] ; then
            # Delete non-hidden files and directories
            rm -rf "${CHECKOUT_DIR:?}"/*
            # Delete files and directories starting with . but excluding ..
            rm -rf "${CHECKOUT_DIR}"/.[!.]*
            # Delete files and directories starting with .. plus any other character
            rm -rf "${CHECKOUT_DIR}"/..?*
          fi
        }

        if [ "${PARAM_DELETE_EXISTING}" = "true" ] ; then
          cleandir
        fi

        /ko-app/git-init \
          -url="${PARAM_URL}" \
          -revision="${PARAM_REVISION}" \
          -refspec="${PARAM_REFSPEC}" \
          -path="${CHECKOUT_DIR}" \
          -sslVerify="${PARAM_SSL_VERIFY}" \
          -submodules="${PARAM_SUBMODULES}" \
          -depth="${PARAM_DEPTH}" \
          -sparseCheckoutDirectories="${PARAM_SPARSE_CHECKOUT_DIRECTORIES}"
        cd "${CHECKOUT_DIR}"
        RESULT_SHA="$(git rev-parse HEAD)"
        EXIT_CODE="$?"
        if [ "${EXIT_CODE}" != 0 ] ; then
          exit "${EXIT_CODE}"
        fi
        printf "%s" "${RESULT_SHA}" > "$(results.commit.path)"
        printf "%s" "${PARAM_URL}" > "$(results.url.path)"
2.3.2 编译打包源码为二进制文件
本项目为golang语言开发的应用
# cat task-build.yaml
apiVersion: tekton.dev/v1beta1
kind: Task
metadata:
  name: build
spec:
  workspaces:
    - name: go-repo
      mountPath: /workspace/repo
  steps:
    - name: build
      image: golang:1.14-alpine
      workingDir: /workspace/repo
      script: |
        go build -v -o app
      env:
        - name: GOPROXY
          value: https://goproxy.cn
        - name: GOOS
          value: linux
        - name: GOARCH
          value: amd64
2.3.3 Docker容器镜像构建及推送至容器镜像仓库
2.3.3.1 Dockerfile
已存放于项目源代码仓库中,便于项目容器镜像构建
# cat Dockerfile

FROM alpine
WORKDIR /home

RUN sed -i 's/dl-cdn.alpinelinux.org/mirrors.ustc.edu.cn/g' /etc/apk/repositories && \
  apk update && \
  apk upgrade && \
  apk add ca-certificates && update-ca-certificates && \
  apk add --update tzdata && \
  rm -rf /var/cache/apk/*

COPY app /home/
ENV TZ=Asia/Shanghai

EXPOSE 8080

ENTRYPOINT ./app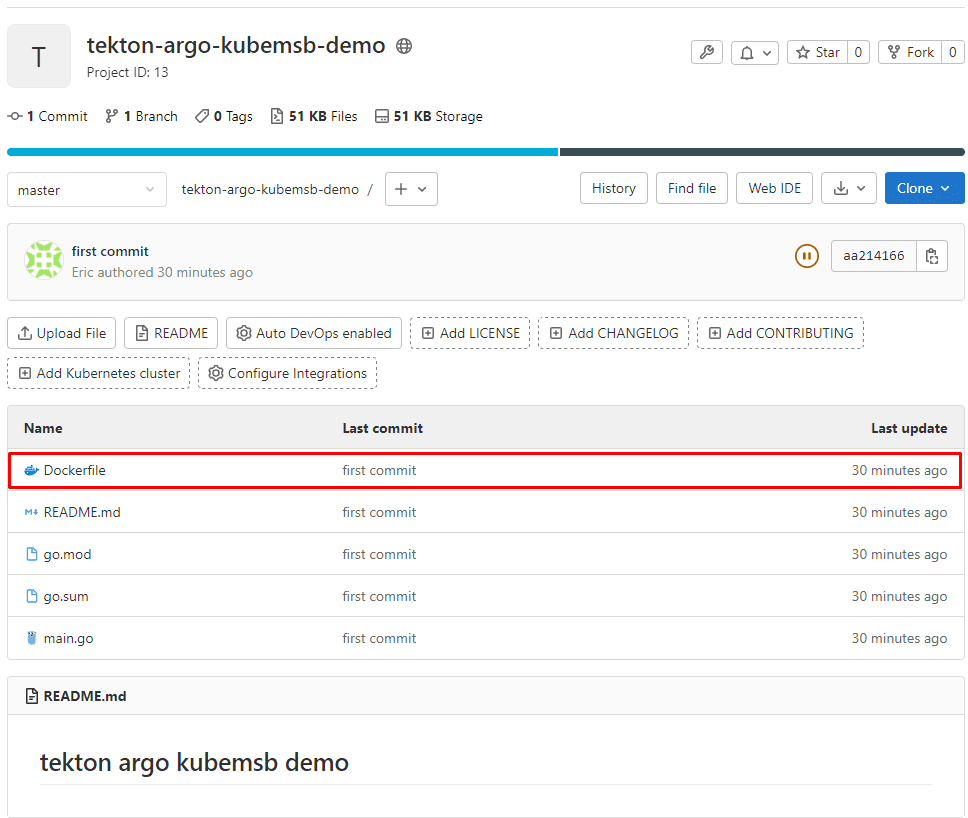
2.3.3.2 Docker容器镜像构建task
# cat task-docker.yaml
apiVersion: tekton.dev/v1beta1
kind: Task
metadata:
  name: docker
spec:
  workspaces:
    - name: go-repo
  params:
    - name: image
      description: Reference of the image docker will produce.
    - name: registry_mirror
      description: Specific the docker registry mirror
      default: ""
    - name: registry_url
      description: private docker images registry url
  steps:
    - name: docker-build # 构建步骤
      image: docker:stable
      env:
        - name: DOCKER_HOST # 用 TLS 形式通过 TCP 链接 sidecar
          value: tcp://localhost:2376
        - name: DOCKER_TLS_VERIFY # 校验 TLS
          value: "1"
        - name: DOCKER_CERT_PATH # 使用 sidecar 守护进程生成的证书
          value: /certs/client
        - name: DOCKER_PASSWORD
          valueFrom:
            secretKeyRef:
              name: harbor-auth
              key: password
        - name: DOCKER_USERNAME
          valueFrom:
            secretKeyRef:
              name: harbor-auth
              key: username
      workingDir: $(workspaces.go-repo.path)
      script: | # docker 构建命令
        docker login $(params.registry_url) -u $DOCKER_USERNAME -p $DOCKER_PASSWORD
        docker build --no-cache -f ./Dockerfile -t $(params.image) .
        docker push $(params.image)
      volumeMounts: # 声明挂载证书目录
        - mountPath: /certs/client
          name: dind-certs
  sidecars: # sidecar 模式,提供 docker daemon服务,实现真正的 DinD 模式
    - image: docker:dind
      name: server
      args:
        - --storage-driver=vfs
        - --userland-proxy=false
        - --debug
        - --insecure-registry=$(params.registry_url)
        - --registry-mirror=$(params.registry_mirror)
      securityContext:
        privileged: true
      env:
        - name: DOCKER_TLS_CERTDIR # 将生成的证书写入与客户端共享的路径
          value: /certs
      volumeMounts:
        - mountPath: /certs/client
          name: dind-certs
      readinessProbe: # 等待 dind daemon 生成它与客户端共享的证书
        periodSeconds: 1
        exec:
          command: ["ls", "/certs/client/ca.pem"]
  volumes: # 使用 emptyDir 的形式即可
    - name: dind-certs
2.3.4 项目部署task
不需要单独定义,由Argo CD来实现
2.3.5 项目部署回滚操作task
不需要单独定义,由Argo CD来实现
2.3.6 触发器
2.3.6.1 部署tekton trigger
整个流水线已经成功执行了,接下来最后一步就是将 Gitlab 和 Tekton 进行对接,也就是通过 Tekton Trigger 来自动触发构建。
# kubectl apply -f https://storage.googleapis.com/tekton-releases/triggers/previous/v0.16.0/release.yaml# kubectl apply -f https://storage.googleapis.com/tekton-releases/triggers/previous/v0.16.0/interceptors.yaml2.3.6.2 创建webhook认证secret及RBAC授权
首先添加一个用于 Gitlab Webhook 访问的 Secret Token,同样要将这个 Secret 关联到上面使用的 ServiceAccount 上面去,然后继续添加对应的 RBAC 权限:
# vim gitlab-webhook-rbac.yaml
# cat gitlab-webhook-rbac.yaml

apiVersion: v1
kind: Secret
metadata:
  name: gitlab-secret
type: Opaque
stringData:
  secretToken: "1234567"

---

apiVersion: v1
kind: ServiceAccount
metadata:
  name: tekton-build-sa
secrets:
  - name: harbor-auth
  - name: gitlab-auth
  - name: gitlab-secret

---
apiVersion: rbac.authorization.k8s.io/v1
kind: Role
metadata:
  name: tekton-triggers-gitlab-minimal
rules:
# EventListeners need to be able to fetch all namespaced resources
- apiGroups: ["triggers.tekton.dev"]
  resources: ["eventlisteners", "triggerbindings", "triggertemplates", "triggers"]
  verbs: ["get", "list", "watch"]
- apiGroups: [""]
# configmaps is needed for updating logging config
  resources: ["configmaps"]
  verbs: ["get", "list", "watch"]
# Permissions to create resources in associated TriggerTemplates
- apiGroups: ["tekton.dev"]
  resources: ["pipelineruns", "pipelineresources", "taskruns"]
  verbs: ["create"]
- apiGroups: [""]
  resources: ["serviceaccounts"]
  verbs: ["impersonate"]
- apiGroups: ["policy"]
  resources: ["podsecuritypolicies"]
  resourceNames: ["tekton-triggers"]
  verbs: ["use"]
---
apiVersion: rbac.authorization.k8s.io/v1
kind: RoleBinding
metadata:
  name: tekton-triggers-gitlab-binding
subjects:
- kind: ServiceAccount
  name: tekton-build-sa
roleRef:
  apiGroup: rbac.authorization.k8s.io
  kind: Role
  name: tekton-triggers-gitlab-minimal
---
kind: ClusterRole
apiVersion: rbac.authorization.k8s.io/v1
metadata:
  name: tekton-triggers-gitlab-clusterrole
rules:
  # EventListeners need to be able to fetch any clustertriggerbindings
- apiGroups: ["triggers.tekton.dev"]
  resources: ["clustertriggerbindings", "clusterinterceptors"]
  verbs: ["get", "list", "watch"]
---
apiVersion: rbac.authorization.k8s.io/v1
kind: ClusterRoleBinding
metadata:
  name: tekton-triggers-gitlab-clusterbinding
subjects:
- kind: ServiceAccount
  name: tekton-build-sa
  namespace: default
roleRef:
  apiGroup: rbac.authorization.k8s.io
  kind: ClusterRole
  name: tekton-triggers-gitlab-clusterrole
2.3.6.3 创建EventListener(事件监听器)
创建 EventListener 资源对象,用来接收 Gitlab 的 Push Event 事件
# vim gitlab-listener.yaml
# cat gitlab-listener.yaml
apiVersion: triggers.tekton.dev/v1alpha1
kind: EventListener
metadata:
  name: gitlab-listener  # 该事件监听器会创建一个名为el-gitlab-listener的Service对象
spec:
  serviceAccountName: tekton-build-sa
  triggers:
  - name: gitlab-push-events-trigger
    interceptors:
    - ref:
        name: gitlab
      params:
      - name: secretRef  # 引用 gitlab-secret 的 Secret 对象中的 secretToken 的值
        value:
          secretName: gitlab-secret
          secretKey: secretToken
      - name: eventTypes
        value:
          - Push Hook # 只接收 GitLab Push 事件
    bindings:  # 定义TriggerBinding,配置参数
    - name: gitrevision
      value: $(body.checkout_sha)
    - name: gitrepositoryurl
      value: $(body.repository.git_http_url)
    template:
      ref: gitlab-template #在argo部署后添加
TriggerTemplate将在配置完Argo CD后,再创建。
2.3.6.4 创建EventListener Ingress对象
# cat ingress-el.yaml
apiVersion: networking.k8s.io/v1
kind: Ingress
metadata:
  name: ingress
  namespace: default
  annotations:
    kubernetes.io/ingress.class: nginx
spec:
  rules:
  - host: el.kubemsb.com
    http:
      paths:
      - pathType: Prefix
        path: "/"
        backend:
          service:
            name: el-gitlab-listener
            port:
              number: 8080
在DNS服务中添加Argo.kubemsb.com域名解析
# vim /var/named/kubemsb.com.zone
# cat /var/named/kubemsb.com.zone
$TTL 1D
@ IN SOA @ admin.kubemsb.com. (
0 ; serial
1D ; refresh
1H ; retry
1W ; expire
3H ) ; minimum
NS @
@ A 192.168.10.253
master01 A 192.168.10.10
worker01 A 192.168.10.20
worker02 A 192.168.10.21
yaml A 192.168.10.252
harbor A 192.168.10.251
www A 192.168.10.251
gitlab A 192.168.10.250
nfsserver A 192.168.10.249
el A 192.168.10.203 添加此处内容
smart A 192.168.10.203
argocd A 192.168.10.203
*.knative A 192.168.10.200
# systemctl restart named2.3.7 应用环境资源Secret及RBAC授权
# cat other.yaml
apiVersion: v1
kind: Secret
metadata:
  name: gitlab-auth
  annotations:
    tekton.dev/git-0: http://gitlab.kubemsb.com
type: kubernetes.io/basic-auth
stringData:
  username: 'root'
  password: 'abc123.net'

---

apiVersion: v1
kind: Secret
metadata:
  name: harbor-auth
  annotations:
    tekton.dev/docker-0: http://www.kubemsb.com
type: kubernetes.io/basic-auth
stringData:
    username: 'admin'
    password: '12345'

---
apiVersion: v1
kind: ServiceAccount
metadata:
  name: tekton-build-sa
secrets:
  - name: harbor-auth
  - name: gitlab-auth

---

apiVersion: rbac.authorization.k8s.io/v1
kind: ClusterRoleBinding
metadata:
  name: tekton-clusterrole-binding
roleRef:
  apiGroup: rbac.authorization.k8s.io
  kind: ClusterRole
  name: cluster-admin
subjects:
- kind: ServiceAccount
  name: tekton-build-sa
  namespace: default

---
apiVersion: v1
kind: PersistentVolumeClaim
metadata:
  name: go-repo-pvc
spec:
  resources:
    requests:
      storage: 5Gi
  volumeMode: Filesystem
  storageClassName: managed-nfs-storage  # 使用 StorageClass 自动生成 PV
  accessModes:
    - ReadWriteOnce
三、安装Argo
3.1 Argo介绍
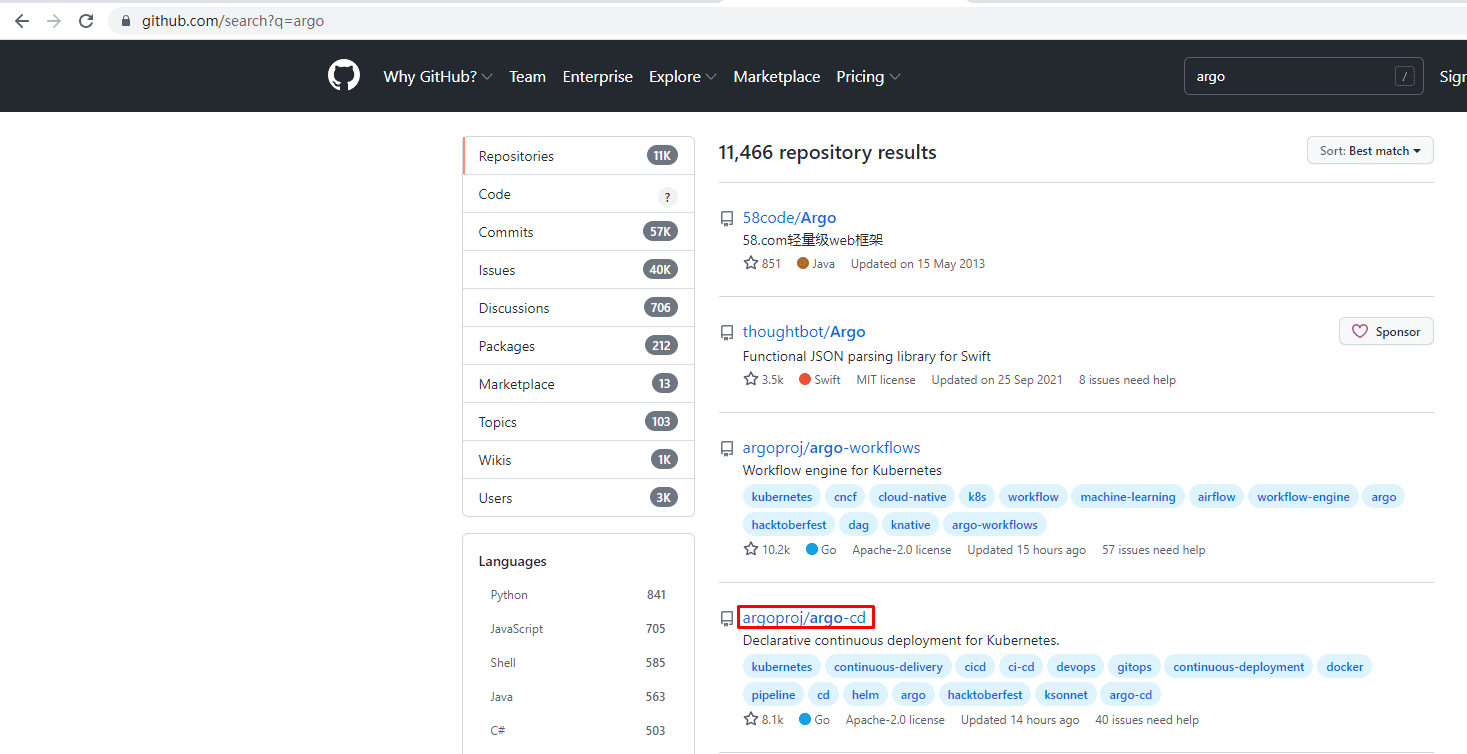
Argo(https://argoproj.github.io/projects/argo) 项目是一组 Kubernetes 原生工具集合,用于运行和管理 Kubernetes 上的作业和应用程序。Argo 提供了一种在 Kubernetes 上创建工作和应用程序的三种计算模式 – 服务模式、工作流模式和基于事件的模式 。所有的 Argo 工具都实现为控制器和自定义资源。
3.2 ArgoCD安装

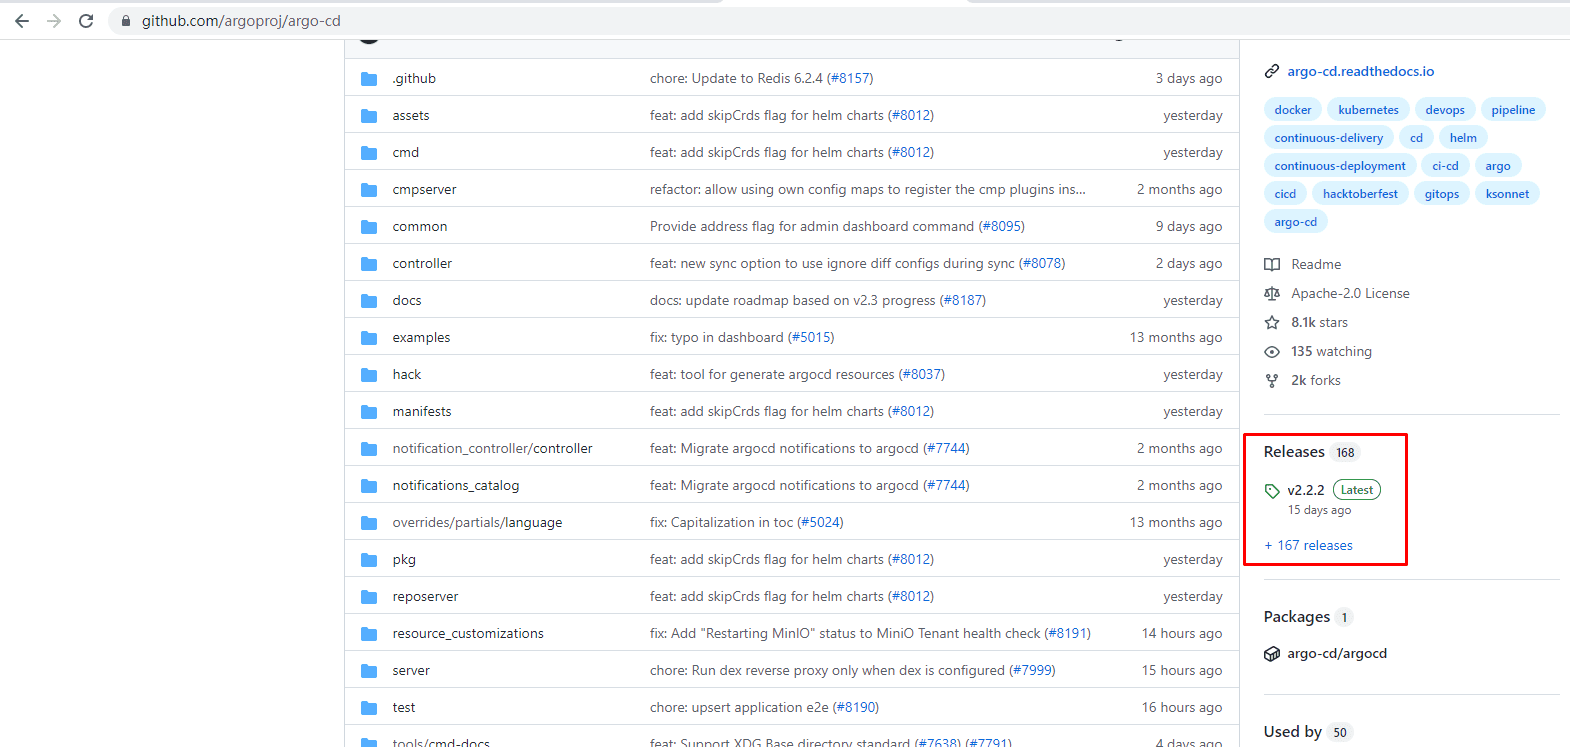
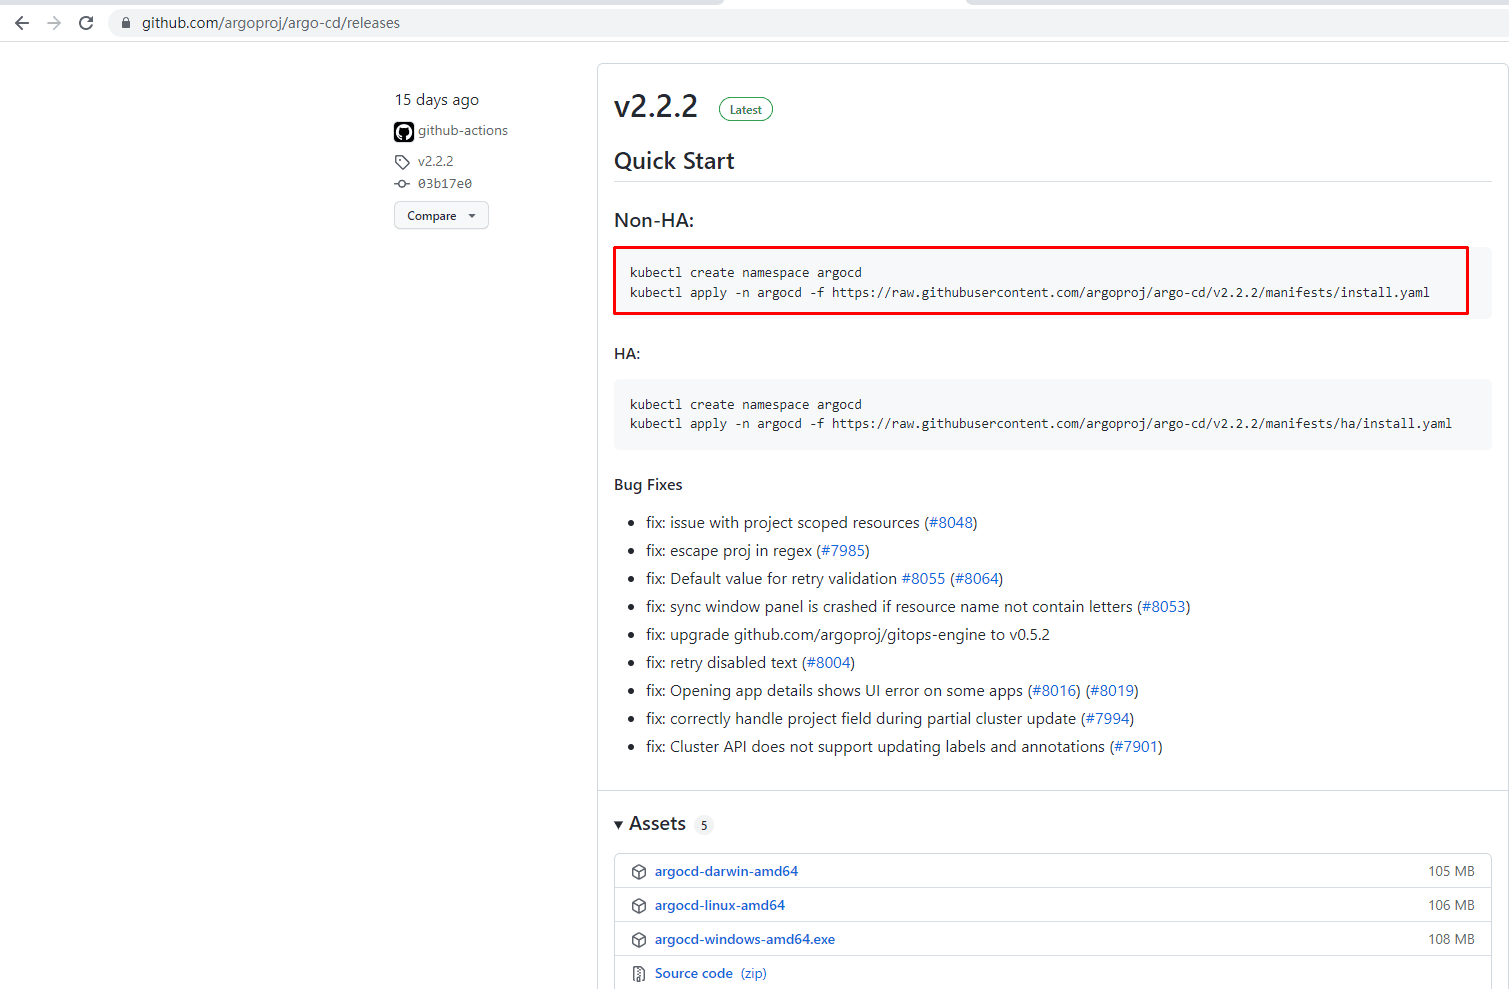
创建命名空间
# kubectl create namespace argocd
namespace/argocd created
由于后期使用ingress暴露服务,所以不建议直接使用,可下载下来,修改后再执行。
# kubectl apply -n argocd -f https://raw.githubusercontent.com/argoproj/argo-cd/v2.2.2/manifests/install.yaml# wget https://raw.githubusercontent.com/argoproj/argo-cd/v2.2.2/manifests/install.yaml在3383行下面添加如下内容:默认必须使用TLS证书才能访问,下面案例中,不使用TLS证书。
# vim install.yaml
3382 - command:
3383 - argocd-server
3384 - --insecure 添加此行内容
3385 env:
3386 - name: ARGOCD_SERVER_INSECURE
3387 valueFrom:# kubectl apply -f install.yaml -n argocd# kubectl get pods -n argocd
NAME READY STATUS RESTARTS AGE
argocd-application-controller-0 1/1 Running 0 2m48s
argocd-dex-server-66f865ffb4-pr5d2 1/1 Running 0 2m49s
argocd-redis-5b6967fdfc-gpcgr 1/1 Running 0 2m49s
argocd-repo-server-656c76778f-x7jvn 1/1 Running 0 2m49s
argocd-server-cd68f46f8-v7sdh 1/1 Running 0 2m48s# kubectl get svc -n argocd
NAME TYPE CLUSTER-IP EXTERNAL-IP PORT(S) AGE
argocd-dex-server ClusterIP 10.107.226.95 <none> 5556/TCP,5557/TCP,5558/TCP 3m6s
argocd-metrics ClusterIP 10.108.242.192 <none> 8082/TCP 3m6s
argocd-redis ClusterIP 10.97.65.204 <none> 6379/TCP 3m6s
argocd-repo-server ClusterIP 10.107.130.183 <none> 8081/TCP,8084/TCP 3m6s
argocd-server ClusterIP 10.105.2.22 <none> 80/TCP,443/TCP 3m6s
argocd-server-metrics ClusterIP 10.102.73.17 <none> 8083/TCP 3m6s3.3 创建Argo Ingress对象
使用ingress,方便在k8s集群外访问。
# vim ingress-argocd.yaml
# cat ingress-argocd.yaml
apiVersion: networking.k8s.io/v1
kind: Ingress
metadata:
  name: ingress
  namespace: argocd
  annotations:
    kubernetes.io/ingress.class: nginx
spec:
  rules:
  - host: argocd.kubemsb.com
    http:
      paths:
      - pathType: Prefix
        path: "/"
        backend:
          service:
            name: argocd-server
            port:
              number: 80
# kubectl apply -f ingress-argocd.yaml
ingress.networking.k8s.io/ingress configured# kubectl get ingress
NAME CLASS HOSTS ADDRESS PORTS AGE
ingress <none> argocd.kubemsb.com 192.168.10.21 80 115m在DNS服务中添加Argo.kubemsb.com域名解析
# vim /var/named/kubemsb.com.zone
# cat /var/named/kubemsb.com.zone
$TTL 1D
@ IN SOA @ admin.kubemsb.com. (
0 ; serial
1D ; refresh
1H ; retry
1W ; expire
3H ) ; minimum
NS @
@ A 192.168.10.253
master01 A 192.168.10.10
worker01 A 192.168.10.20
worker02 A 192.168.10.21
yaml A 192.168.10.252
harbor A 192.168.10.251
www A 192.168.10.251
gitlab A 192.168.10.250
nfsserver A 192.168.10.249
el A 192.168.10.203
smart A 192.168.10.203
argocd A 192.168.10.203 添加此处内容
*.knative A 192.168.10.200
# systemctl restart named3.4 访问Argo UI界面
访问argocd域名:argocd.kubemsb.com
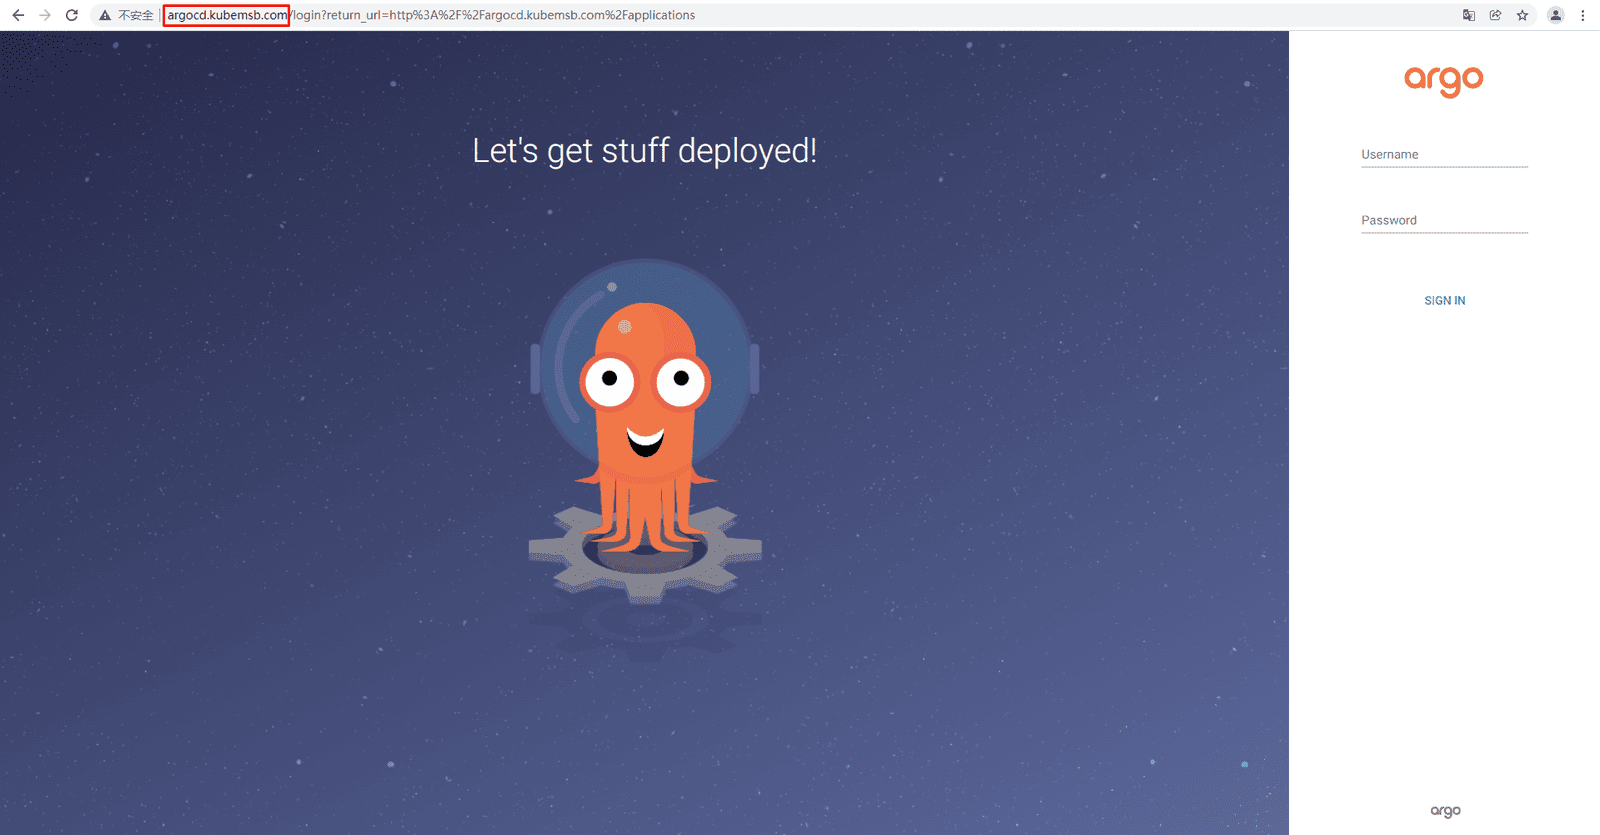
3.4.1 获取登录密码
用户名为:admin,密码需要查询后解密方可知晓
查看加密后的密码
# kubectl get secret argocd-initial-admin-secret -o yaml -n argocd
apiVersion: v1
data:
  password: clpYZ3d4dkY4TGlmMTV4Qw==  此处为加密后密码,需要解密才能使用。
kind: Secret
metadata:
把加密后的密码进行解密
# echo clpYZ3d4dkY4TGlmMTV4Qw== | base64 -d
rZXgwxvF8Lif15xC 此为真正的密码或使用下面命令直接获取登录密码:
# kubectl -n argocd get secret argocd-initial-admin-secret -o jsonpath="{.data.password}" | base64 -d
rZXgwxvF8Lif15xC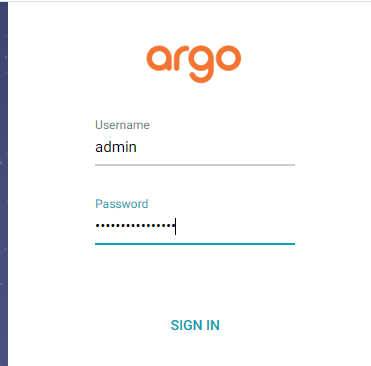
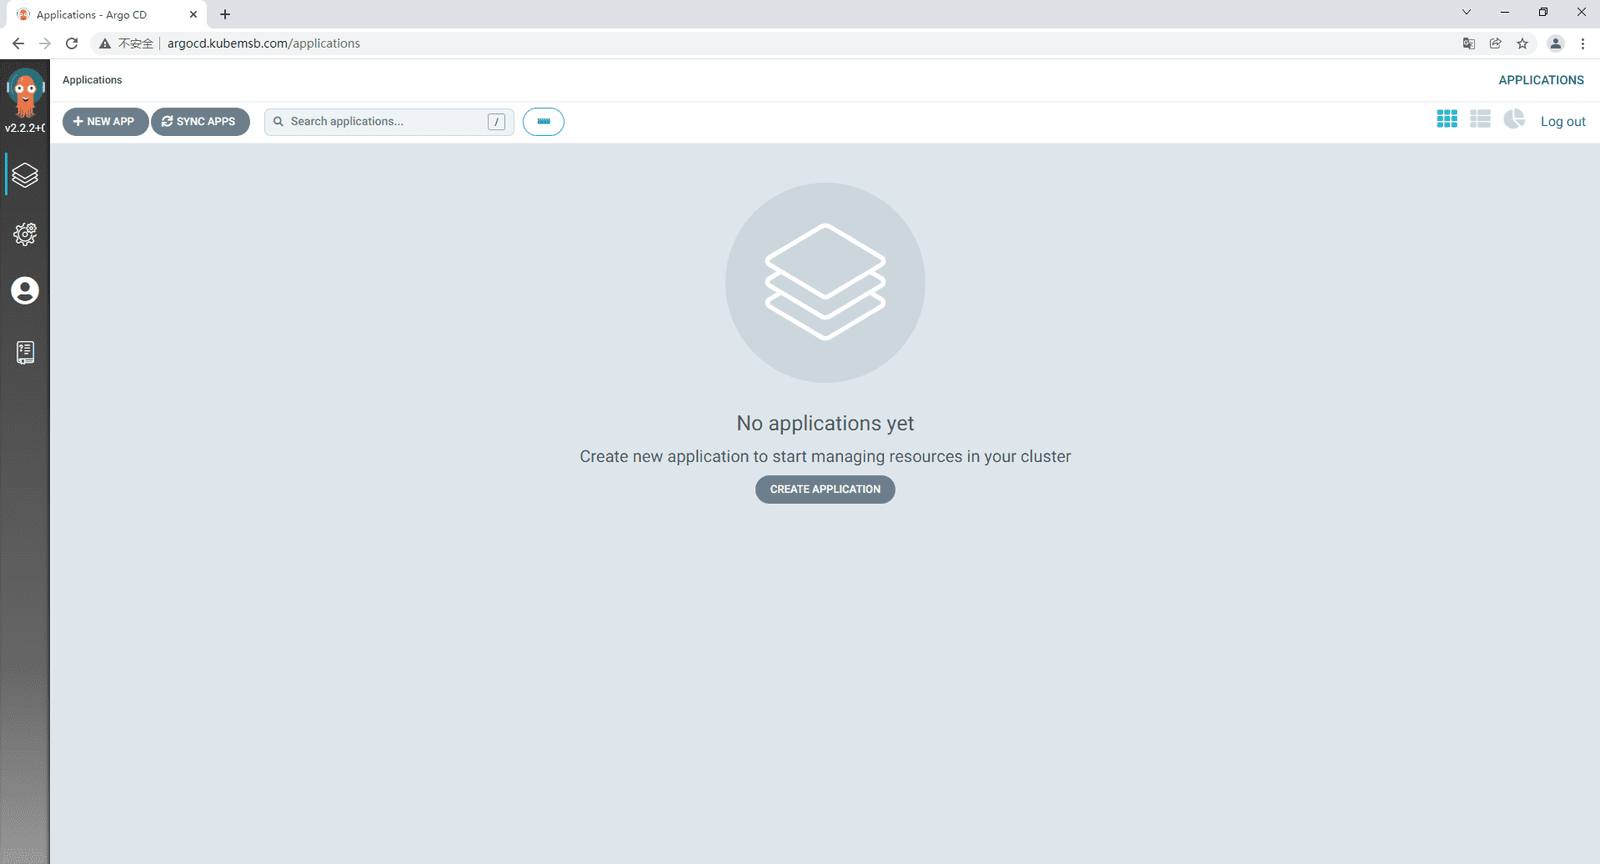
3.4.2 客户端安装
可通过客户端登录Argocd命令行或直接修改admin登录密码等
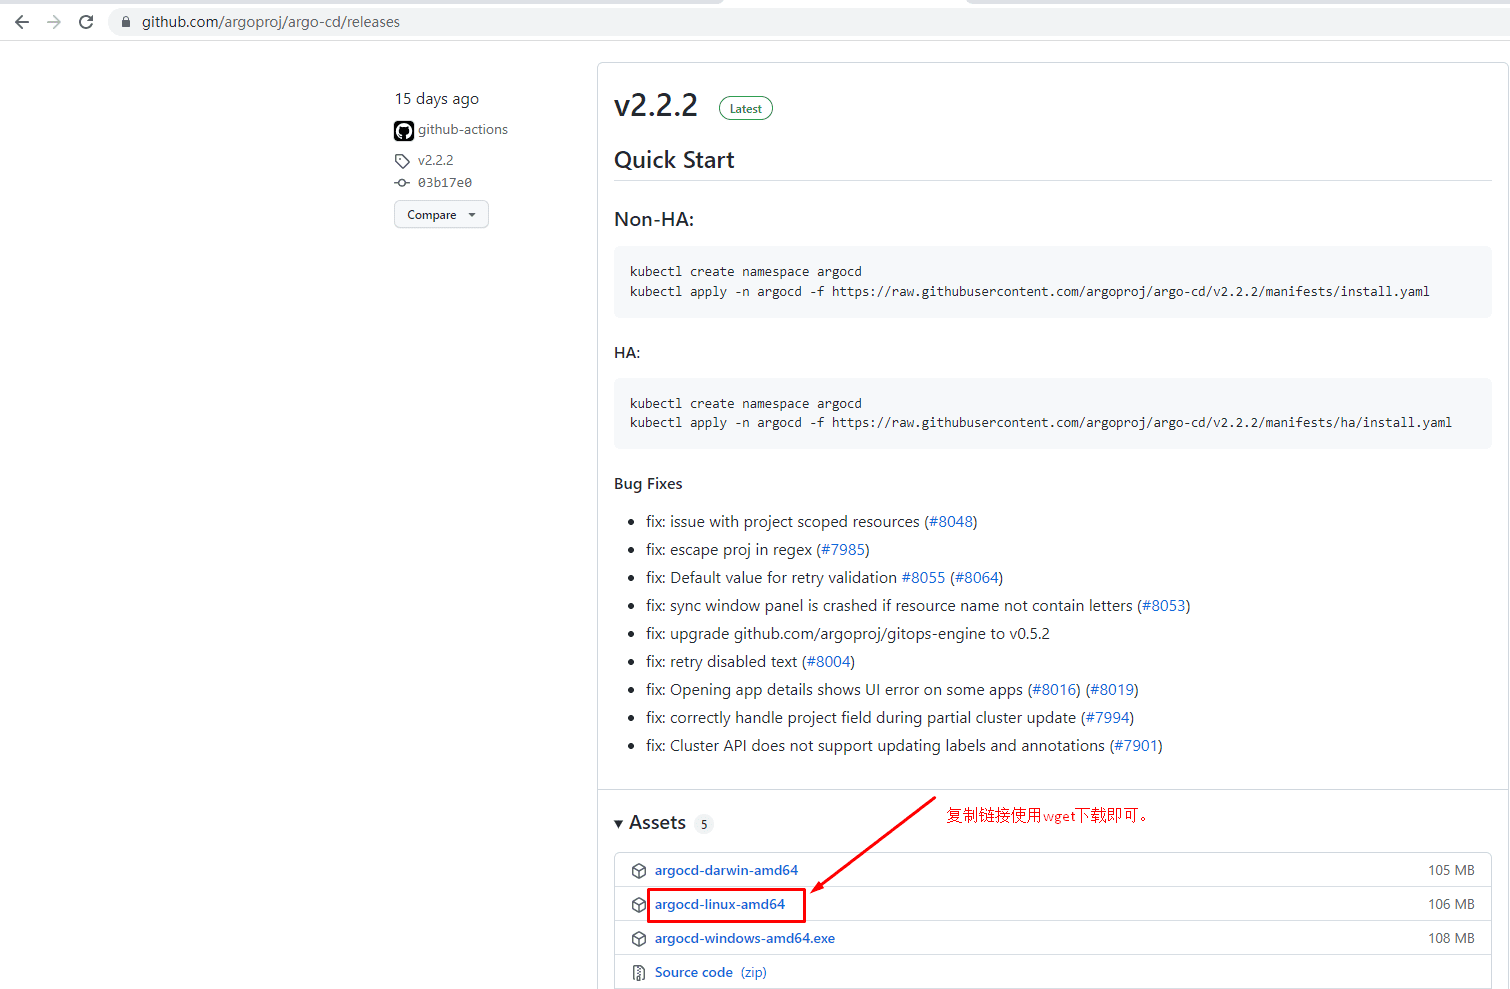
下载argocd客户端软件
# wget https://github.com/argoproj/argo-cd/releases/latest/download/argocd-linux-amd64
安装Argocd客户端软件
# chmod +x argocd-linux-amd64
# mv argocd-linux-amd64 /usr/local/bin/argocd使用argocd version查看版本相关信息
# argocd version
argocd: v2.2.2+03b17e0
BuildDate: 2022-01-01T06:27:52Z
GitCommit: 03b17e0233e64787ffb5fcf65c740cc2a20822ba
GitTreeState: clean
GoVersion: go1.16.11
Compiler: gc
Platform: linux/amd64
FATA[0000] Argo CD server address unspecified# argocd version --server argocd.kubemsb.com --insecure
输出:
argocd: v2.2.2+03b17e0
BuildDate: 2022-01-01T06:27:52Z
GitCommit: 03b17e0233e64787ffb5fcf65c740cc2a20822ba
GitTreeState: clean
GoVersion: go1.16.11
Compiler: gc
Platform: linux/amd64
WARN[0000] Failed to invoke grpc call. Use flag --grpc-web in grpc calls. To avoid this warning message, use flag --grpc-web.
argocd-server: v2.2.2+03b17e0在命令行登录
# argocd login argocd.kubemsb.com
WARNING: server certificate had error: x509: certificate is valid for ingress.local, not argocd.kubemsb.com. Proceed insecurely (y/n)? y
WARN[0015] Failed to invoke grpc call. Use flag --grpc-web in grpc calls. To avoid this warning message, use flag --grpc-web.
Username: admin 用户名
Password: 密码
'admin:login' logged in successfully
Context 'argocd.kubemsb.com' updated修改admin管理员密码
# argocd account update-password
WARN[0000] Failed to invoke grpc call. Use flag --grpc-web in grpc calls. To avoid this warning message, use flag --grpc-web.
*** Enter password of currently logged in user (admin): 输入当前密码,可直接复制粘贴
*** Enter new password for user admin: 12345678 必须为8-32位
*** Confirm new password for user admin: 密码确认
Password updated 更新成功,可使用此密码登录WEB UI界面。
Context 'argocd.kubemsb.com' updated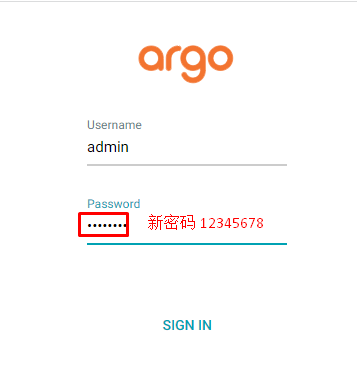
登出argocd
# argocd logout argocd.kubemsb.com
四、Argo应用
4.1 在Argo web界面添加helm Charts模板仓库
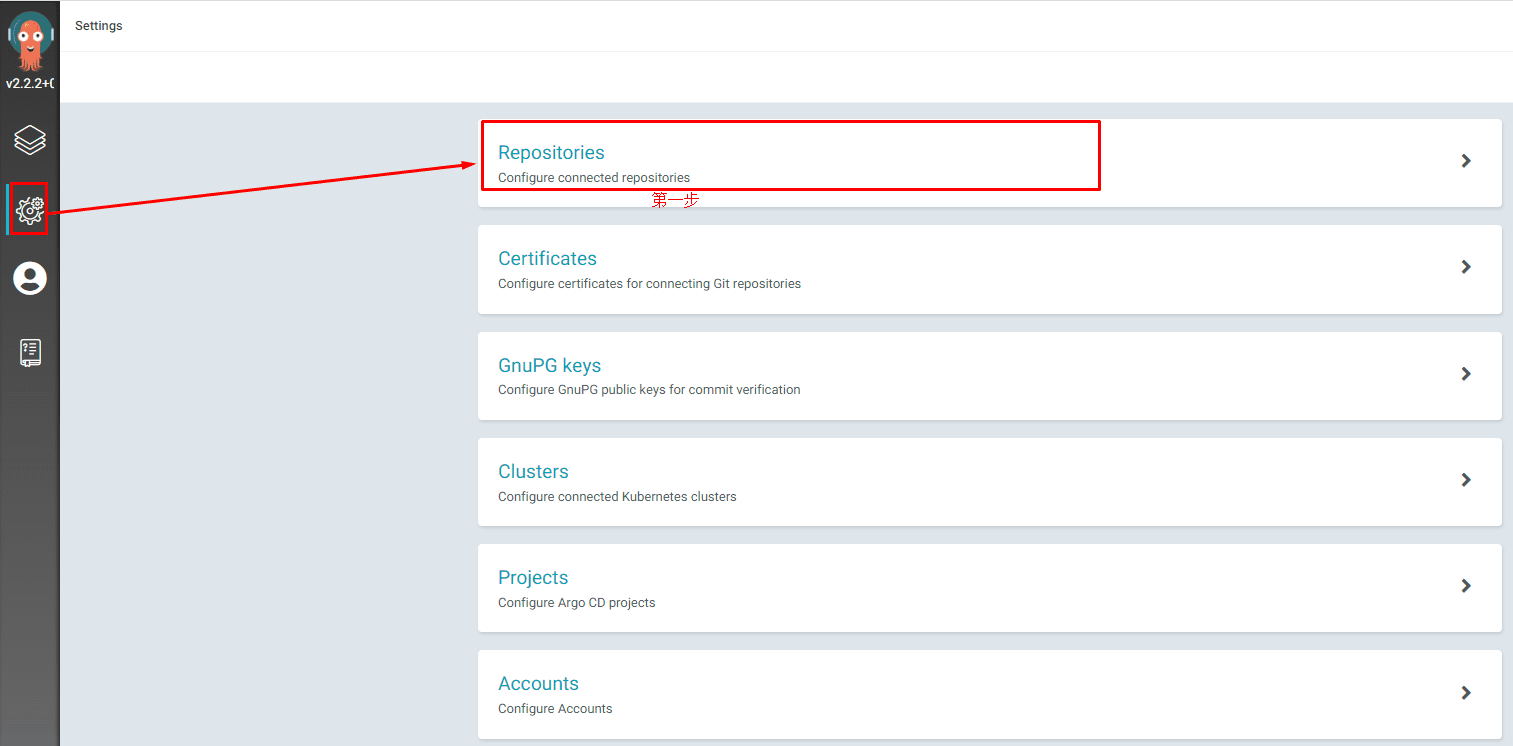
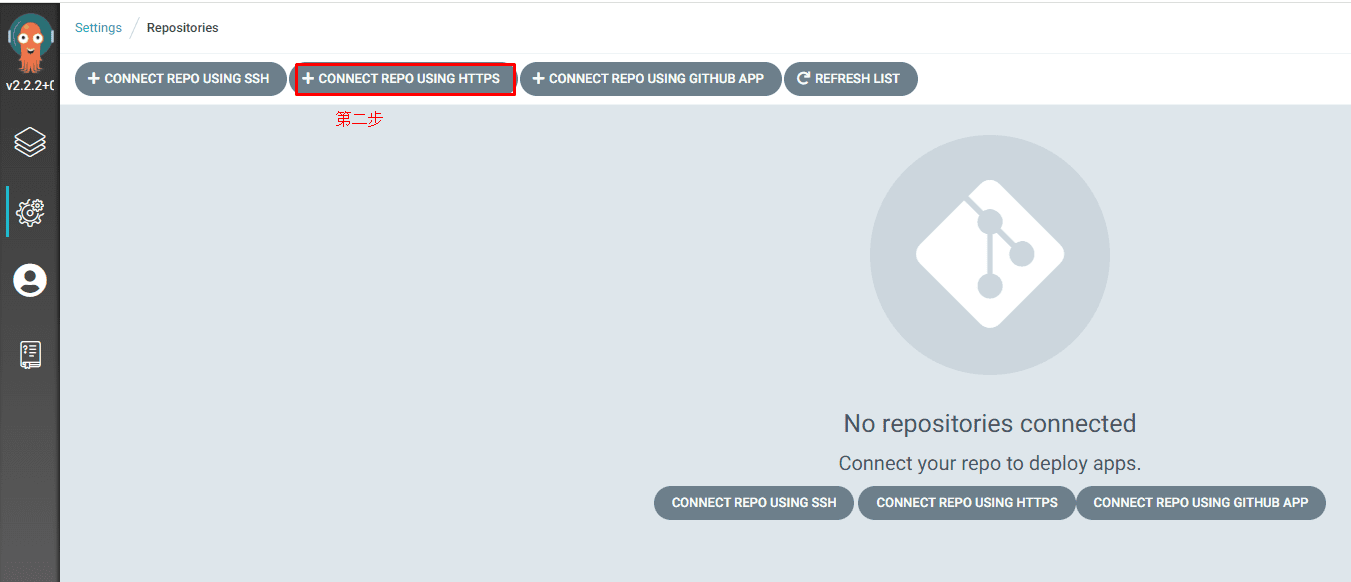
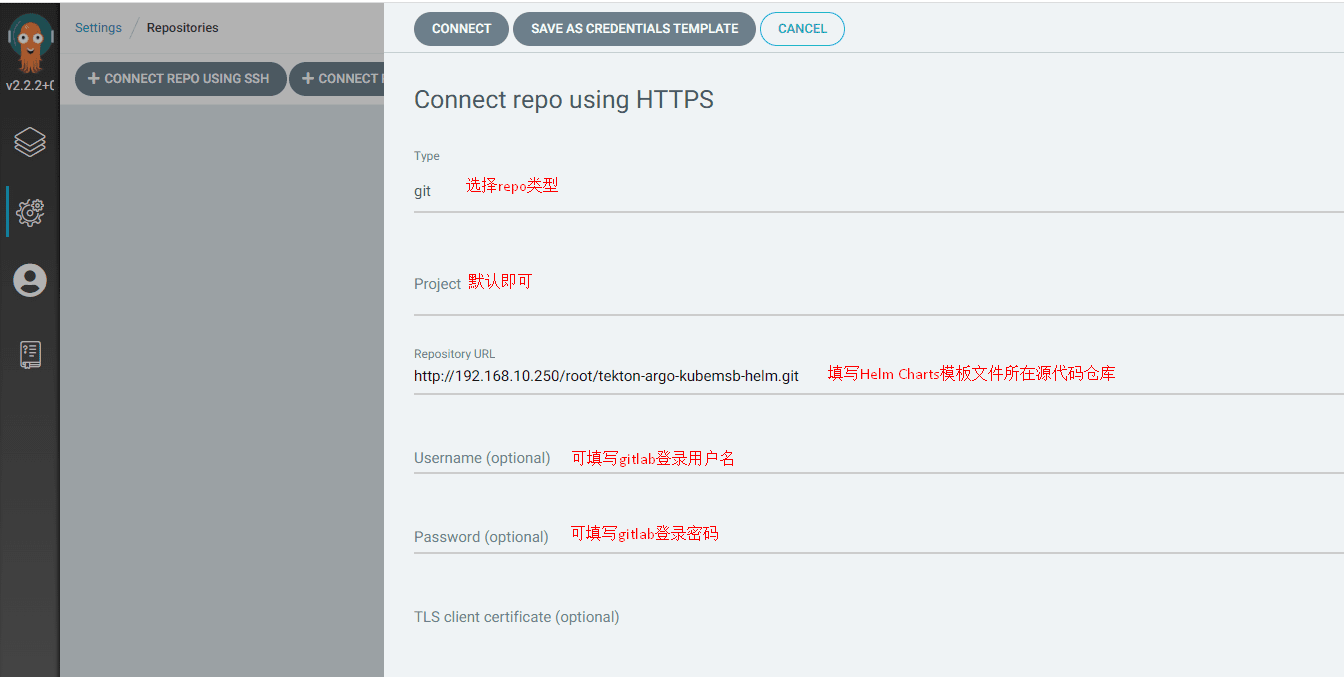
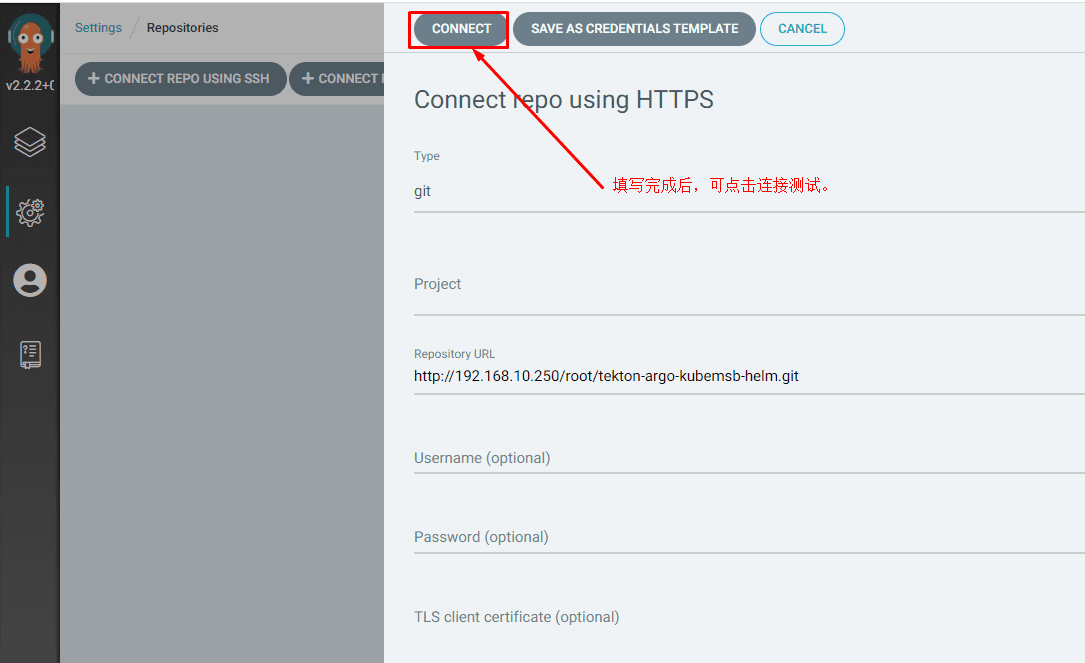
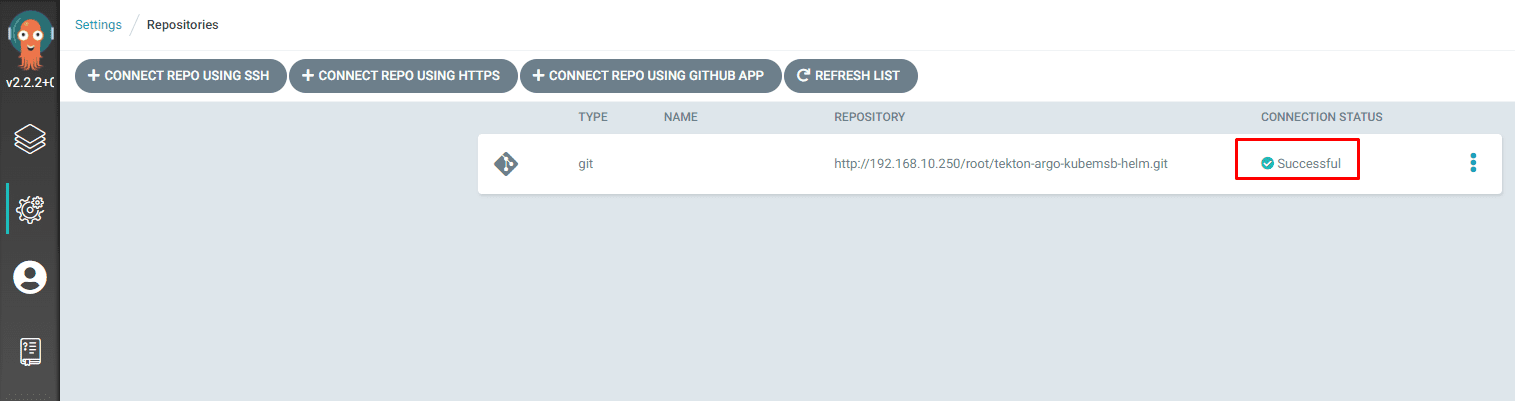
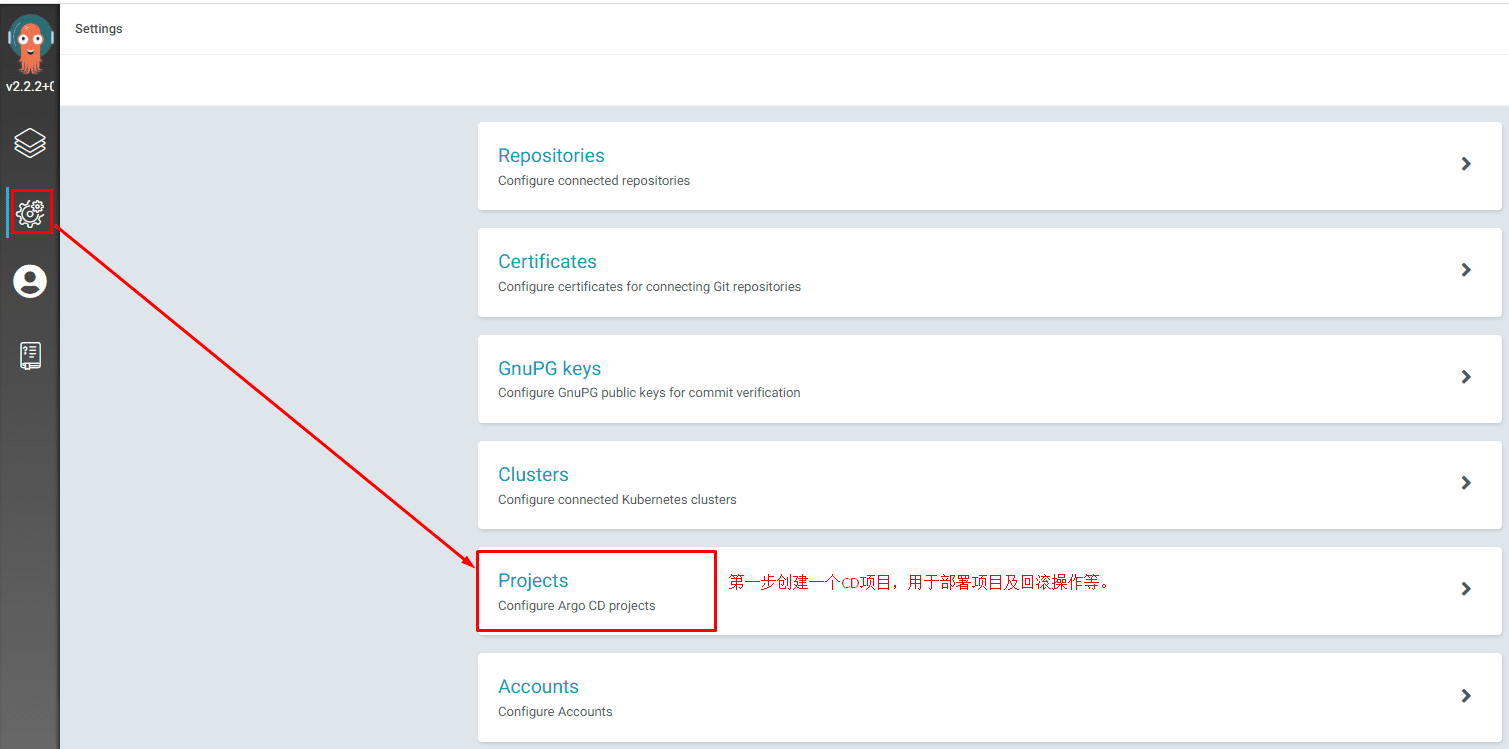
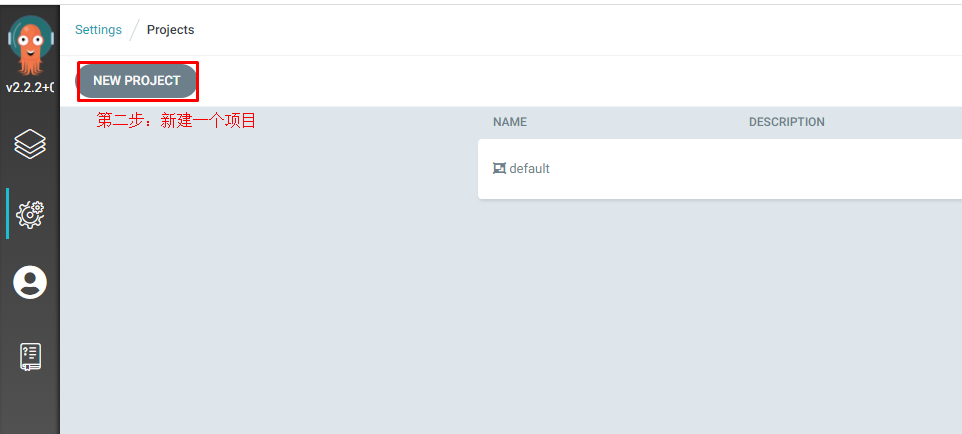
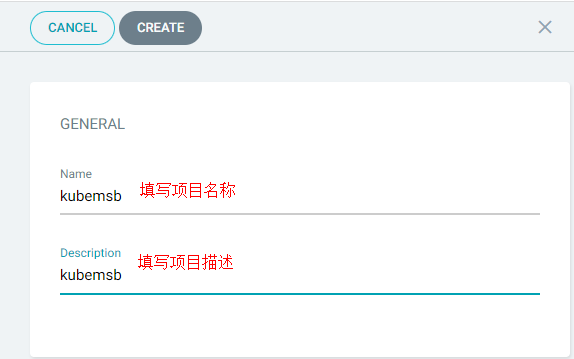
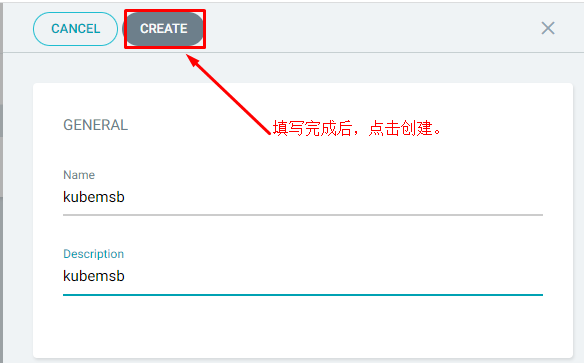
4.2 在Argocd UI界面创建项目
创建一个CD项目,用于应用部署、回滚操作等。
创建一个项目,在 Argo CD 中有一个 AppProject 的 CRD,表示应用程序的逻辑分组,它由以下几个关键属性组成:
sourceRepos:项目中的应用程序可以从中获取清单的仓库引用destinations:项目中的应用可以部署到的集群和命名空间roles:项目内资源访问定义的角色
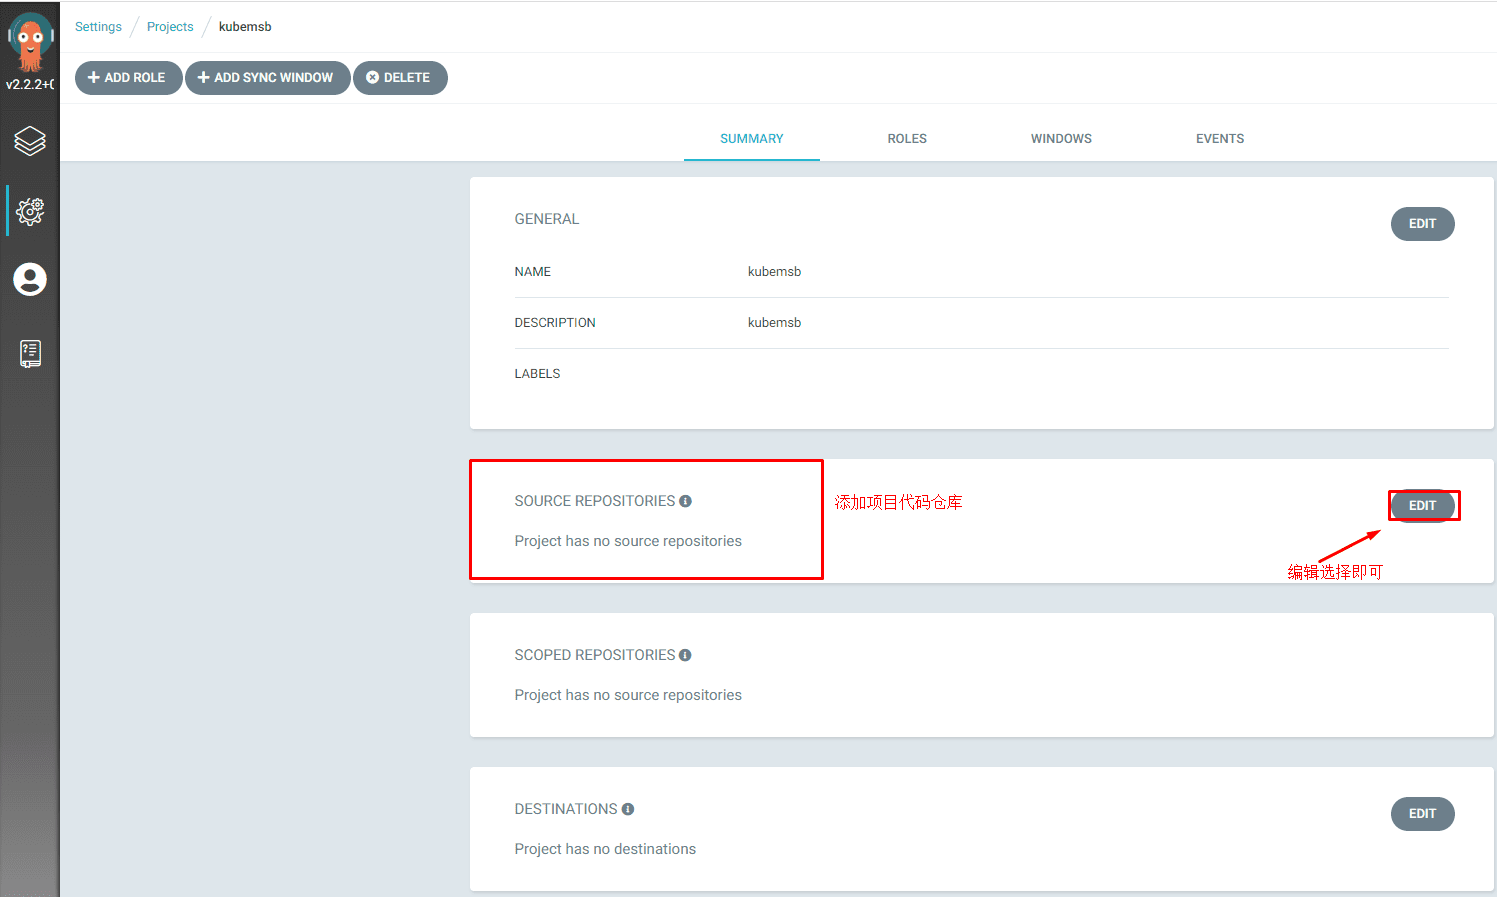


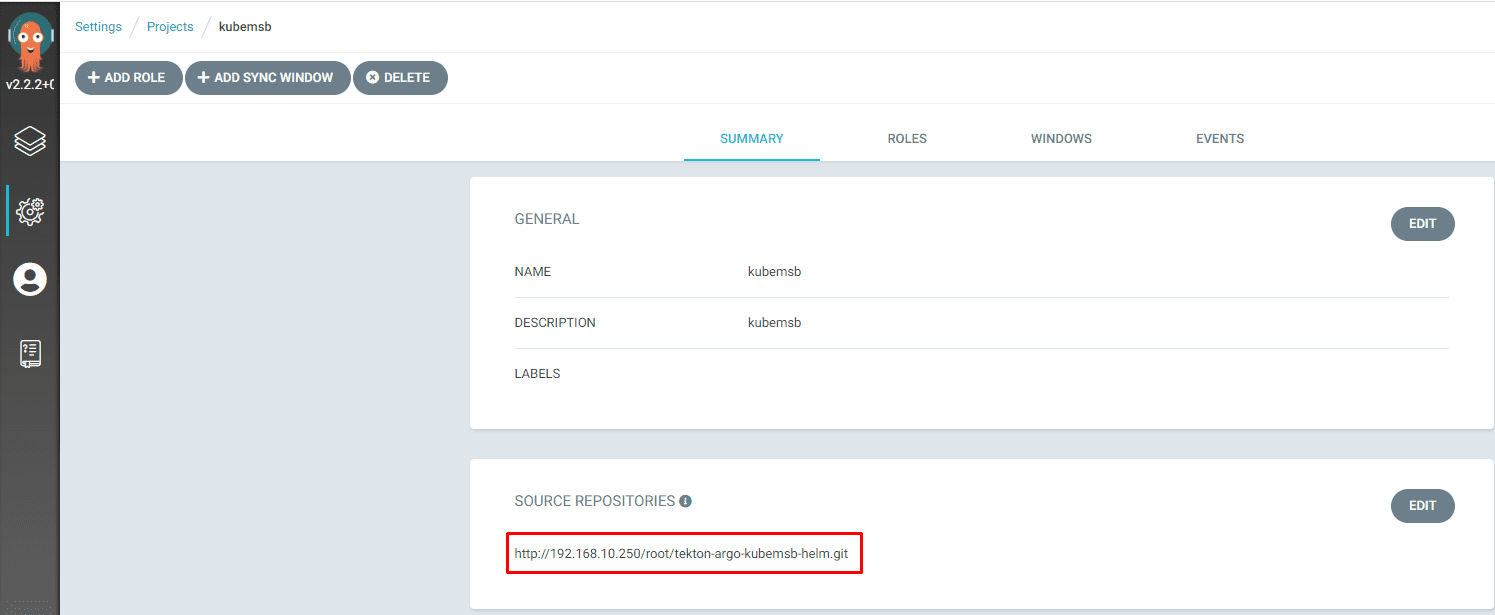
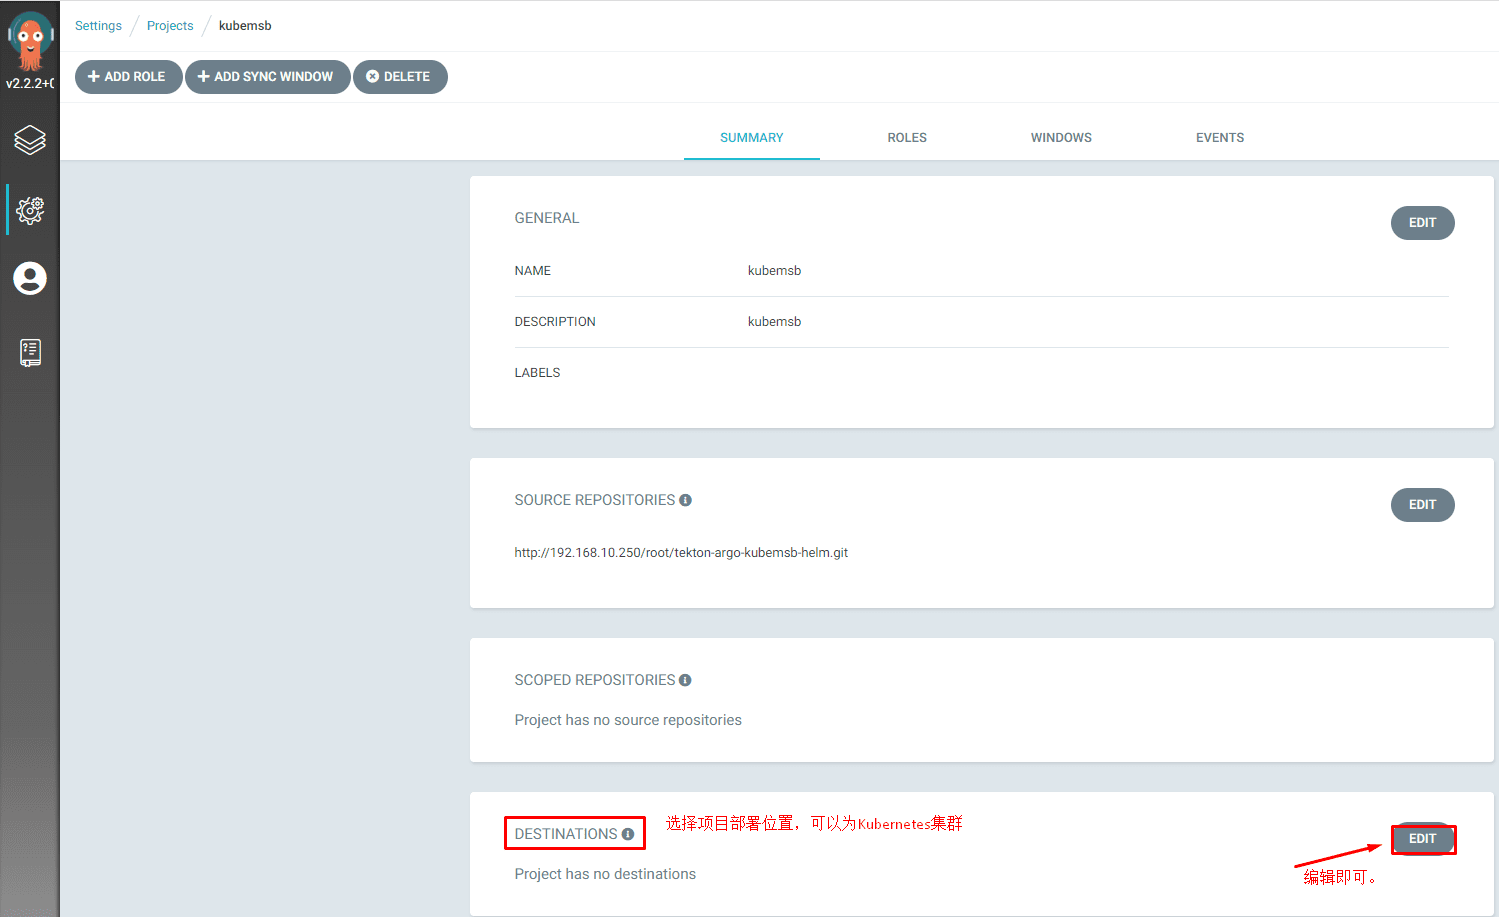

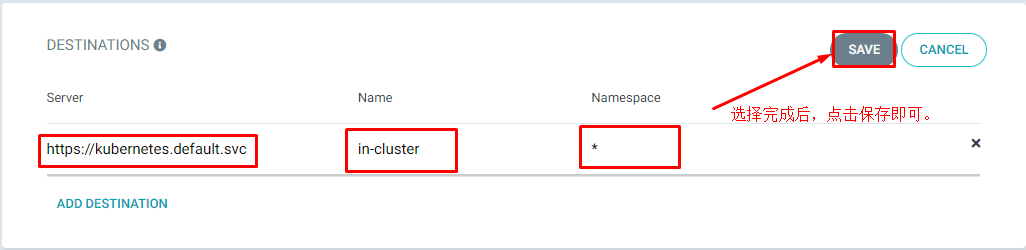
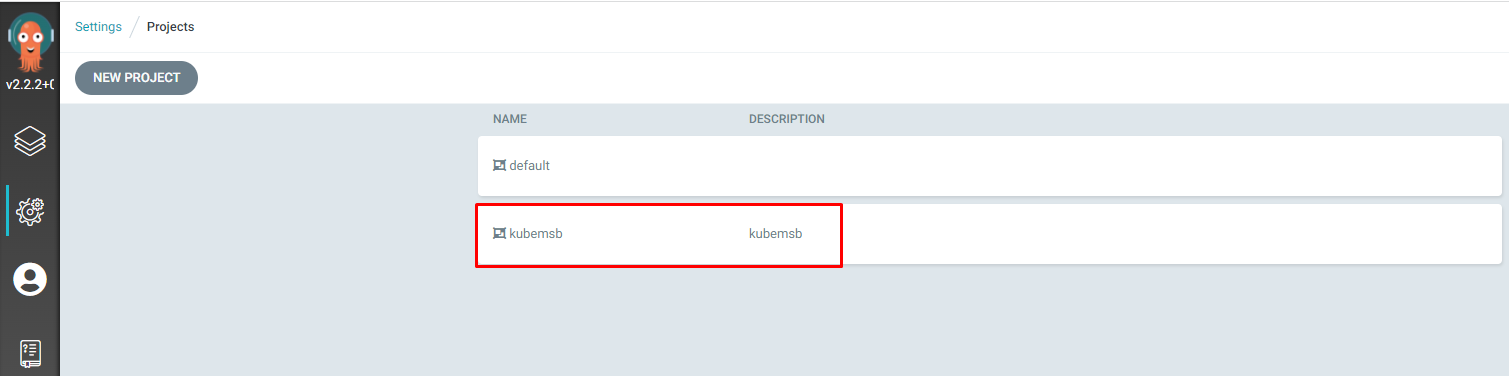
4.3 在Argo Web界面创建应用(Application)
项目创建完成后,在该项目下创建一个 Application,代表环境中部署的应用程序实例。
应用部署涉及到的命名空间一定要手动创建。
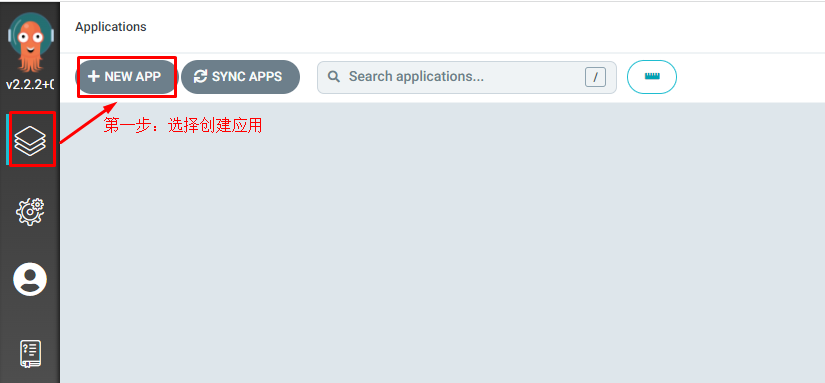
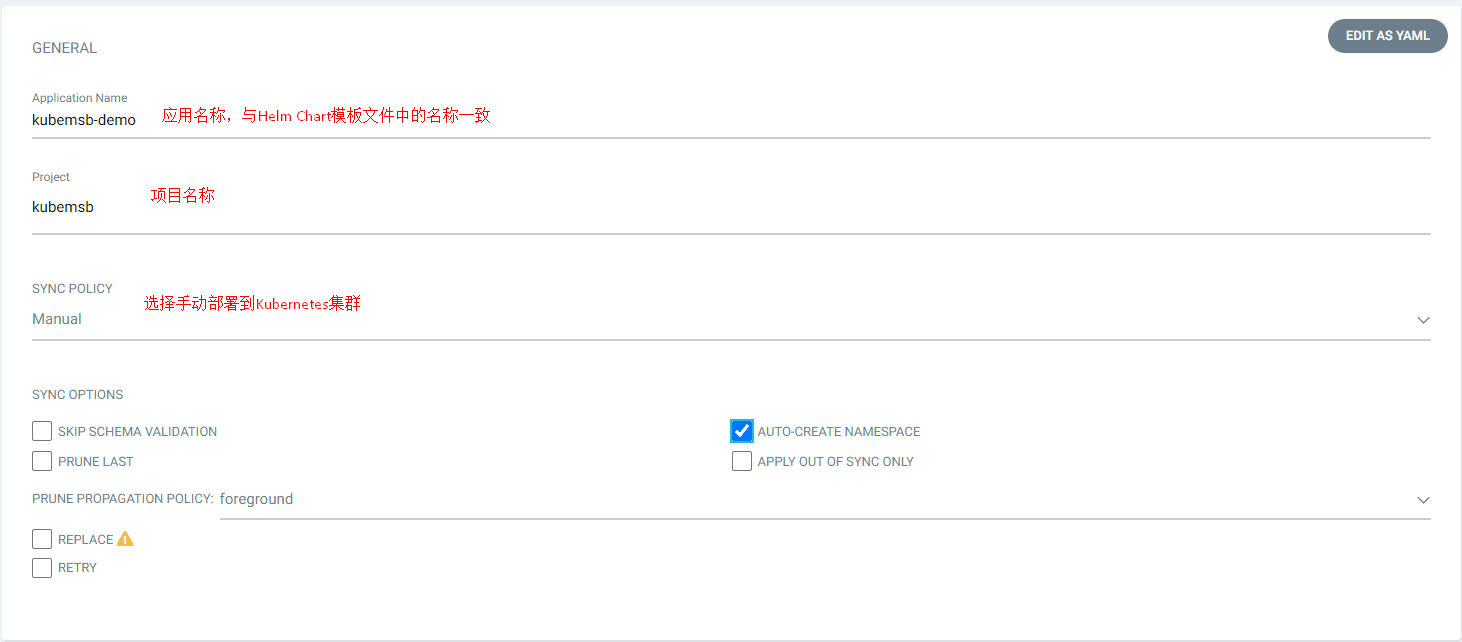
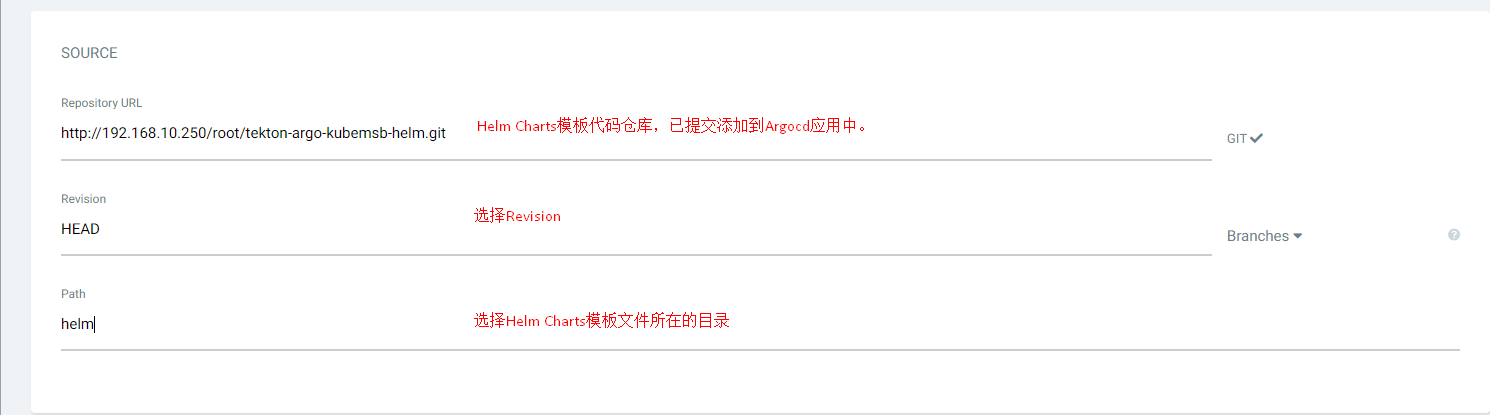
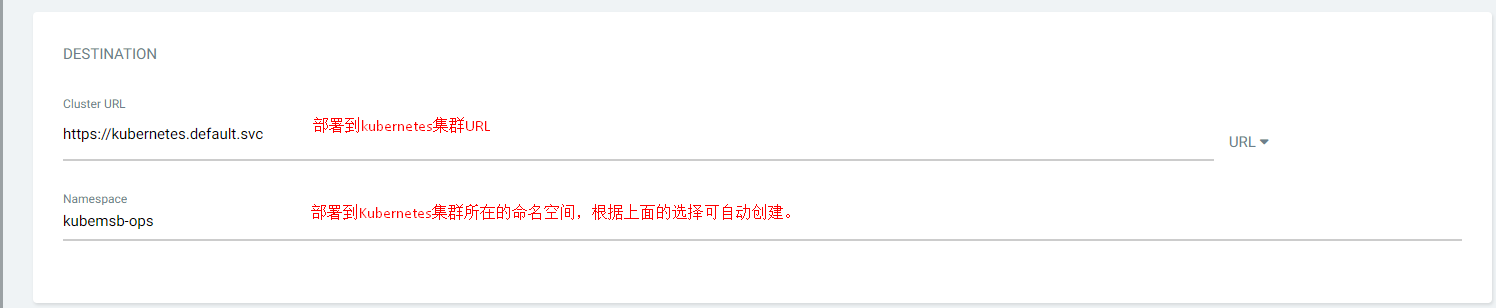
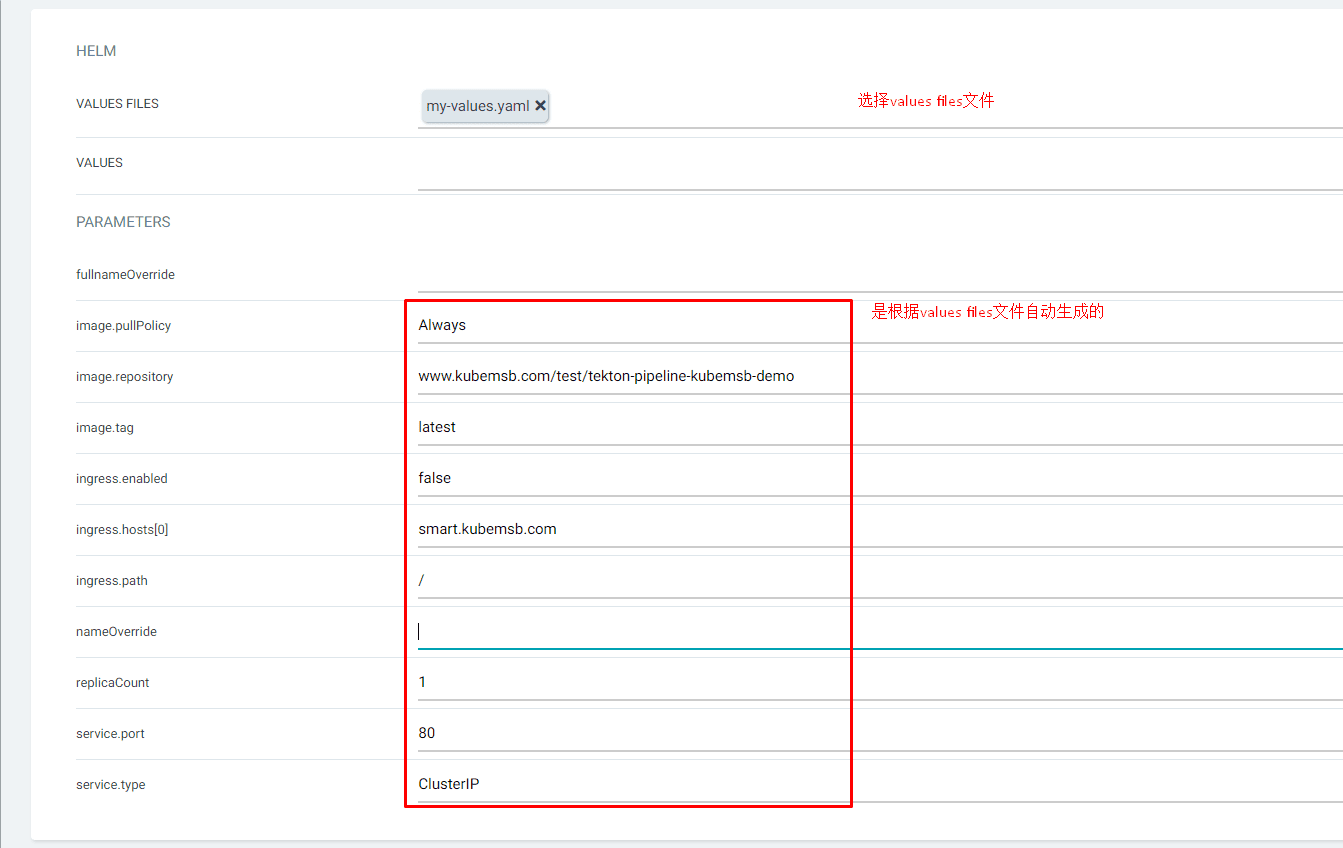
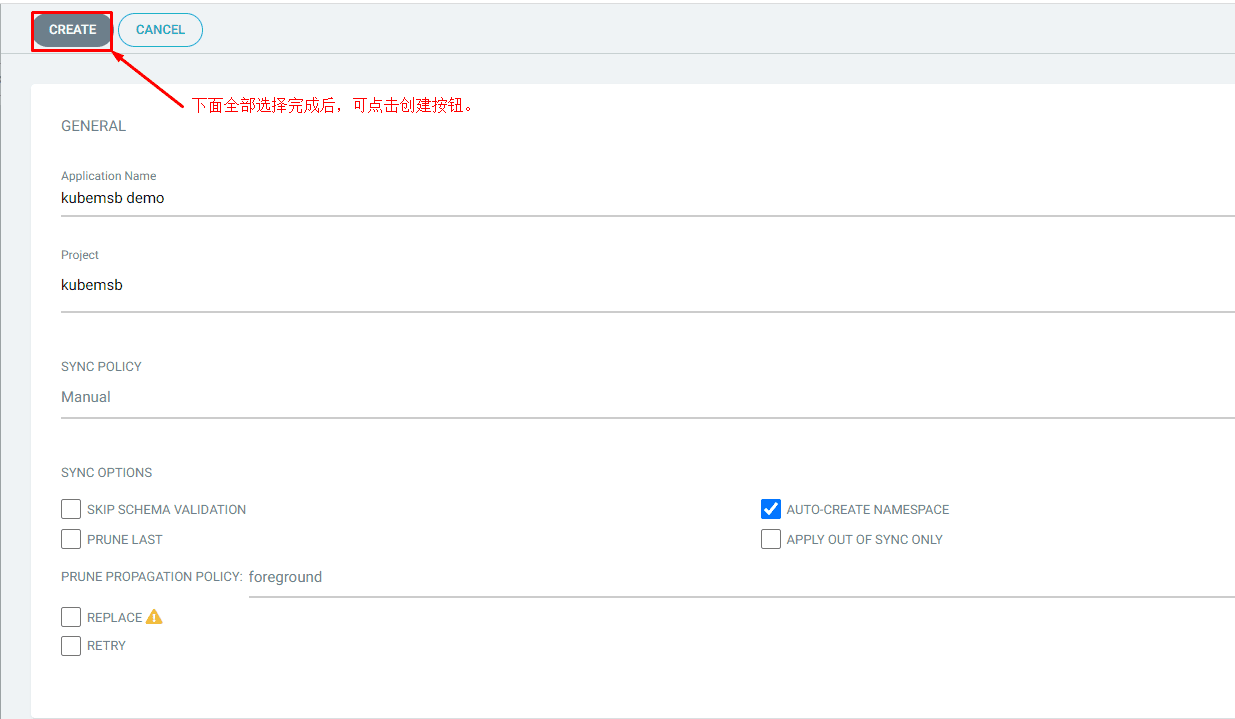
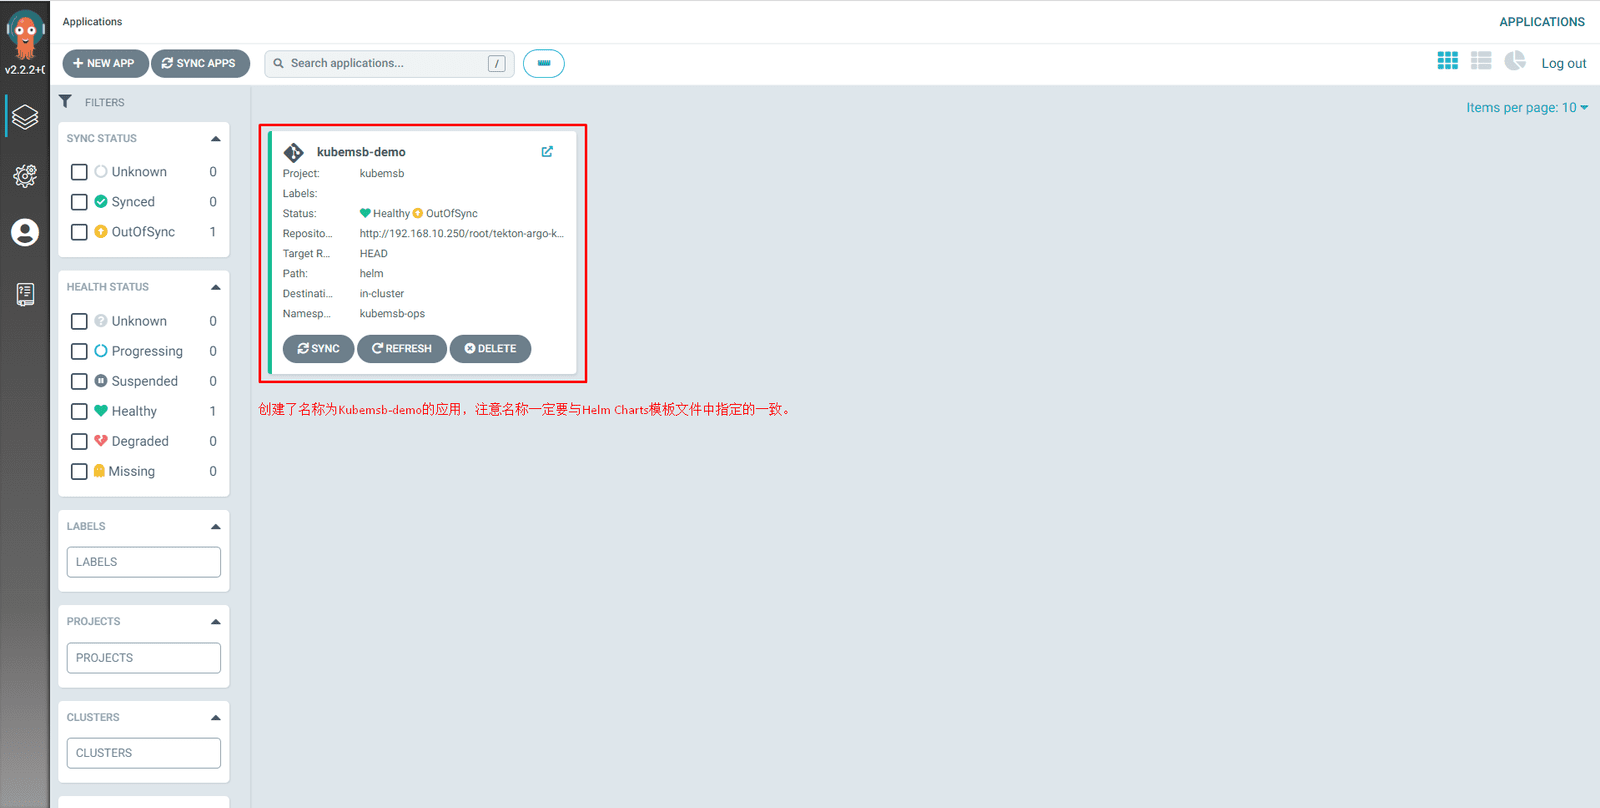
这里我们定义了一个名为 kubemsb-demo 的应用,应用源来自于 helm 路径,使用的是 my-values.yaml 文件,此外还可以通过 source.helm.parameters 来配置参数,同步策略我们仍然选择使用手动的方式,我们可以在 Tekton 的任务中去手动触发同步。上面的资源对象创建完成后应用就会处于 OutOfSync 状态,因为集群中还没部署该应用。
五、Tekton流水线改造
5.1 重新生成新的Pipeline
去掉原有Pipeline文件中最后的 deploy 和 rollback 两个任务,当 Docker 镜像构建完成并推送至Harbor容器镜像仓库后,只需要去修改部署代码仓库中的 values 文件,然后再去手动触发 Argo CD 同步状态即可(如果开启了自动同步这一步都可以省略了),而回滚操作直接在 Argo CD 中去操作即可,不需要定义一个单独的 Task 任务。
5.1.1 原有 Pipeline 流水线
# vim argo-pipeline.yaml
# cat argo-pipeline.yaml
apiVersion: tekton.dev/v1beta1
kind: Pipeline
metadata:
  name: pipeline
spec:
  workspaces: # 声明 workspaces
    - name: go-repo-pvc
  params:
    # 定义代码仓库
    - name: git_url
    - name: revision
      type: string
      default: "master"
    # 定义镜像参数
    - name: image
    - name: registry_url
      type: string
      default: "www.kubemsb.com"
    - name: registry_mirror
      type: string
      default: "https://ot2k4d59.mirror.aliyuncs.com/"
    # 定义 helm charts 参数
    - name: charts_dir
    - name: release_name
    - name: release_namespace
      default: "default"
    - name: overwrite_values
      default: ""
    - name: values_file
      default: "values.yaml"
  tasks: # 添加task到流水线中
    - name: clone
      taskRef:
        name: git-clone
      workspaces:
        - name: output
          workspace: go-repo-pvc
      params:
        - name: url
          value: $(params.git_url)
        - name: revision
          value: $(params.revision)
    - name: test
      taskRef:
        name: test
    - name: build # 编译二进制程序
      taskRef:
        name: build
      runAfter: # 测试任务执行之后才执行 build task
        - test
        - clone
      workspaces: # 传递 workspaces
        - name: go-repo
          workspace: go-repo-pvc
    - name: docker # 构建并推送 Docker 镜像
      taskRef:
        name: docker
      runAfter:
        - build
      workspaces: # 传递 workspaces
        - name: go-repo
          workspace: go-repo-pvc
      params: # 传递参数
        - name: image
          value: $(params.image)
        - name: registry_url
          value: $(params.registry_url)
        - name: registry_mirror
          value: $(params.registry_mirror)
    - name: deploy # 部署应用
      taskRef:
        name: deploy
      runAfter:
        - docker
      workspaces:
        - name: source
          workspace: go-repo-pvc
      params:
        - name: charts_dir
          value: $(params.charts_dir)
        - name: release_name
          value: $(params.release_name)
        - name: release_namespace
          value: $(params.release_namespace)
        - name: overwrite_values
          value: $(params.overwrite_values)
        - name: values_file
          value: $(params.values_file)
    - name: rollback # 回滚
      taskRef:
        name: rollback
      when:
        - input: "$(tasks.deploy.results.helm-status)"
          operator: in
          values: ["failed"]
      params:
        - name: release_name
          value: $(params.release_name)
        - name: release_namespace
          value: $(params.release_namespace)
5.1.2 定义使用Argo CD同步应用状态task
添加到Pipeline文件中替换原来的deploy任务
# vim argo-task.yaml
# cat argo-task.yaml
apiVersion: tekton.dev/v1alpha1
kind: Task
metadata:
  name: sync
spec:
  volumes:
  - name: argocd-secret
    secret:
      secretName: $(inputs.params.argocd_secret)
  params:
    - name: argocd_url
      description: "The URL of the ArgoCD server"
    - name: argocd_secret
      description: "The secret containing the username and password for the tekton task to connect to argo"
    #- name: commit_id
    #  description: "The commit ID to update"
    - name: app_name
      description: "The name of the argo app to update"
    - name: app_revision
      default: "HEAD"
      description: "The revision of the argo app to update"
  steps:
  - name: deploy
    image: argoproj/argocd
    volumeMounts:
    - name: argocd-secret
      mountPath: /var/secret
    command:
    - sh
    args:
    - -ce
    - |
      set -e
      echo "update commit id"
      argocd login --insecure $(params.argocd_url) --username $(/bin/cat /var/secret/username) --password $(/bin/cat /var/secret/password)
      argocd app sync $(params.app_name) --revision $(params.app_revision)
      argocd app wait $(params.app_name) --health
5.1.3 定义修改Helm Chart模板文件中Values的task
由于我们这里只需要修改 Helm Chart 的 Values 文件中的 image.tag 参数,最好的方式当然还是在一个 Task 中去修改 values.yaml 文件并 commit 到 Repo 仓库中去。
当然也可以为了简单直接在 Argo CD 的应用侧配置参数即可,比如可以使用 argocd app set 命令来为应用配置参数,然后下面再用 argocd app sync 命令手动触发同步操作,这里其实就可以有很多操作了,比如我们可以根据某些条件来判断是否需要部署,满足条件后再执行 sync 操作,最后使用 wait 命令等待应用部署完成。
除了通过手动 argocd app set 的方式来配置参数之外,可能更好的方式还是直接去修改 Repo 仓库中的 values 值,这样在源代码仓库中有一个版本记录,我们可以新建如下所示的一个任务用来修改 values 值。
# vim argo-task-values.yaml
# cat argo-task-values.yaml
apiVersion: tekton.dev/v1beta1
kind: Task
metadata:
  name: change-manifests
spec:
  params:
    - name: git_url
      description: Git repository containing manifest files to update
    - name: git_email
      default: admin@kubemsb.com
    - name: git_name
      default: Tekton Pipeline
    - name: git_manifest_dir
      description: Manifests files dir
    - name: tool_image
      default: www.kubemsb.com/tekton/helm-kubectl-curl-git-jq-yq:latest
    - name: image_tag
      description: Deploy docker image tag
  steps:
    - name: git-push
      image: $(params.tool_image)
      env:
        - name: GIT_USERNAME
          valueFrom:
            secretKeyRef:
              name: gitlab-auth
              key: username
              optional: true
        - name: GIT_PASSWORD
          valueFrom:
            secretKeyRef:
              name: gitlab-auth
              key: password
              optional: true
      command: ["/bin/bash"]
      args:
        - -c
        - |
          set -eu
          echo Load environment variables from previous steps
          # source /workspace/env-config
          git config --global user.email "$(params.git_email)"
          git config --global user.name "$(params.git_name)"
          git clone --branch master --depth 1 http://${GIT_USERNAME}:${GIT_PASSWORD}@$(params.git_url) repo
          cd "repo/$(params.git_manifest_dir)"
          ls -l
          echo old value:
          cat my-values.yaml | yq r - 'image.tag'
          echo replacing with new value:
          echo $(params.image_tag)
          yq w --inplace my-values.yaml 'image.tag' "$(params.image_tag)"
          echo verifying new value
          yq r my-values.yaml 'image.tag'
          if ! git diff-index --quiet HEAD --; then
            git status
            git add .
            git commit -m "helm values updated by tekton pipeline in change-manifests task"
            git push
          else
              echo "no changes, git repository is up to date"
          fi
5.2 生成新的Pipeline资源清单文件
# vim argo-kubemsb-demo-pipeline.yaml
# cat argo-kubemsb-demo-pipeline.yaml
apiVersion: tekton.dev/v1beta1
kind: Pipeline
metadata:
  name: pipeline
spec:
  workspaces: # 声明 workspaces
    - name: go-repo-pvc
  params:
    # 定义代码仓库
    - name: git_url
    - name: git_infra_url
    - name: revision
      type: string
      default: "master"
    # 定义镜像参数
    - name: image
    - name: image_tag
    - name: registry_url
      type: string
      default: "www.kubemsb.com"
    - name: registry_mirror
      type: string
      default: "https://ot2k4d59.mirror.aliyuncs.com/"
    - name: git_manifest_dir
      default: "helm"
    # 定义 argocd 参数
    - name: argocd_url
    - name: argocd_secret
    - name: app_name
    - name: app_revision
      type: string
      default: "HEAD"
  tasks: # 添加task到流水线中
    - name: clone
      taskRef:
        name: git-clone
      workspaces:
        - name: output
          workspace: go-repo-pvc
      params:
        - name: url
          value: $(params.git_url)
        - name: revision
          value: $(params.revision)
    - name: build # 编译二进制程序
      taskRef:
        name: build
      runAfter: # 测试任务执行之后才执行 build task
        - clone
      workspaces: # 传递 workspaces
        - name: go-repo
          workspace: go-repo-pvc
    - name: docker # 构建并推送 Docker 镜像
      taskRef:
        name: docker
      runAfter:
        - build
      workspaces: # 传递 workspaces
        - name: go-repo
          workspace: go-repo-pvc
      params: # 传递参数
        - name: image
          value: $(params.image):$(params.image_tag)
        - name: registry_url
          value: $(params.registry_url)
        - name: registry_mirror
          value: $(params.registry_mirror)
    - name: manifests
      taskRef:
        name: change-manifests
      runAfter:
        - docker
      params:
      - name: git_url
        value: $(params.git_infra_url)
      - name: git_manifest_dir
        value: $(params.git_manifest_dir)
      - name: image_tag
        value: $(params.image_tag)
    - name: sync
      taskRef:
        name: sync
      runAfter:
        - manifests
      params:
      - name: argocd_url
        value: $(params.argocd_url)
      - name: argocd_secret
        value: $(params.argocd_secret)
      - name: app_name
        value: $(params.app_name)
      - name: app_revision
        value: $(params.app_revision)
六、创建Argo CD认证的Secret
创建登录用于 Argo CD 使用的 Secret 对象
# vim argo-secret.yaml
# cat argo-secret.yaml
apiVersion: v1
kind: Secret
metadata:
  name: argocd-auth
type: Opaque
stringData:
  username: "admin"
  password: "12345678"
七、重新生成新的Triggers Template
# vim argo-gitlab-template.yaml
# cat argo-gitlab-template.yaml
apiVersion: triggers.tekton.dev/v1alpha1
kind: TriggerTemplate
metadata:
  name: gitlab-template
spec:
  params: # 定义参数,和 TriggerBinding 中的保持一致
    - name: gitrevision
    - name: gitrepositoryurl
  resourcetemplates: # 定义资源模板
    - apiVersion: tekton.dev/v1beta1
      kind: PipelineRun # 定义 pipeline 模板
      metadata:
        generateName: gitlab-run- # TaskRun 名称前缀
      spec:
        serviceAccountName: tekton-build-sa
        pipelineRef:
          name: pipeline
        workspaces:
          - name: go-repo-pvc
            persistentVolumeClaim:
              claimName: go-repo-pvc
        params:
          - name: git_url
            value: $(tt.params.gitrepositoryurl)
          - name: git_infra_url
            value: gitlab.kubemsb.com/root/tekton-argo-kubemsb-com-helm.git
          - name: image
            value: "www.kubemsb.com/test/tekton-argo-kubemsb-demo"
          - name: image_tag
            value: "$(tt.params.gitrevision)"
          - name: argocd_url
            value: argocd.kubemsb.com
          - name: argocd_secret
            value: argocd-auth
          - name: app_name
            value: kubemsb-demo
八、应用资源清单文件及验证运行结果
8.1 应用资源清单文件
# kubectl apply -f task-clone.yaml# kubectl apply -f task-build.yaml# kubectl apply -f task-docker.yaml# kubectl apply -f gitlab-webhook-rbac.yaml# kubectl apply -f gitlab-listener.yaml# kubectl apply -f other.yaml# kubectl apply -f argo-task.yaml# kubectl apply -f argo-task-values.yaml# kubectl apply -f argo-kubemsb-demo-pipeline.yaml# kubectl apply -f argo-secret.yaml# kubectl apply -f argo-gitlab-template.yaml8.2 修改本地应用源代码并提交到Gitlab仓库
# vim main.go
# git add .
# git commit -m "four commit"
# git push -u origin master
8.3 查看流水线运行
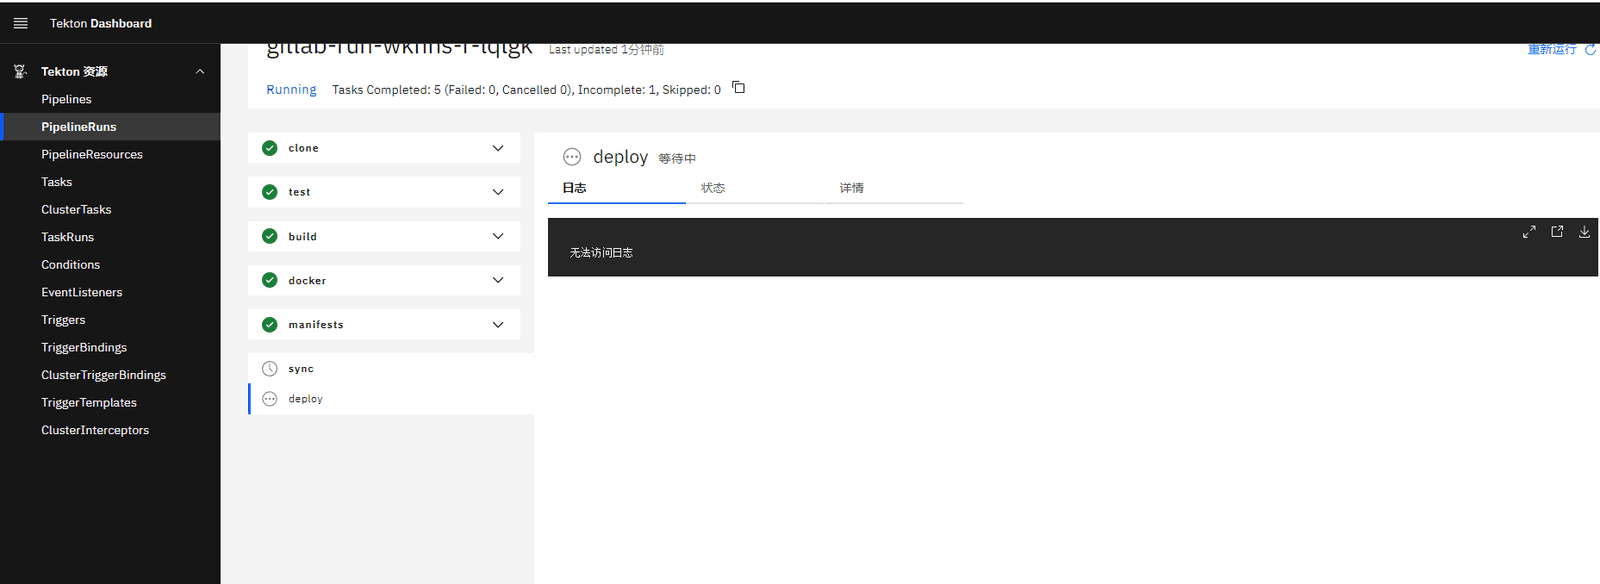
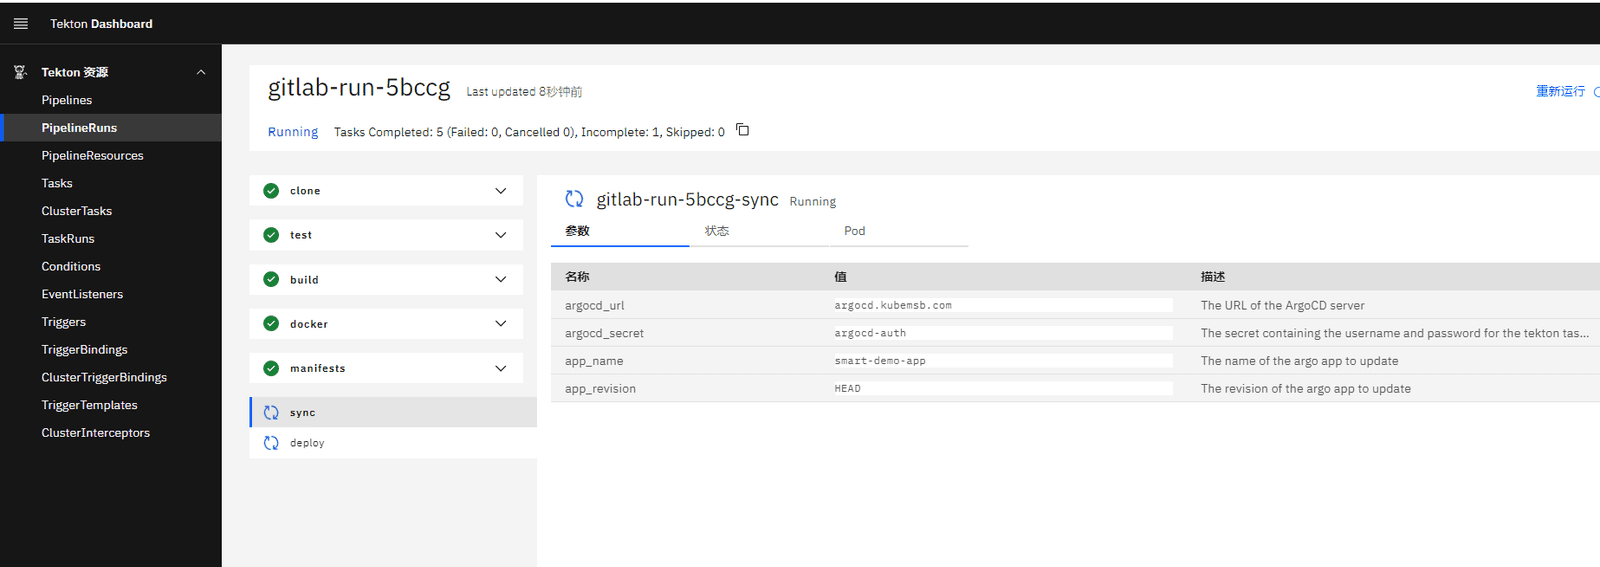
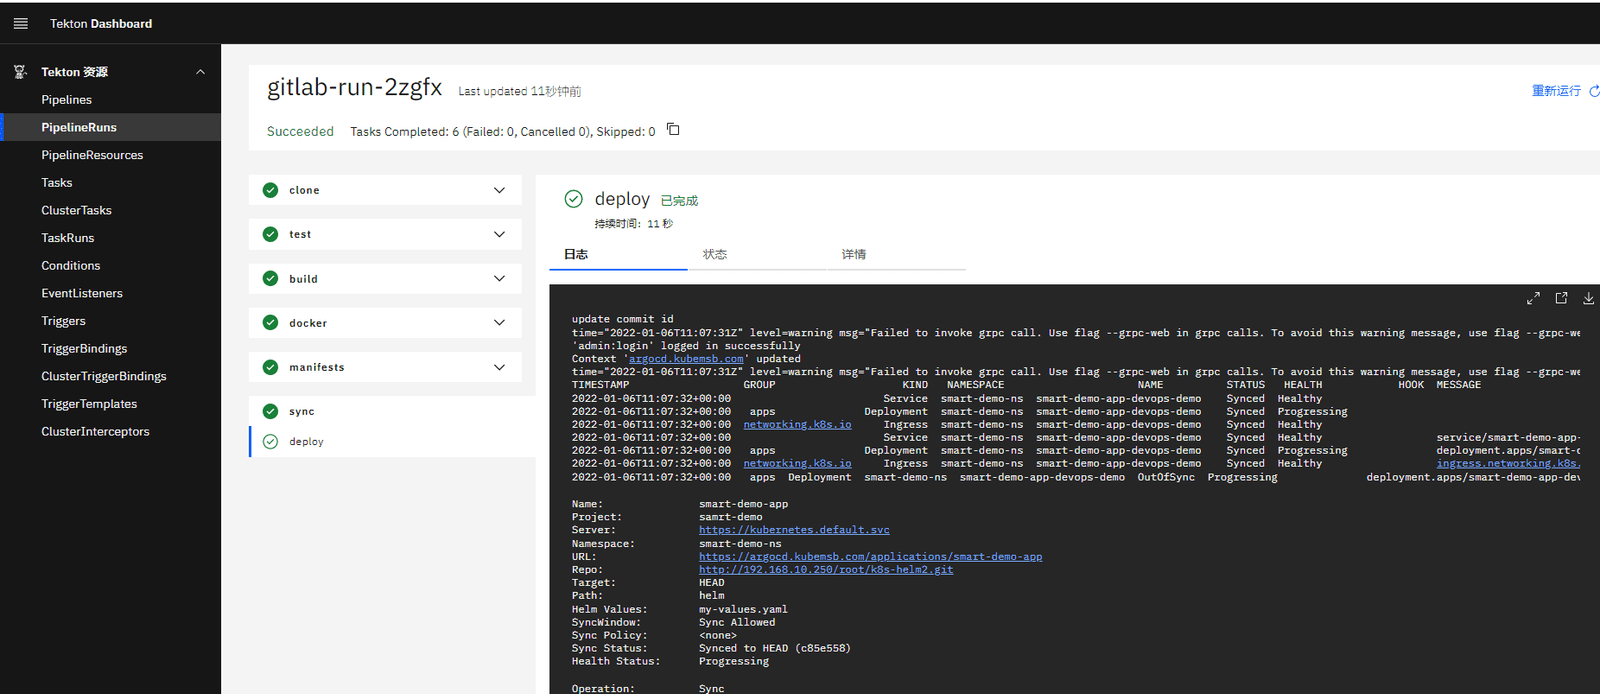
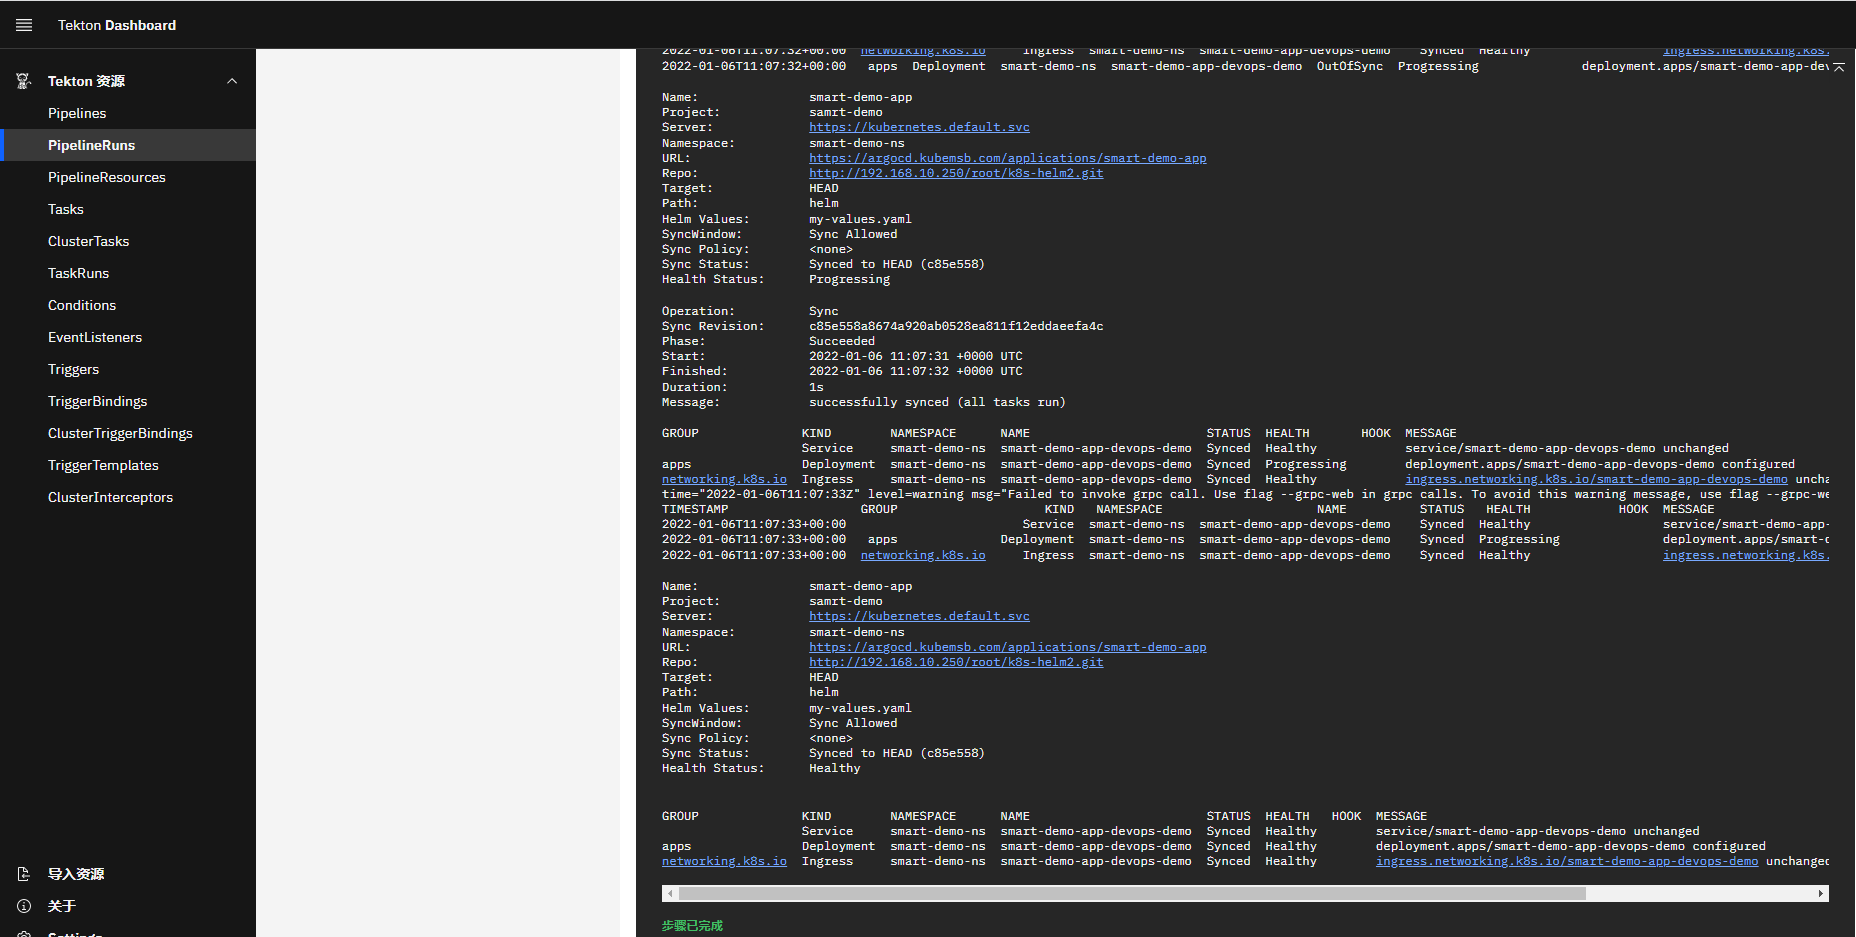
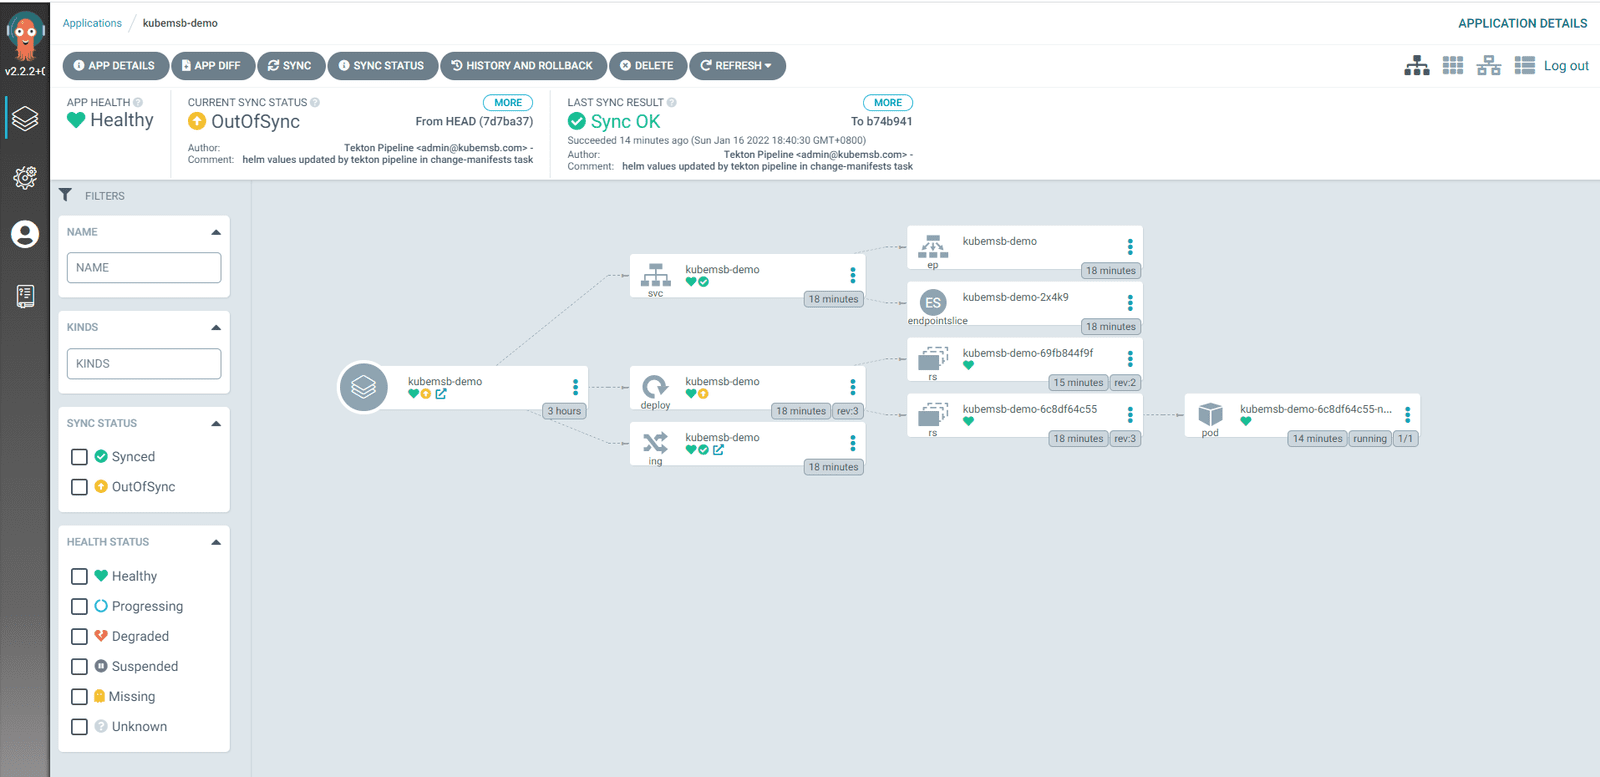
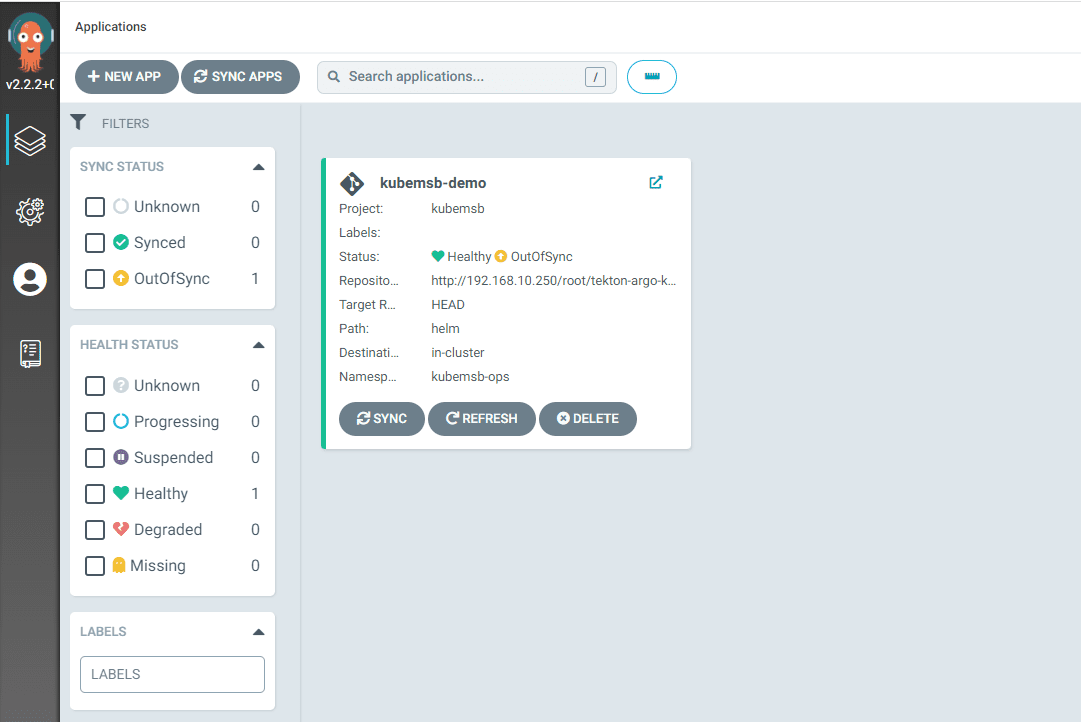
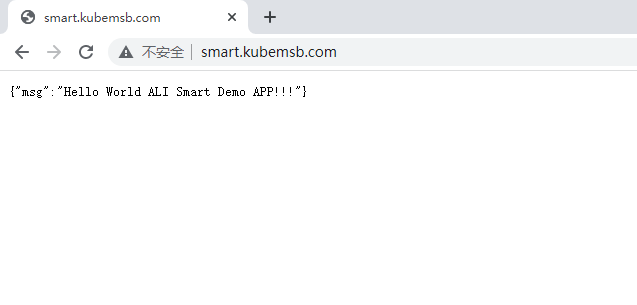
九、应用部署回滚操作
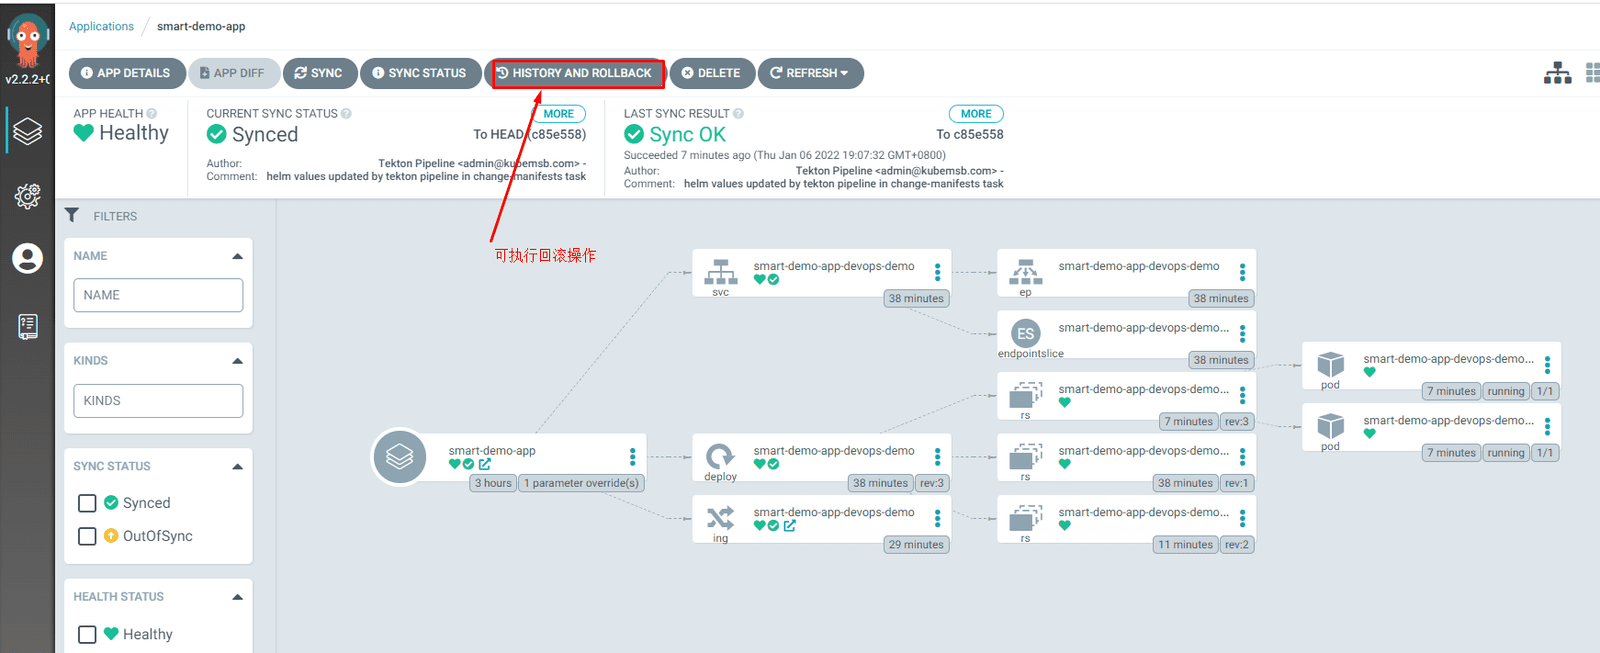
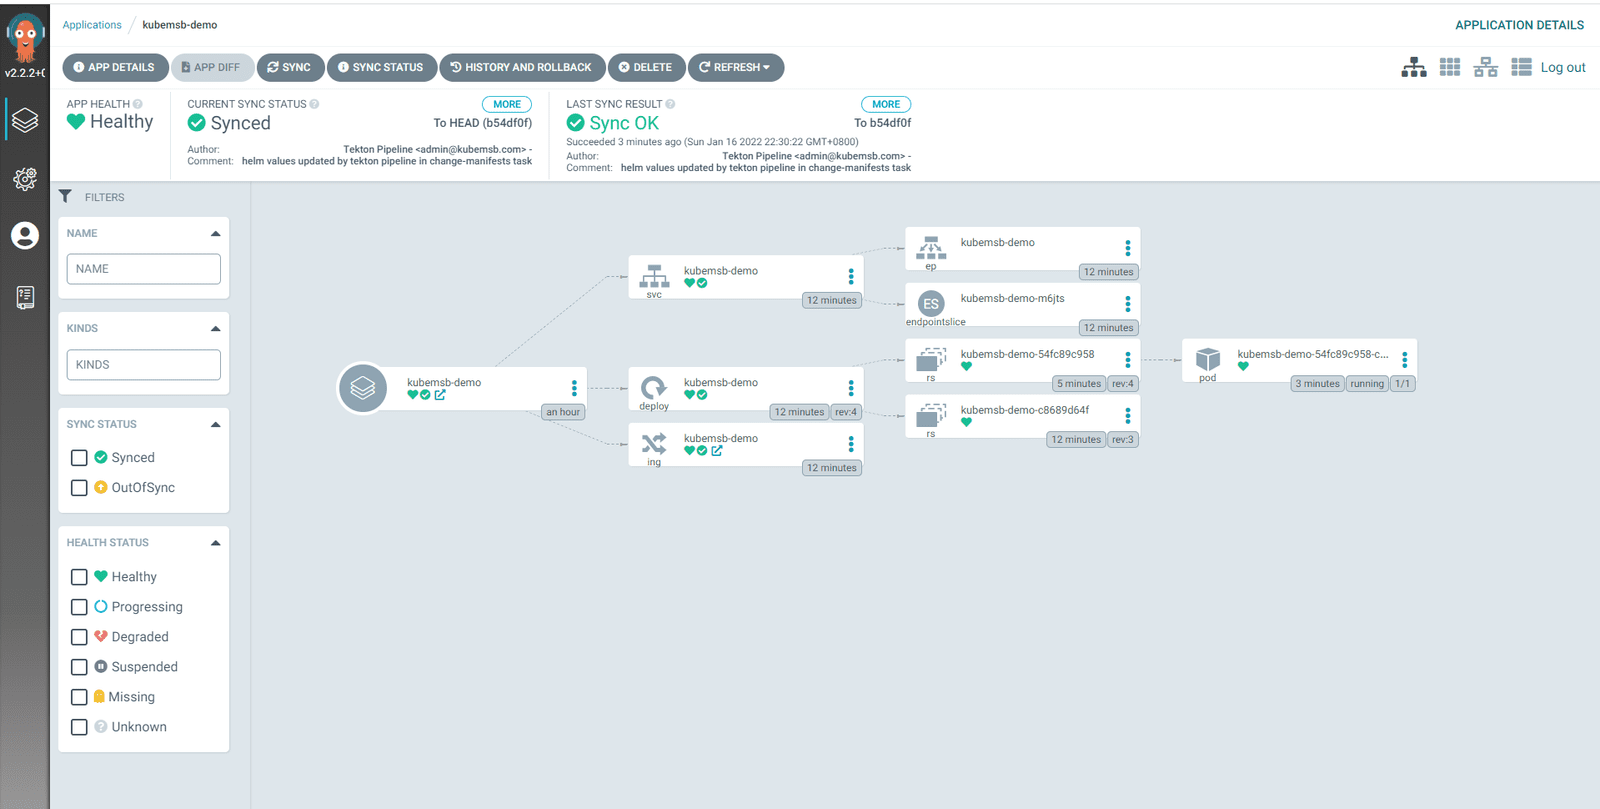
如果需要回滚,则可以直接在 Argo CD 页面上点击 HISTORY AND ROLLBACK 安装查看部署的历史记录选择回滚的版本即可: