
Knative Eventing组件及应用案例
Serverless · 第 12 篇
来源课程笔记整理优化;插图已迁入博客静态目录。
Knative Eventing组件及应用案例
一、总览及组件介绍
1.0 概述
Knative Eventing提供了事件路由的工具,可以将生产者(Producer)生成的事件(event)路由到指定的事件接收器(sink)。能够让开发者采用基于事件架构(event-driven architecture )来构建应用。
事件的路由有点类似生产者-消费者模式。生产者产生事件,根据knative eventing的机制,支持对事件进行过滤,再发送到指定的消费者
基于事件架构(event-driven architecture)这个是构建serverless应用的基础,也就是应用的代码(函数)通过事件来进行触发。
1.1 事件源 Event Source
An event source is a Kubernetes custom resource (CR), created by a developer or cluster administrator, that acts as a link between an event producer and an event sink. A sink can be a k8s service, including Knative Services, a Channel, or a Broker that receives events from an event source.
事件源是kubernetes自定义资源(CR),由开发人员或管理人员创建,它的作用是连接事件生产者到事件接收者(sink)。事件接收者(sink)可以是knative service、channel、broker。
所以,基本上可以认为Event Source就是事件生产者(event producer),生产事件,然后发送到事件接收者(sink)那里去。
Event source是kubernetes自定义资源(CR),通过Source对象实例化CR来创建的。Source对象定义了实例化CR所需要的参数。
所有的Sources都是事件源sources的范畴。
包括以下Sources:
- APIServerSource:kubernetes Api server自身的事件,可以直接带入到Knative中。比如kubernetes资源发生更新、删除时,APIServerSource 都会触发一个新事件;
- ContainerSource:ContainerSource 可以实例化一些用来生成事件容器镜像,直到ContainerSource 被删除。 比如轮询一个FTP服务来判断是否有了新文件,或者自行设置一个定时器来生成事件。ContainerSource 会让这些事件在指定的pod上保持运行。 所以大部分情况我们可以使用ContainerSource 在自定义事件源。
可以使用如下命令,来查询有哪些sources:
# kubectl get sources1.2 事件接收者 Sink
事件接收者Sink用来指定source产生的事件发送到哪里去。Sink可以是knative service、channel、broker。
Sink有两种类型对象:Addressable、Callable
- Addressable objects 有个
status.address.url属性,用来定义事件接收者的地址,它接收和确认通过HTTP传送的事件。作为一种特殊情况,核心的 Kubernetes Service Object 也实现了 Addressable 接口。 - Callable objects 能够接收通过Http传送的事件,并且能够对该事件做一些改造,然后在HTTP response里返回0个或者1个新的事件,返回的事件还可以发送到别的Sink再进一步处理。
1.3 事件通道 Channel
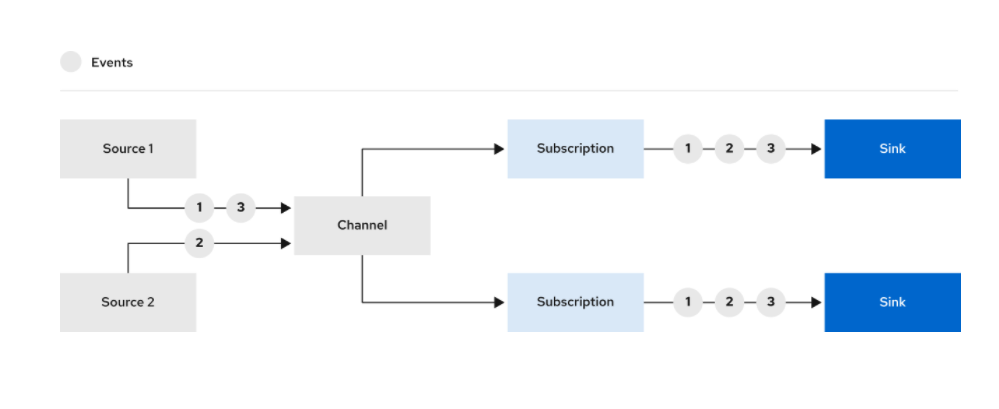
通道Channel也是Kubernetes自定义资源(custom resources),它定义了一个单一的事件转发和持久层。
Channel提供了一种事件传递机制,可以通过订阅将接收到的事件发送到多个目的地或接收器(sink)。
1.4 Broker和Trigger
Brokers也是Kubernetes自定义资源,用于定义用于收集 CloudEvent 池的事件网格(event mesh)。
Broker是事件的入口,Trigger则是分发事件。
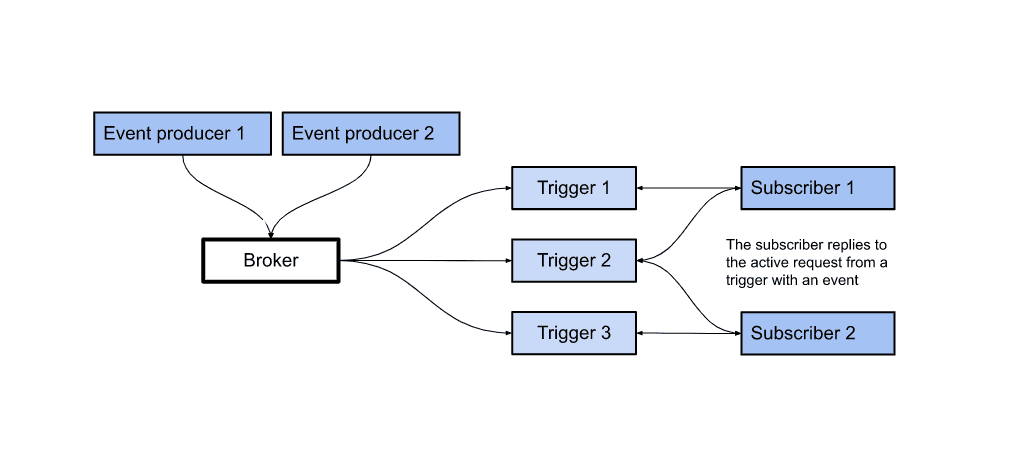
事件进入Broker后,可以使用Trigger将其转发给订阅者。Trigger允许按属性过滤事件,以便可以将具有特定属性的事件发送给特定的订阅者。
Brokers and Triggers 提供了一种叫做"event mesh"模型。事件生成者将事件发送到Broker,然后再通过Trigger 统一将这些事件分发给消费者(consumer)。
这种方式有以下好处:
- 消费者可以注册特定类型的事件,而无需直接与事件生产者协商。
- 底层平台可以使用指定的过滤条件优化事件路由。
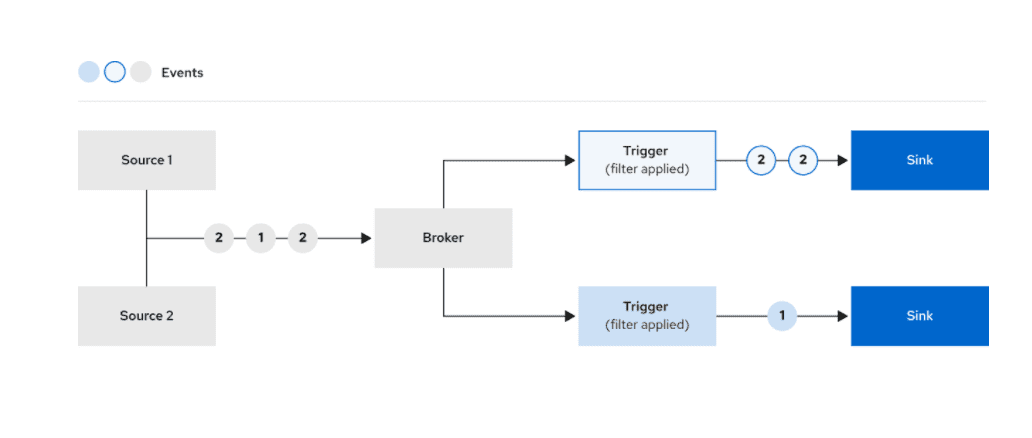
Sink字面意思叫做事件接收者,理论上来说Broker、Channel,都是Sink,即都是事件的接收者。
Sink给人一种事件最终的接收者的意思,可以想象生产者—消费者模型,事件从Source里来,最终要到Consumer里去,所以该图的Sink可以看作事件最后的消费者(consumer)。此外,Sink还有除了接收者的字面意思外,还有再对事件再次处理的功能,即Sink接收到事件,做了一层转换,再发送到下一个Sink里去,貌似这里也能说通。
二、Eventing应用
自定义Eventing
2.1 创建命名空间
创建一个学习用的命令空间event-example,把后续所有的例子全部都放在这个命令空间里。
# kubectl create namespace event-example
namespace/event-example created
# kubectl get ns
NAME STATUS AGE
default Active 2d2h
event-example Active 6s
ingress-nginx Active 43h
istio-system Active 15h
knative-eventing Active 3h22m
knative-serving Active 16h
kube-node-lease Active 2d2h
kube-public Active 2d2h
kube-system Active 2d2h
kubernetes-dashboard Active 45h
metallb-system Active 17h2.2 创建Broker
broker的作用就是:允许你将事件路由到不同的事件接收者,或者说事件消费者(consumer)。
2.2.1 准备资源清单文件
创建一个名为default的broker。先写好broker-default.yaml文件,内容如下:
# mkdir event-example
# cd event-example/
# vim broker-default.yaml
# cat broker-default.yaml
apiVersion: eventing.knative.dev/v1
kind: Broker
metadata:
 name: default
 namespace: event-example
2.2.2 执行资源清单文件
# kubectl apply -f broker-default.yaml
broker.eventing.knative.dev/default created
2.2.3 查看是否创建broker
会看到有个URL,后面我们就可以通过
HTTP请求来作为事件源,手动调用该URL,来模拟事件的触发
# kubectl get broker -n event-example
NAME      URL                                                                              AGE   READY   REASON
default   http://broker-ingress.knative-eventing.svc.cluster.local/event-example/default   57s   True
2.3 创建事件消费者 Event Consumer
事件消费者(event consumers)可以认为就是knative的service,它肯定是一个程序(或者叫做函数),程序逻辑也就是一个输入输出过程。
2.3.1 准备资源清单文件
这里我们创建两个consumer:hello-display、goodbye-display。用于接收不同类型的事件。
# vim hello-display.yaml
# cat hello-display.yaml
apiVersion: apps/v1
kind: Deployment
metadata:
  name: hello-display
  namespace: event-example
spec:
  replicas: 1
  selector:
    matchLabels: &labels
      app: hello-display
  template:
    metadata:
      labels: *labels
    spec:
      containers:
        - name: event-display
          image: gcr.io/knative-releases/knative.dev/eventing/cmd/event_display:latest
          imagePullPolicy: IfNotPresent

---

kind: Service
apiVersion: v1
metadata:
  name: hello-display
  namespace: event-example
spec:
  selector:
    app: hello-display
  ports:
  - protocol: TCP
    port: 80
    targetPort: 8080
# vim goodbye-display.yaml
# cat goodbye-display.yaml
apiVersion: apps/v1
kind: Deployment
metadata:
name: goodbye-display
namespace: event-example
spec:
replicas: 1
selector:
matchLabels: &labels
app: goodbye-display
template:
metadata:
labels: *labels
spec:
containers:
- name: event-display
image: gcr.io/knative-releases/knative.dev/eventing/cmd/event_display:latest
imagePullPolicy: IfNotPresent
---
kind: Service
apiVersion: v1
metadata:
name: goodbye-display
namespace: event-example
spec:
selector:
app: goodbye-display
ports:
- protocol: TCP
port: 80
targetPort: 80802.3.2 应用资源清单文件
# kubectl apply -f hello-display.yaml
deployment.apps/hello-display created
service/hello-display created
# kubectl apply -f goodbye-display.yaml
deployment.apps/goodbye-display created
service/goodbye-display created2.3.3 验证Event Consumers是否创建成功
# kubectl get pods -n event-example
NAME                               READY   STATUS    RESTARTS   AGE
goodbye-display-6479f484cb-s7wgm   1/1     Running   0          90s
hello-display-79b6c5d565-g5kw7     1/1     Running   0          104s
2.4 创建Tigger
2.4.1 介绍
此时consumer创建了好了,那么自然而然就想到一个问题:从broker过来的事件(event),哪些应该到hello-display里?又哪些应该到goodbye-display里呢?
触发器(trigger)的作用就是提供一个过滤器(filter)的机制,根据云事件(Cloud Event)的上下文属性来选择相应的事件。
2.4.2 准备资源清单文件
需要为每个consumer来创建trigger。
2.4.2.1 hello-display的触发器(hello-trigger)
# vim hello-trigger.yaml
# cat hello-trigger.yaml
apiVersion: eventing.knative.dev/v1
kind: Trigger
metadata:
  name: hello-display
  namespace: event-example
spec:
  broker: default
  filter:
    attributes:
      type: greeting
  subscriber:
    ref:
     apiVersion: v1
     kind: Service
     name: hello-display
说明:
type: greeting,也就是说需要属性 type为greeting的事件2.4.2.2 goodbye-display的触发器(goodbye-trigger)
# vim goodbye-trigger.yaml
# cat goodbye-trigger.yaml
apiVersion: eventing.knative.dev/v1
kind: Trigger
metadata:
  name: goodbye-display
  namespace: event-example
spec:
  broker: default
  filter:
    attributes:
      source: sendoff
  subscriber:
    ref:
     apiVersion: v1
     kind: Service
     name: goodbye-display
说明:
source: sendoff,也就是说需要属性source为sendoff的事件2.4.3 应用资源清单文件
# kubectl apply -f hello-trigger.yaml
trigger.eventing.knative.dev/hello-display created
# kubectl apply -f goodbye-trigger.yaml
trigger.eventing.knative.dev/goodbye-display created2.4.4 验证触发器是否创建
# kubectl get trigger -n event-example
NAME              BROKER    SUBSCRIBER_URI                                           AGE   READY   REASON
goodbye-display   default   http://goodbye-display.event-example.svc.cluster.local   19s   True
hello-display     default   http://hello-display.event-example.svc.cluster.local     38s   True
2.5 事件生成方法
万事俱备,现在就可以开始上手来手动生成事件。还记得之前创建的broker嘛?有个URL,我们直接可以通过HTTP请求的方式来制造事件。
但是有个注意项:broker只能在knative-eventing集群内部访问。
所以我们需要在集群内部创建一个pod,用这个pod来执行curl命令,用它作为事件的产生者(producer)。
2.5.1 创建资源清单文件
创建该pod,producer-curl.yaml内容如下:
# vim producer-curl.yaml
# cat producer-curl.yaml
apiVersion: v1
kind: Pod
metadata:
  labels:
    run: curl
  name: curl
  namespace: event-example
spec:
  containers:
    # This could be any image that we can SSH into and has curl.
  - image: radial/busyboxplus:curl
    imagePullPolicy: IfNotPresent
    name: curl
    resources: {}
    stdin: true
    terminationMessagePath: /dev/termination-log
    terminationMessagePolicy: File
    tty: true
2.5.2 应用资源清单文件
# kubectl apply -f producer-curl.yaml
pod/curl created
2.5.3 验证Pod是否被创建
# kubectl get pods -n event-example
NAME                               READY   STATUS    RESTARTS   AGE
curl                               1/1     Running   0          48s
2.5.4 进入Pod中容器执行验证命令
2.5.4.1 进入方法
方式一:
# kubectl exec -it curl -n event-example -- sh
sh: shopt: not found
[ root@curl:/ ]$
方式二:使用ssh协议
# kubectl attach -it curl -n event-example
If you don't see a command prompt, try pressing enter.
[ root@curl:/ ]$2.5.4.2 发起type: greeting的请求
[ root@curl:/ ]$ curl -v "http://broker-ingress.knative-eventing.svc.cluster.local/event-example/default" \
   -X POST \
   -H "Ce-Id: say-hello" \
   -H "Ce-Specversion: 1.0" \
   -H "Ce-Type: greeting" \
   -H "Ce-Source: not-sendoff" \
   -H "Content-Type: application/json" \
   -d '{"msg":"Hello Knative!"}'
提交过程:
> POST /event-example/default HTTP/1.1
> User-Agent: curl/7.35.0
> Host: broker-ingress.knative-eventing.svc.cluster.local
> Accept: */*
> Ce-Id: say-hello
> Ce-Specversion: 1.0
> Ce-Type: greeting
> Ce-Source: not-sendoff
> Content-Type: application/json
> Content-Length: 24
>
响应后返回信息
< HTTP/1.1 202 Accepted
< Allow: POST, OPTIONS
< Date: Wed, 22 Dec 2021 06:05:28 GMT
< Content-Length: 0
<2.5.4.3 发起source: sendoff的请求
[ root@curl:/ ]$ curl -v "http://broker-ingress.knative-eventing.svc.cluster.local/event-example/default" \
   -X POST \
   -H "Ce-Id: say-goodbye" \
   -H "Ce-Specversion: 1.0" \
   -H "Ce-Type: not-greeting" \
   -H "Ce-Source: sendoff" \
   -H "Content-Type: application/json" \
   -d '{"msg":"Goodbye Knative!"}
提交的信息
> POST /event-example/default HTTP/1.1
> User-Agent: curl/7.35.0
> Host: broker-ingress.knative-eventing.svc.cluster.local
> Accept: */*
> Ce-Id: say-goodbye
> Ce-Specversion: 1.0
> Ce-Type: not-greeting
> Ce-Source: sendoff
> Content-Type: application/json
> Content-Length: 26
>
响应后返回信息
< HTTP/1.1 202 Accepted
< Allow: POST, OPTIONS
< Date: Wed, 22 Dec 2021 06:08:17 GMT
< Content-Length: 0
<2.5.4.4 发起type: greeting的请求及发起source: sendoff的请求
[ root@curl:/ ]$ curl -v "http://broker-ingress.knative-eventing.svc.cluster.local/event-example/default" \
   -X POST \
   -H "Ce-Id: say-hello-goodbye" \
   -H "Ce-Specversion: 1.0" \
   -H "Ce-Type: greeting" \
   -H "Ce-Source: sendoff" \
   -H "Content-Type: application/json" \
   -d '{"msg":"Hello Knative! Goodbye Knative!"}'
提交的信息
> POST /event-example/default HTTP/1.1
> User-Agent: curl/7.35.0
> Host: broker-ingress.knative-eventing.svc.cluster.local
> Accept: */*
> Ce-Id: say-hello-goodbye
> Ce-Specversion: 1.0
> Ce-Type: greeting
> Ce-Source: sendoff
> Content-Type: application/json
> Content-Length: 41
>
响应后返回信息
< HTTP/1.1 202 Accepted
< Allow: POST, OPTIONS
< Date: Wed, 22 Dec 2021 06:10:49 GMT
< Content-Length: 0
<说明:
每次curl的请求,都有202 Accepted的响应。如下:
< HTTP/1.1 202 Accepted
< Allow: POST, OPTIONS
< Date: Wed, 22 Dec 2021 06:10:49 GMT
< Content-Length: 0
<2.6 事件接收确认
先用
exit命令退出curl容器。
生成了事件,并且收到了正常了返回信息,此时可以验证一下consumer是不是正常消费了。
通过如下命令,来查看hello-display的日志:
# kubectl  logs -l app=hello-display --tail=100 -n event-example

☁️  cloudevents.Event
Context Attributes,
  specversion: 1.0
  type: greeting
  source: not-sendoff
  id: say-hello
  datacontenttype: application/json
Extensions,
  knativearrivaltime: 2021-12-22T06:05:28.576813284Z
Data,
  {
    "msg": "Hello Knative!"
  }

☁️  cloudevents.Event
Context Attributes,
  specversion: 1.0
  type: greeting
  source: not-sendoff
  id: say-hello
  datacontenttype: application/json
Extensions,
  knativearrivaltime: 2021-12-22T06:13:01.771639373Z
Data,
  {
    "msg": "Hello Knative!"
  }
通过如下命令,来查看goodbye-display`的日志:
# kubectl  logs -l app=goodbye-display --tail=100 -n event-example
2021/12/22 05:42:36 Failed to read tracing config, using the no-op default: empty json tracing config
☁️  cloudevents.Event
Context Attributes,
  specversion: 1.0
  type: not-greeting
  source: sendoff
  id: say-goodbye
  datacontenttype: application/json
Extensions,
  knativearrivaltime: 2021-12-22T06:08:17.401605123Z
Data,
  {
    "msg": "Goodbye Knative!"
  }
☁️  cloudevents.Event
Context Attributes,
  specversion: 1.0
  type: greeting
  source: sendoff
  id: say-hello-goodbye
  datacontenttype: application/json
Extensions,
  knativearrivaltime: 2021-12-22T06:10:49.291086798Z
Data,
  {
    "msg": "Hello Knative! Goodbye Knative!"
  }
说明:
通过以上说明发送的消息与接收的消息是一致的。