
如何通过Cilium Cluster Mesh实现Kubernetes多集群方案?
多集群 · 第 2 篇
来源课程笔记整理优化;插图已迁入博客静态目录。
如何通过Cilium Cluster Mesh实现Kubernetes多集群方案?
一、Cilium Cluster Mesh
1.1 Cilium Cluster Mesh功能
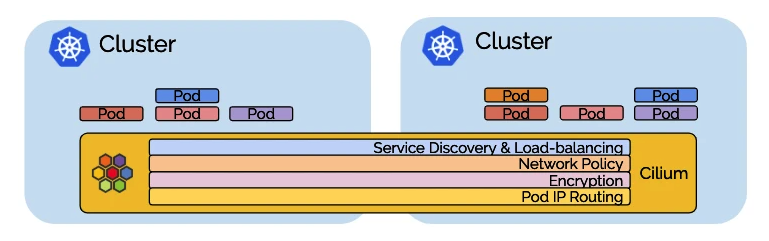
Cluster Mesh 是 Cilium 的多集群实现,可以帮助 Cilium 实现跨数据中心、跨 VPC 的多 Kubernetes 集群管理,Cluster Mesh 主要有以下功能:
1.通过隧道或直接路由的方式,在多个 Kubernetes 集群间进行 Pod IP 路由,而无需任何网关或代理。
2.使用标准 Kubernetes 服务发现机制。
3.跨多个集群的网络策略。策略可以使用 Kubernetes 原生的 NetworkPolicy 资源或者扩展的 CiliumNetworkPolicy CRD。
4.透明加密本集群以及跨集群节点间所有通信的流量。
1.2 Cilium Cluster Mesh应用场景
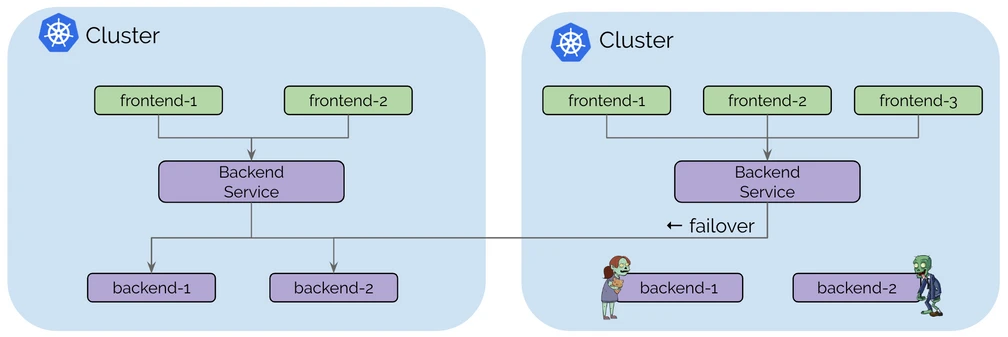
1.2.1 高可用
对大多数人来说,高可用是最普遍的使用场景。可以在多个区域(regions)或可用区(availability zones)中运行多个 Kubernetes 集群,并在每个集群中运行相同服务的副本。一旦发生异常,请求可以故障转移到其他集群。
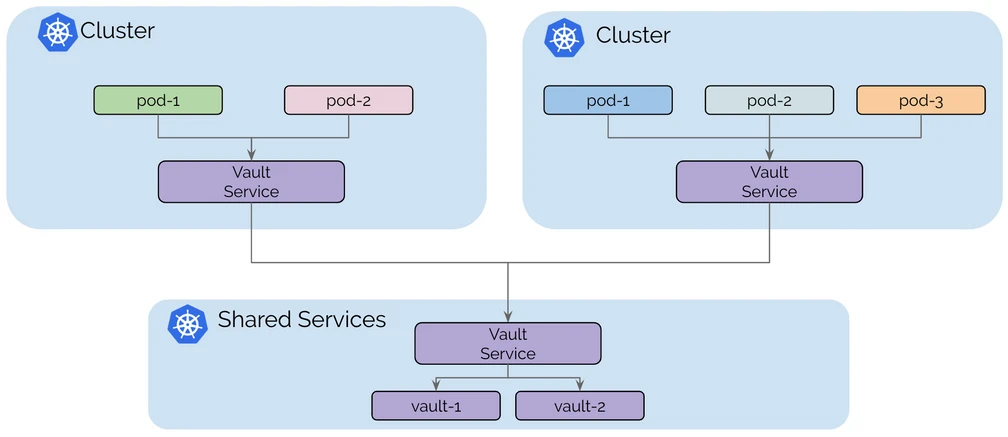
1.2.2 共享服务
某些公共基础服务可以在集群间进行共享(如密钥管理,日志记录,监控或 DNS 服务等),以避免额外的资源开销。
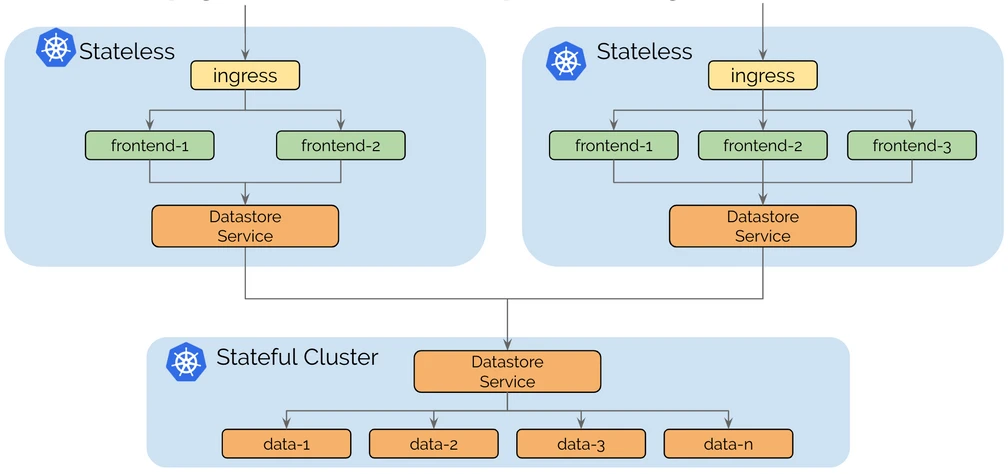
1.2.3 拆分有状态和无状态服务
运行有状态或无状态服务的操作复杂性是非常不同的。无状态服务易于扩展,迁移和升级。完全使用无状态服务运行集群可使集群保持灵活和敏捷。有状态服务(例如 MySQL,Elasticsearch, Etcd 等)可能会引入潜在的复杂依赖,迁移有状态服务通常涉及存储的迁移。为无状态和有状态服务分别运行独立的集群可以将依赖复杂性隔离到较少数量的集群中。
1.3 Cilium Cluster Mesh架构
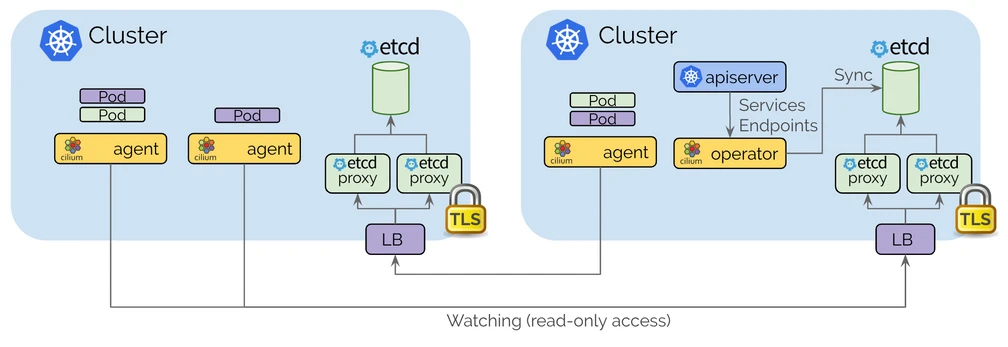
- 每个 Kubernetes 集群都维护自己的 etcd 集群,保存自身集群的状态。来自多个集群的状态永远不会在本集群的 etcd 中混淆。
- 每个集群通过一组 etcd 代理暴露自己的 etcd,在其他集群中运行的 Cilium agent 连接到 etcd 代理以监视更改。
- Cilium 使用 clustermesh-apiserver Pod 来建立多集群的互联,在 clustermesh-apiserver Pod 中有两个容器:其中 apiserver 容器负责将多集群的相关信息写入 etcd 容器;etcd 容器(etcd 代理)用来存储 Cluster Mesh 相关的配置信息。
- 从一个集群到另一个集群的访问始终是只读的。这确保了故障域保持不变,即一个集群中的故障永远不会传播到其他集群。
二、Kubernetes集群部署
本次部署两套K8S集群,每个集群pod与service使用不同的网络。
为了避免其它影响,本次使用kubeadm部署原生Kubernetes集群。
2.1 Cluster1集群部署
2.1.1 Kubernetes集群节点准备
2.1.1.1 主机操作系统说明
| 序号 | 操作系统及版本 | 备注 |
|---|---|---|
| 1 | CentOS7u9 |
2.1.1.2 主机硬件配置说明
| 需求 | CPU | 内存 | 硬盘 | IP地址 | 角色 | 主机名 |
|---|---|---|---|---|---|---|
| 值 | 8C | 8G | 1024GB | 192.168.10.140/24 | master | k8s-master01-c1 |
| 值 | 8C | 8G | 1024GB | 192.168.10.141/24 | worker(node) | k8s-worker01-c1 |
| 值 | 8C | 8G | 1024GB | 192.168.10.142/24 | worker(node) | k8s-worker02-c1 |
2.1.1.3 主机配置
2.1.1.3.1 主机名配置
由于本次使用3台主机完成kubernetes集群部署,其中1台为master节点,名称为k8s-master01;其中2台为worker节点,名称分别为:k8s-worker01及k8s-worker02
master节点
# hostnamectl set-hostname k8s-master01-c1
worker01节点
# hostnamectl set-hostname k8s-worker01-c1worker02节点
# hostnamectl set-hostname k8s-worker02-c12.1.1.3.2 主机IP地址配置
k8s-master01节点IP地址为:192.168.10.140/24
# vim /etc/sysconfig/network-scripts/ifcfg-ens33
TYPE="Ethernet"
PROXY_METHOD="none"
BROWSER_ONLY="no"
BOOTPROTO="none"
DEFROUTE="yes"
IPV4_FAILURE_FATAL="no"
IPV6INIT="yes"
IPV6_AUTOCONF="yes"
IPV6_DEFROUTE="yes"
IPV6_FAILURE_FATAL="no"
IPV6_ADDR_GEN_MODE="stable-privacy"
NAME="ens33"
DEVICE="ens33"
ONBOOT="yes"
IPADDR="192.168.10.140"
PREFIX="24"
GATEWAY="192.168.10.2"
DNS1="119.29.29.29"k8s-worker01节点IP地址为:192.168.10.141/24
# vim /etc/sysconfig/network-scripts/ifcfg-ens33
TYPE="Ethernet"
PROXY_METHOD="none"
BROWSER_ONLY="no"
BOOTPROTO="none"
DEFROUTE="yes"
IPV4_FAILURE_FATAL="no"
IPV6INIT="yes"
IPV6_AUTOCONF="yes"
IPV6_DEFROUTE="yes"
IPV6_FAILURE_FATAL="no"
IPV6_ADDR_GEN_MODE="stable-privacy"
NAME="ens33"
DEVICE="ens33"
ONBOOT="yes"
IPADDR="192.168.10.141"
PREFIX="24"
GATEWAY="192.168.10.2"
DNS1="119.29.29.29"k8s-worker02节点IP地址为:192.168.10.142/24
# vim /etc/sysconfig/network-scripts/ifcfg-ens33
TYPE="Ethernet"
PROXY_METHOD="none"
BROWSER_ONLY="no"
BOOTPROTO="none"
DEFROUTE="yes"
IPV4_FAILURE_FATAL="no"
IPV6INIT="yes"
IPV6_AUTOCONF="yes"
IPV6_DEFROUTE="yes"
IPV6_FAILURE_FATAL="no"
IPV6_ADDR_GEN_MODE="stable-privacy"
NAME="ens33"
DEVICE="ens33"
ONBOOT="yes"
IPADDR="192.168.10.142"
PREFIX="24"
GATEWAY="192.168.10.2"
DNS1="119.29.29.29"2.1.1.3.3 主机名与IP地址解析
所有集群主机均需要进行配置。
# cat /etc/hosts
127.0.0.1   localhost localhost.localdomain localhost4 localhost4.localdomain4
::1         localhost localhost.localdomain localhost6 localhost6.localdomain6
192.168.10.140 k8s-master01-c1
192.168.10.141 k8s-worker01-c1
192.168.10.142 k8s-worker02-c1
2.1.1.3.4 防火墙配置
所有主机均需要操作。
关闭现有防火墙firewalld
# systemctl disable firewalld
# systemctl stop firewalld

或
# systemctl disable --now firewalld

查看firewalld状态
# firewall-cmd --state
not running
2.1.1.3.5 SELINUX配置
所有主机均需要操作。修改SELinux配置需要重启操作系统。
# sed -ri 's/SELINUX=enforcing/SELINUX=disabled/' /etc/selinux/config# sestatus2.1.1.3.6 时间同步配置
所有主机均需要操作。最小化安装系统需要安装ntpdate软件。
# crontab -l
0 */1 * * * /usr/sbin/ntpdate time1.aliyun.com
2.1.1.3.7 升级操作系统内核
所有主机均需要操作。
导入elrepo gpg key
# rpm --import https://www.elrepo.org/RPM-GPG-KEY-elrepo.org
安装elrepo YUM源仓库
# yum -y install https://www.elrepo.org/elrepo-release-7.0-4.el7.elrepo.noarch.rpm安装kernel-ml版本,ml为长期稳定版本,lt为长期维护版本
# yum --enablerepo="elrepo-kernel" -y install kernel-lt.x86_64设置grub2默认引导为0
# grub2-set-default 0重新生成grub2引导文件
# grub2-mkconfig -o /boot/grub2/grub.cfg更新后,需要重启,使用升级的内核生效。
# reboot重启后,需要验证内核是否为更新对应的版本
# uname -r2.1.1.3.8 配置内核路由转发及网桥过滤
所有主机均需要操作。
添加网桥过滤及内核转发配置文件
# cat > /etc/sysctl.d/k8s.conf << EOF
net.bridge.bridge-nf-call-ip6tables = 1
net.bridge.bridge-nf-call-iptables = 1
net.ipv4.ip_forward = 1
EOF
加载br_netfilter模块
# modprobe br_netfilter查看是否加载
# lsmod | grep br_netfilter
br_netfilter 22256 0
bridge 151336 1 br_netfilter使其生效
# sysctl --system2.1.1.3.9 安装ipset及ipvsadm
所有主机均需要操作。
安装ipset及ipvsadm
# yum -y install ipset ipvsadm
配置ipvsadm模块加载方式
添加需要加载的模块
# cat > /etc/sysconfig/modules/ipvs.modules <<EOF
#!/bin/bash
modprobe -- ip_vs
modprobe -- ip_vs_rr
modprobe -- ip_vs_wrr
modprobe -- ip_vs_sh
modprobe -- nf_conntrack
EOF授权、运行、检查是否加载
# chmod 755 /etc/sysconfig/modules/ipvs.modules && bash /etc/sysconfig/modules/ipvs.modules && lsmod | grep -e ip_vs -e nf_conntrack2.1.1.3.10 关闭SWAP分区
修改完成后需要重启操作系统,如不重启,可临时关闭,命令为swapoff -a
永远关闭swap分区,需要重启操作系统
# cat /etc/fstab
......

# /dev/mapper/centos-swap swap                    swap    defaults        0 0

在上一行中行首添加#
2.1.2 Docker-ce及cri-dockerd准备
2.1.2.1 Docker安装YUM源准备
使用阿里云开源软件镜像站。
# wget https://mirrors.aliyun.com/docker-ce/linux/centos/docker-ce.repo -O /etc/yum.repos.d/docker-ce.repo2.1.2.2 Docker安装
# yum -y install docker-ce2.1.2.3 启动Docker服务
# systemctl enable --now docker2.1.2.4 修改cgroup方式
/etc/docker/daemon.json 默认没有此文件,需要单独创建
在/etc/docker/daemon.json添加如下内容

# cat > /etc/docker/daemon.json <<EOF
{
        "exec-opts": ["native.cgroupdriver=systemd"]
}
EOF
# systemctl restart docker2.1.2.5 cri-dockerd安装
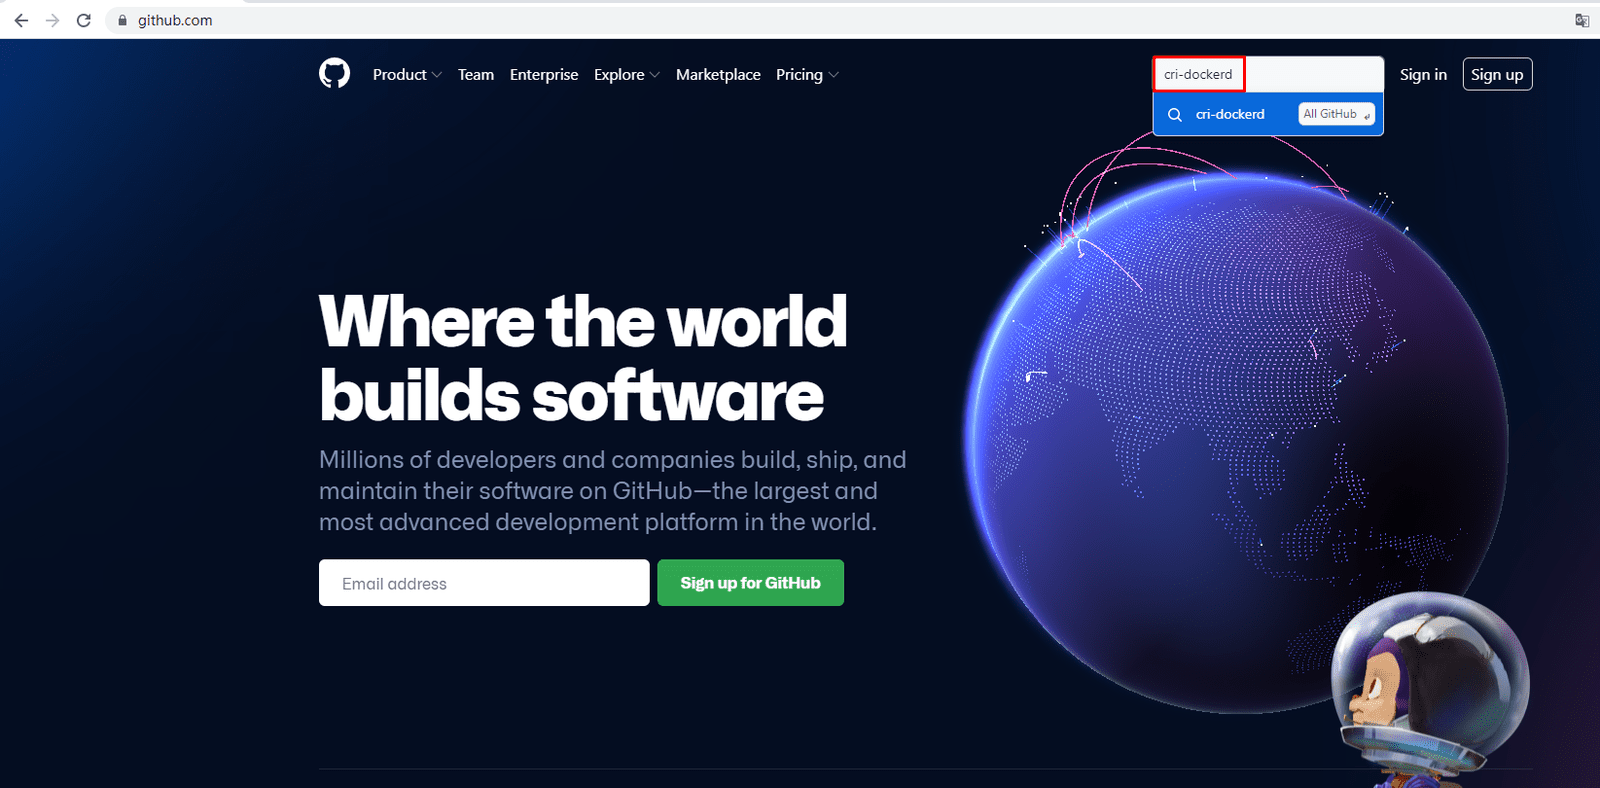
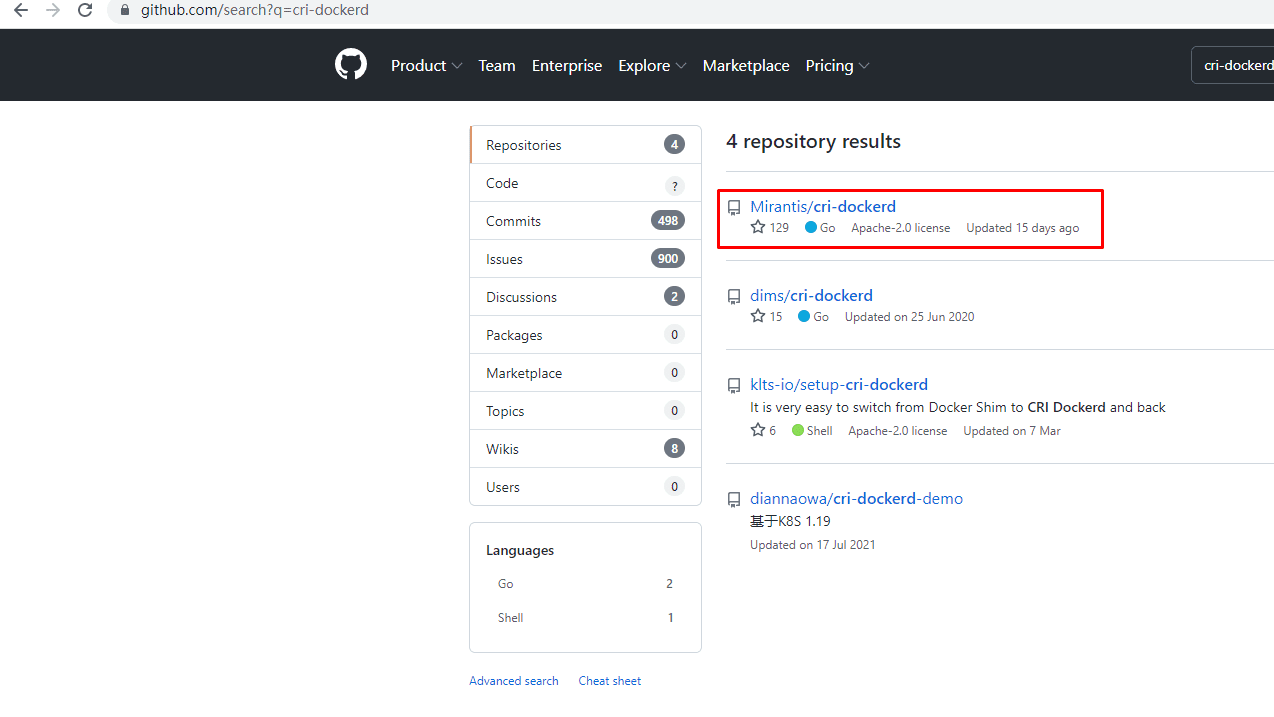
# wget https://github.com/Mirantis/cri-dockerd/releases/download/v0.3.8/cri-dockerd-0.3.8-3.el7.x86_64.rpm# yum -y install cri-dockerd-0.3.8-3.el7.x86_64.rpm# vim /usr/lib/systemd/system/cri-docker.service
修改第10行内容
ExecStart=/usr/bin/cri-dockerd --pod-infra-container-image=registry.k8s.io/pause:3.9 --container-runtime-endpoint fd://# systemctl enable --new cri-docker2.1.3 kubernetes 1.28.X 集群部署
2.1.3.1 集群软件及版本说明
| kubeadm | kubelet | kubectl | |
|---|---|---|---|
| 版本 | 1.28.X | 1.28.X | 1.28.X |
| 安装位置 | 集群所有主机 | 集群所有主机 | 集群所有主机 |
| 作用 | 初始化集群、管理集群等 | 用于接收api-server指令,对pod生命周期进行管理 | 集群应用命令行管理工具 |
2.1.3.2 kubernetes YUM源准备
使用kubernetes社区YUM源
# cat > /etc/yum.repos.d/k8s.repo <<EOF
[kubernetes]
name=Kubernetes
baseurl=https://pkgs.k8s.io/core:/stable:/v1.28/rpm/
enabled=1
gpgcheck=1
gpgkey=https://pkgs.k8s.io/core:/stable:/v1.28/rpm/repodata/repomd.xml.key
#exclude=kubelet kubeadm kubectl cri-tools kubernetes-cni
EOF
2.1.3.3 集群软件安装
所有节点均可安装
默认安装
# yum -y install  kubeadm  kubelet kubectl
安装指定版本
# yum -y install kubeadm-1.28.5-150500.1.1 kubelet-1.28.5-150500.1.1 kubectl-1.28.5-150500.1.12.1.3.4 配置kubelet
为了实现docker使用的cgroupdriver与kubelet使用的cgroup的一致性,建议修改如下文件内容。
# vim /etc/sysconfig/kubelet
KUBELET_EXTRA_ARGS="--cgroup-driver=systemd"
设置kubelet为开机自启动即可,由于没有生成配置文件,集群初始化后自动启动
# systemctl enable kubelet2.1.3.5 集群镜像准备
可使用VPN实现下载。
# kubeadm config images list --kubernetes-version=v1.28.X# cat image_download.sh
#!/bin/bash
images_list='
镜像列表'
for i in $images_list
do
docker pull $i
done
docker save -o k8s-1-28-X.tar $images_list2.1.3.6 集群初始化
[root@k8s-master01 ~]# kubeadm init --kubernetes-version=v1.28.5 --pod-network-cidr=10.10.0.0/16 --service-cidr=10.11.0.0/16 --apiserver-advertise-address=192.168.10.140 --cri-socket unix:///var/run/cri-dockerd.sock初始化过程输出
[init] Using Kubernetes version: v1.28.5
[preflight] Running pre-flight checks
[preflight] Pulling images required for setting up a Kubernetes cluster
[preflight] This might take a minute or two, depending on the speed of your internet connection
[preflight] You can also perform this action in beforehand using 'kubeadm config images pull'
[certs] Using certificateDir folder "/etc/kubernetes/pki"
[certs] Generating "ca" certificate and key
[certs] Generating "apiserver" certificate and key
[certs] apiserver serving cert is signed for DNS names [k8s-master01 kubernetes kubernetes.default kubernetes.default.svc kubernetes.default.svc.cluster.local] and IPs [10.96.0.1 192.168.10.160]
[certs] Generating "apiserver-kubelet-client" certificate and key
[certs] Generating "front-proxy-ca" certificate and key
[certs] Generating "front-proxy-client" certificate and key
[certs] Generating "etcd/ca" certificate and key
[certs] Generating "etcd/server" certificate and key
[certs] etcd/server serving cert is signed for DNS names [k8s-master01 localhost] and IPs [192.168.10.160 127.0.0.1 ::1]
[certs] Generating "etcd/peer" certificate and key
[certs] etcd/peer serving cert is signed for DNS names [k8s-master01 localhost] and IPs [192.168.10.160 127.0.0.1 ::1]
[certs] Generating "etcd/healthcheck-client" certificate and key
[certs] Generating "apiserver-etcd-client" certificate and key
[certs] Generating "sa" key and public key
[kubeconfig] Using kubeconfig folder "/etc/kubernetes"
[kubeconfig] Writing "admin.conf" kubeconfig file
[kubeconfig] Writing "super-admin.conf" kubeconfig file
[kubeconfig] Writing "kubelet.conf" kubeconfig file
[kubeconfig] Writing "controller-manager.conf" kubeconfig file
[kubeconfig] Writing "scheduler.conf" kubeconfig file
[etcd] Creating static Pod manifest for local etcd in "/etc/kubernetes/manifests"
[control-plane] Using manifest folder "/etc/kubernetes/manifests"
[control-plane] Creating static Pod manifest for "kube-apiserver"
[control-plane] Creating static Pod manifest for "kube-controller-manager"
[control-plane] Creating static Pod manifest for "kube-scheduler"
[kubelet-start] Writing kubelet environment file with flags to file "/var/lib/kubelet/kubeadm-flags.env"
[kubelet-start] Writing kubelet configuration to file "/var/lib/kubelet/config.yaml"
[kubelet-start] Starting the kubelet
[wait-control-plane] Waiting for the kubelet to boot up the control plane as static Pods from directory "/etc/kubernetes/manifests". This can take up to 4m0s
[apiclient] All control plane components are healthy after 4.001643 seconds
[upload-config] Storing the configuration used in ConfigMap "kubeadm-config" in the "kube-system" Namespace
[kubelet] Creating a ConfigMap "kubelet-config" in namespace kube-system with the configuration for the kubelets in the cluster
[upload-certs] Skipping phase. Please see --upload-certs
[mark-control-plane] Marking the node k8s-master01 as control-plane by adding the labels: [node-role.kubernetes.io/control-plane node.kubernetes.io/exclude-from-external-load-balancers]
[mark-control-plane] Marking the node k8s-master01 as control-plane by adding the taints [node-role.kubernetes.io/control-plane:NoSchedule]
[bootstrap-token] Using token: nnyedz.y3ajtpy468lmol2g
[bootstrap-token] Configuring bootstrap tokens, cluster-info ConfigMap, RBAC Roles
[bootstrap-token] Configured RBAC rules to allow Node Bootstrap tokens to get nodes
[bootstrap-token] Configured RBAC rules to allow Node Bootstrap tokens to post CSRs in order for nodes to get long term certificate credentials
[bootstrap-token] Configured RBAC rules to allow the csrapprover controller automatically approve CSRs from a Node Bootstrap Token
[bootstrap-token] Configured RBAC rules to allow certificate rotation for all node client certificates in the cluster
[bootstrap-token] Creating the "cluster-info" ConfigMap in the "kube-public" namespace
[kubelet-finalize] Updating "/etc/kubernetes/kubelet.conf" to point to a rotatable kubelet client certificate and key
[addons] Applied essential addon: CoreDNS
[addons] Applied essential addon: kube-proxy
Your Kubernetes control-plane has initialized successfully!
To start using your cluster, you need to run the following as a regular user:
mkdir -p $HOME/.kube
sudo cp -i /etc/kubernetes/admin.conf $HOME/.kube/config
sudo chown $(id -u):$(id -g) $HOME/.kube/config
Alternatively, if you are the root user, you can run:
export KUBECONFIG=/etc/kubernetes/admin.conf
You should now deploy a pod network to the cluster.
Run "kubectl apply -f [podnetwork].yaml" with one of the options listed at:
https://kubernetes.io/docs/concepts/cluster-administration/addons/
Then you can join any number of worker nodes by running the following on each as root:
kubeadm join 192.168.10.140:6443 --token nnyedz.y3ajtpy468lmol2g \
--discovery-token-ca-cert-hash sha256:da611f922567238facd9c9557bd2e6b40d066b35567ca9696849f005dd15e6462.1.3.7 集群应用客户端管理集群文件准备
[root@k8s-master01-c1 ~]# mkdir -p $HOME/.kube
[root@k8s-master01-c1 ~]# cp -i /etc/kubernetes/admin.conf $HOME/.kube/config
[root@k8s-master01-c1 ~]# chown $(id -u):$(id -g) $HOME/.kube/config
[root@k8s-master01-c1 ~]# ls /root/.kube/
config
2.1.3.8 添加worker节点
[root@k8s-worker01-c1 ~]# kubeadm join 192.168.10.140:6443 --token nnyedz.y3ajtpy468lmol2g \
--discovery-token-ca-cert-hash sha256:da611f922567238facd9c9557bd2e6b40d066b35567ca9696849f005dd15e646 --cri-socket unix:///var/run/cri-dockerd.sock[root@k8s-worker02-c1 ~]# kubeadm join 192.168.10.140:6443 --token nnyedz.y3ajtpy468lmol2g \
--discovery-token-ca-cert-hash sha256:da611f922567238facd9c9557bd2e6b40d066b35567ca9696849f005dd15e646 --cri-socket unix:///var/run/cri-dockerd.sock2.1.3.9 验证集群
# kubectl get nodes
NAME              STATUS     ROLES           AGE   VERSION
k8s-master01-c1   NotReady   control-plane   28h   v1.28.5
k8s-worker01-c1   NotReady   <none>          28h   v1.28.5
k8s-worker02-c1   NotReady   <none>          28h   v1.28.5
# kubectl get pods -n kube-system
NAME READY STATUS RESTARTS AGE
coredns-5dd5756b68-br5zp 0/1 Pending 0 28h
coredns-5dd5756b68-fjxph 0/1 Pending 0 28h
etcd-k8s-master01-c1 1/1 Running 1 (28h ago) 28h
kube-apiserver-k8s-master01-c1 1/1 Running 1 (159m ago) 28h
kube-controller-manager-k8s-master01-c1 1/1 Running 1 (28h ago) 28h
kube-proxy-jdcwc 1/1 Running 1 (28h ago) 28h
kube-proxy-jzchj 1/1 Running 1 (28h ago) 28h
kube-proxy-kcghq 1/1 Running 1 (28h ago) 28h
kube-scheduler-k8s-master01-c1 1/1 Running 1 (159m ago) 28h2.2 Cluster2集群部署
2.2.1 Kubernetes集群节点准备
2.2.1.1 主机操作系统说明
| 序号 | 操作系统及版本 | 备注 |
|---|---|---|
| 1 | CentOS7u9 |
2.2.1.2 主机硬件配置说明
| 需求 | CPU | 内存 | 硬盘 | IP地址 | 角色 | 主机名 |
|---|---|---|---|---|---|---|
| 值 | 8C | 8G | 1024GB | 192.168.10.160/24 | master | k8s-master01-c2 |
| 值 | 8C | 8G | 1024GB | 192.168.10.161/24 | worker(node) | k8s-worker01-c2 |
| 值 | 8C | 8G | 1024GB | 192.168.10.162/24 | worker(node) | k8s-worker02-c2 |
2.2.1.3 主机配置
2.2.1.3.1 主机名配置
由于本次使用3台主机完成kubernetes集群部署,其中1台为master节点,名称为k8s-master01;其中2台为worker节点,名称分别为:k8s-worker01及k8s-worker02
master节点
# hostnamectl set-hostname k8s-master01-c2
worker01节点
# hostnamectl set-hostname k8s-worker01-c2worker02节点
# hostnamectl set-hostname k8s-worker02-c22.2.1.3.2 主机IP地址配置
k8s-master01节点IP地址为:192.168.10.160/24
# vim /etc/sysconfig/network-scripts/ifcfg-ens33
TYPE="Ethernet"
PROXY_METHOD="none"
BROWSER_ONLY="no"
BOOTPROTO="none"
DEFROUTE="yes"
IPV4_FAILURE_FATAL="no"
IPV6INIT="yes"
IPV6_AUTOCONF="yes"
IPV6_DEFROUTE="yes"
IPV6_FAILURE_FATAL="no"
IPV6_ADDR_GEN_MODE="stable-privacy"
NAME="ens33"
DEVICE="ens33"
ONBOOT="yes"
IPADDR="192.168.10.160"
PREFIX="24"
GATEWAY="192.168.10.2"
DNS1="119.29.29.29"k8s-worker01节点IP地址为:192.168.10.161/24
# vim /etc/sysconfig/network-scripts/ifcfg-ens33
TYPE="Ethernet"
PROXY_METHOD="none"
BROWSER_ONLY="no"
BOOTPROTO="none"
DEFROUTE="yes"
IPV4_FAILURE_FATAL="no"
IPV6INIT="yes"
IPV6_AUTOCONF="yes"
IPV6_DEFROUTE="yes"
IPV6_FAILURE_FATAL="no"
IPV6_ADDR_GEN_MODE="stable-privacy"
NAME="ens33"
DEVICE="ens33"
ONBOOT="yes"
IPADDR="192.168.10.161"
PREFIX="24"
GATEWAY="192.168.10.2"
DNS1="119.29.29.29"k8s-worker02节点IP地址为:192.168.10.162/24
# vim /etc/sysconfig/network-scripts/ifcfg-ens33
TYPE="Ethernet"
PROXY_METHOD="none"
BROWSER_ONLY="no"
BOOTPROTO="none"
DEFROUTE="yes"
IPV4_FAILURE_FATAL="no"
IPV6INIT="yes"
IPV6_AUTOCONF="yes"
IPV6_DEFROUTE="yes"
IPV6_FAILURE_FATAL="no"
IPV6_ADDR_GEN_MODE="stable-privacy"
NAME="ens33"
DEVICE="ens33"
ONBOOT="yes"
IPADDR="192.168.10.162"
PREFIX="24"
GATEWAY="192.168.10.2"
DNS1="119.29.29.29"2.2.1.3.3 主机名与IP地址解析
所有集群主机均需要进行配置。
# cat /etc/hosts
127.0.0.1   localhost localhost.localdomain localhost4 localhost4.localdomain4
::1         localhost localhost.localdomain localhost6 localhost6.localdomain6
192.168.10.160 k8s-master01-c2
192.168.10.161 k8s-worker01-c2
192.168.10.162 k8s-worker02-c2
2.2.1.3.4 防火墙配置
所有主机均需要操作。
关闭现有防火墙firewalld
# systemctl disable firewalld
# systemctl stop firewalld

或
# systemctl disable --now firewalld

查看firewalld状态
# firewall-cmd --state
not running
2.2.1.3.5 SELINUX配置
所有主机均需要操作。修改SELinux配置需要重启操作系统。
# sed -ri 's/SELINUX=enforcing/SELINUX=disabled/' /etc/selinux/config# sestatus2.2.1.3.6 时间同步配置
所有主机均需要操作。最小化安装系统需要安装ntpdate软件。
# crontab -l
0 */1 * * * /usr/sbin/ntpdate time1.aliyun.com
2.2.1.3.7 升级操作系统内核
所有主机均需要操作。
导入elrepo gpg key
# rpm --import https://www.elrepo.org/RPM-GPG-KEY-elrepo.org
安装elrepo YUM源仓库
# yum -y install https://www.elrepo.org/elrepo-release-7.0-4.el7.elrepo.noarch.rpm安装kernel-ml版本,ml为长期稳定版本,lt为长期维护版本
# yum --enablerepo="elrepo-kernel" -y install kernel-lt.x86_64设置grub2默认引导为0
# grub2-set-default 0重新生成grub2引导文件
# grub2-mkconfig -o /boot/grub2/grub.cfg更新后,需要重启,使用升级的内核生效。
# reboot重启后,需要验证内核是否为更新对应的版本
# uname -r2.2.1.3.8 配置内核路由转发及网桥过滤
所有主机均需要操作。
添加网桥过滤及内核转发配置文件
# cat > /etc/sysctl.d/k8s.conf << EOF
net.bridge.bridge-nf-call-ip6tables = 1
net.bridge.bridge-nf-call-iptables = 1
net.ipv4.ip_forward = 1
EOF
加载br_netfilter模块
# modprobe br_netfilter查看是否加载
# lsmod | grep br_netfilter
br_netfilter 22256 0
bridge 151336 1 br_netfilter使其生效
# sysctl --system2.2.1.3.9 安装ipset及ipvsadm
所有主机均需要操作。
安装ipset及ipvsadm
# yum -y install ipset ipvsadm
配置ipvsadm模块加载方式
添加需要加载的模块
# cat > /etc/sysconfig/modules/ipvs.modules <<EOF
#!/bin/bash
modprobe -- ip_vs
modprobe -- ip_vs_rr
modprobe -- ip_vs_wrr
modprobe -- ip_vs_sh
modprobe -- nf_conntrack
EOF授权、运行、检查是否加载
# chmod 755 /etc/sysconfig/modules/ipvs.modules && bash /etc/sysconfig/modules/ipvs.modules && lsmod | grep -e ip_vs -e nf_conntrack2.2.1.3.10 关闭SWAP分区
修改完成后需要重启操作系统,如不重启,可临时关闭,命令为swapoff -a
永远关闭swap分区,需要重启操作系统
# cat /etc/fstab
......

# /dev/mapper/centos-swap swap                    swap    defaults        0 0

在上一行中行首添加#
2.2.2 Docker-ce及cri-dockerd准备
2.2.2.1 Docker安装YUM源准备
使用阿里云开源软件镜像站。
# wget https://mirrors.aliyun.com/docker-ce/linux/centos/docker-ce.repo -O /etc/yum.repos.d/docker-ce.repo2.2.2.2 Docker安装
# yum -y install docker-ce2.2.2.3 启动Docker服务
# systemctl enable --now docker2.2.2.4 修改cgroup方式
/etc/docker/daemon.json 默认没有此文件,需要单独创建
在/etc/docker/daemon.json添加如下内容

# cat > /etc/docker/daemon.json <<EOF
{
        "exec-opts": ["native.cgroupdriver=systemd"]
}
EOF
# systemctl restart docker2.2.2.5 cri-dockerd安装
# wget https://github.com/Mirantis/cri-dockerd/releases/download/v0.3.8/cri-dockerd-0.3.8-3.el7.x86_64.rpm# yum -y install cri-dockerd-0.3.8-3.el7.x86_64.rpm# vim /usr/lib/systemd/system/cri-docker.service
修改第10行内容
ExecStart=/usr/bin/cri-dockerd --pod-infra-container-image=registry.k8s.io/pause:3.9 --container-runtime-endpoint fd://# systemctl enable --new cri-docker2.2.3 kubernetes 1.28.X 集群部署
2.2.3.1 集群软件及版本说明
| kubeadm | kubelet | kubectl | |
|---|---|---|---|
| 版本 | 1.28.X | 1.28.X | 1.28.X |
| 安装位置 | 集群所有主机 | 集群所有主机 | 集群所有主机 |
| 作用 | 初始化集群、管理集群等 | 用于接收api-server指令,对pod生命周期进行管理 | 集群应用命令行管理工具 |
2.2.3.2 kubernetes YUM源准备
使用kubernetes社区YUM源
# cat > /etc/yum.repos.d/k8s.repo <<EOF
[kubernetes]
name=Kubernetes
baseurl=https://pkgs.k8s.io/core:/stable:/v1.28/rpm/
enabled=1
gpgcheck=1
gpgkey=https://pkgs.k8s.io/core:/stable:/v1.28/rpm/repodata/repomd.xml.key
#exclude=kubelet kubeadm kubectl cri-tools kubernetes-cni
EOF
2.2.3.3 集群软件安装
所有节点均可安装
默认安装
# yum -y install  kubeadm  kubelet kubectl
安装指定版本
# yum -y install kubeadm-1.28.5-150500.1.1 kubelet-1.28.5-150500.1.1 kubectl-1.28.5-150500.1.12.2.3.4 配置kubelet
为了实现docker使用的cgroupdriver与kubelet使用的cgroup的一致性,建议修改如下文件内容。
# vim /etc/sysconfig/kubelet
KUBELET_EXTRA_ARGS="--cgroup-driver=systemd"
设置kubelet为开机自启动即可,由于没有生成配置文件,集群初始化后自动启动
# systemctl enable kubelet2.2.3.5 集群镜像准备
可使用VPN实现下载。
# kubeadm config images list --kubernetes-version=v1.28.X# cat image_download.sh
#!/bin/bash
images_list='
镜像列表'
for i in $images_list
do
docker pull $i
done
docker save -o k8s-1-28-X.tar $images_list2.2.3.6 集群初始化
[root@k8s-master01 ~]# kubeadm init --kubernetes-version=v1.28.5 --pod-network-cidr=10.20.0.0/16 --service-cidr=10.21.0.0/16 --apiserver-advertise-address=192.168.10.160 --cri-socket unix:///var/run/cri-dockerd.sock初始化过程输出
[init] Using Kubernetes version: v1.28.5
[preflight] Running pre-flight checks
[preflight] Pulling images required for setting up a Kubernetes cluster
[preflight] This might take a minute or two, depending on the speed of your internet connection
[preflight] You can also perform this action in beforehand using 'kubeadm config images pull'
[certs] Using certificateDir folder "/etc/kubernetes/pki"
[certs] Generating "ca" certificate and key
[certs] Generating "apiserver" certificate and key
[certs] apiserver serving cert is signed for DNS names [k8s-master01 kubernetes kubernetes.default kubernetes.default.svc kubernetes.default.svc.cluster.local] and IPs [10.96.0.1 192.168.10.160]
[certs] Generating "apiserver-kubelet-client" certificate and key
[certs] Generating "front-proxy-ca" certificate and key
[certs] Generating "front-proxy-client" certificate and key
[certs] Generating "etcd/ca" certificate and key
[certs] Generating "etcd/server" certificate and key
[certs] etcd/server serving cert is signed for DNS names [k8s-master01 localhost] and IPs [192.168.10.160 127.0.0.1 ::1]
[certs] Generating "etcd/peer" certificate and key
[certs] etcd/peer serving cert is signed for DNS names [k8s-master01 localhost] and IPs [192.168.10.160 127.0.0.1 ::1]
[certs] Generating "etcd/healthcheck-client" certificate and key
[certs] Generating "apiserver-etcd-client" certificate and key
[certs] Generating "sa" key and public key
[kubeconfig] Using kubeconfig folder "/etc/kubernetes"
[kubeconfig] Writing "admin.conf" kubeconfig file
[kubeconfig] Writing "super-admin.conf" kubeconfig file
[kubeconfig] Writing "kubelet.conf" kubeconfig file
[kubeconfig] Writing "controller-manager.conf" kubeconfig file
[kubeconfig] Writing "scheduler.conf" kubeconfig file
[etcd] Creating static Pod manifest for local etcd in "/etc/kubernetes/manifests"
[control-plane] Using manifest folder "/etc/kubernetes/manifests"
[control-plane] Creating static Pod manifest for "kube-apiserver"
[control-plane] Creating static Pod manifest for "kube-controller-manager"
[control-plane] Creating static Pod manifest for "kube-scheduler"
[kubelet-start] Writing kubelet environment file with flags to file "/var/lib/kubelet/kubeadm-flags.env"
[kubelet-start] Writing kubelet configuration to file "/var/lib/kubelet/config.yaml"
[kubelet-start] Starting the kubelet
[wait-control-plane] Waiting for the kubelet to boot up the control plane as static Pods from directory "/etc/kubernetes/manifests". This can take up to 4m0s
[apiclient] All control plane components are healthy after 4.001643 seconds
[upload-config] Storing the configuration used in ConfigMap "kubeadm-config" in the "kube-system" Namespace
[kubelet] Creating a ConfigMap "kubelet-config" in namespace kube-system with the configuration for the kubelets in the cluster
[upload-certs] Skipping phase. Please see --upload-certs
[mark-control-plane] Marking the node k8s-master01 as control-plane by adding the labels: [node-role.kubernetes.io/control-plane node.kubernetes.io/exclude-from-external-load-balancers]
[mark-control-plane] Marking the node k8s-master01 as control-plane by adding the taints [node-role.kubernetes.io/control-plane:NoSchedule]
[bootstrap-token] Using token: nnyedz.y3ajtpy468lmol2g
[bootstrap-token] Configuring bootstrap tokens, cluster-info ConfigMap, RBAC Roles
[bootstrap-token] Configured RBAC rules to allow Node Bootstrap tokens to get nodes
[bootstrap-token] Configured RBAC rules to allow Node Bootstrap tokens to post CSRs in order for nodes to get long term certificate credentials
[bootstrap-token] Configured RBAC rules to allow the csrapprover controller automatically approve CSRs from a Node Bootstrap Token
[bootstrap-token] Configured RBAC rules to allow certificate rotation for all node client certificates in the cluster
[bootstrap-token] Creating the "cluster-info" ConfigMap in the "kube-public" namespace
[kubelet-finalize] Updating "/etc/kubernetes/kubelet.conf" to point to a rotatable kubelet client certificate and key
[addons] Applied essential addon: CoreDNS
[addons] Applied essential addon: kube-proxy
Your Kubernetes control-plane has initialized successfully!
To start using your cluster, you need to run the following as a regular user:
mkdir -p $HOME/.kube
sudo cp -i /etc/kubernetes/admin.conf $HOME/.kube/config
sudo chown $(id -u):$(id -g) $HOME/.kube/config
Alternatively, if you are the root user, you can run:
export KUBECONFIG=/etc/kubernetes/admin.conf
You should now deploy a pod network to the cluster.
Run "kubectl apply -f [podnetwork].yaml" with one of the options listed at:
https://kubernetes.io/docs/concepts/cluster-administration/addons/
Then you can join any number of worker nodes by running the following on each as root:
kubeadm join 192.168.10.160:6443 --token nnyedz.y3ajtpy468lmol2g \
--discovery-token-ca-cert-hash sha256:da611f922567238facd9c9557bd2e6b40d066b35567ca9696849f005dd15e6462.2.3.7 集群应用客户端管理集群文件准备
[root@k8s-master01 ~]# mkdir -p $HOME/.kube
[root@k8s-master01 ~]# cp -i /etc/kubernetes/admin.conf $HOME/.kube/config
[root@k8s-master01 ~]# chown $(id -u):$(id -g) $HOME/.kube/config
[root@k8s-master01 ~]# ls /root/.kube/
config
2.2.3.8 添加worker节点
[root@k8s-worker01-c2 ~]# kubeadm join 192.168.10.160:6443 --token nnyedz.y3ajtpy468lmol2g \
--discovery-token-ca-cert-hash sha256:da611f922567238facd9c9557bd2e6b40d066b35567ca9696849f005dd15e646 --cri-socket unix:///var/run/cri-dockerd.sock[root@k8s-worker02-c2 ~]# kubeadm join 192.168.10.160:6443 --token nnyedz.y3ajtpy468lmol2g \
--discovery-token-ca-cert-hash sha256:da611f922567238facd9c9557bd2e6b40d066b35567ca9696849f005dd15e646 --cri-socket unix:///var/run/cri-dockerd.sock2.2.3.9 验证集群
# kubectl get nodes
NAME              STATUS     ROLES           AGE   VERSION
k8s-master01-c2   NotReady   control-plane   28h   v1.28.5
k8s-worker01-c2   NotReady   <none>          28h   v1.28.5
k8s-worker02-c2   NotReady   <none>          28h   v1.28.5
# kubectl get pods -n kube-system
NAME READY STATUS RESTARTS AGE
coredns-5dd5756b68-79sjk 0/1 Pending 0 28h
coredns-5dd5756b68-lqx6t 0/1 Pending 0 28h
etcd-k8s-master01-c2 1/1 Running 1 (28h ago) 28h
kube-apiserver-k8s-master01-c2 1/1 Running 1 (160m ago) 28h
kube-controller-manager-k8s-master01-c2 1/1 Running 1 (160m ago) 28h
kube-proxy-b9qwp 1/1 Running 1 (28h ago) 28h
kube-proxy-pcnc6 1/1 Running 1 (28h ago) 28h
kube-proxy-x4gm5 1/1 Running 1 (28h ago) 28h
kube-scheduler-k8s-master01-c2 1/1 Running 1 (28h ago) 28h三、kubeconfig 准备
把cluster1与cluster2集群的kubeconfig合并,放置于cluster1集群中/root/.kube目录中。
[root@k8s-master01-c1 ~]# cd /root/.kube/
[root@k8s-master01-c1 .kube]# cat config
apiVersion: v1
clusters:
- cluster:
    certificate-authority-data: LS0tLS1CRUdJTiBDRVJUSUZJQ0FURS0tLS0tCk1JSURCVENDQWUyZ0F3SUJBZ0lJS0tZdjFFNVc1N3N3RFFZSktvWklodmNOQVFFTEJRQXdGVEVUTUJFR0ExVUUKQXhNS2EzVmlaWEp1WlhSbGN6QWVGdzB5TXpFeU16RXdNalEzTURoYUZ3MHpNekV5TWpnd01qVXlNRGhhTUJVeApFekFSQmdOVkJBTVRDbXQxWW1WeWJtVjBaWE13Z2dFaU1BMEdDU3FHU0liM0RRRUJBUVVBQTRJQkR3QXdnZ0VLCkFvSUJBUUNrakUwalk1L0dqNERtMjNVWHQwZXhCb3ZaaHMvWkZDMUdDamJqVitnTWVzcVgxWjVUUXlEYWIvZUwKNXByeWdRZ1NXYVpIT1RpeGJGYTVWS096ZHEvbllLVXlvMmZ0bFBIUi9GeXRyTmQ3aDFrOXJIbFFjV3JLMzdjYQo4VDUwZzBaNWx1QlU1VGY0TXlBTFJTQms4dmh1KzhOMWlUU2VtM3N0R0VRN3R5UHlXYUV5dUo2YWdLajFFejlZClBhNEkzUGxPQ0hnQ1E0Ylo2T01tNkp6bjlJdVpYbTdqek5kYlFFNXFXaXpGSFFMeS9tN09RaVhtYmMvMjh3algKb2FxUnJHeEtCZFc2dDQ2cWdyajJzQldHQ3hRdGVJaHRnd2JmREF3dlVsZlBTelRQSUxvRk5VM2lhNTMwYmpDRgpmSEpKaS8xUzUrRWo4L05mSU9FcVdGaHhzNmYxQWdNQkFBR2pXVEJYTUE0R0ExVWREd0VCL3dRRUF3SUNwREFQCkJnTlZIUk1CQWY4RUJUQURBUUgvTUIwR0ExVWREZ1FXQkJSZ3hEeDRnVzF2RDFKQnE2YkFoT3lmSGJMNmRqQVYKQmdOVkhSRUVEakFNZ2dwcmRXSmxjbTVsZEdWek1BMEdDU3FHU0liM0RRRUJDd1VBQTRJQkFRQ2E1NTJudWIvOQo1bEdzYlRCdVRPZ2R4N2JOM0pQckE0L3QramMvSUxWQUNxLzVIMTVKSnVPT1RqT3hWRlJtRUtpSTRTQTh4NDdaCkhLZXZPUC9BOHYxNHZoWkdQMWJ4T283OTRkSnUxSFk0VXNoSzd1dm9WRkRpamJPU0F5cm9hYlFSRWp1Z1FFVlgKdnU4bnR2TnBDRWlydE9oVWZGd0RST2pYeVRWUjZPR1FpN09EQko3NkRlU0ZvQVJMTkhCcVhyeGkxQWpmQitkeApyVjBsV0ZOZCtSbCtrY1hLcm1NNHl5eitvRkhjSGNaVzZZRXdrdUJwQXEvcG1GNGthV3IySElETlFGa2t3S1RGCmdoQXhTUlRJL0hsdnUyUHEwYWwwem1HOTFvUGZPZ1pzdHdRdklJRm5nSUl0UFhScE5EYUNjUVVQOUNSOFU0ekgKVXprNVFCbVZONGdOCi0tLS0tRU5EIENFUlRJRklDQVRFLS0tLS0K
    server: https://192.168.10.140:6443
  name: cluster1
- cluster:
    certificate-authority-data: LS0tLS1CRUdJTiBDRVJUSUZJQ0FURS0tLS0tCk1JSURCVENDQWUyZ0F3SUJBZ0lJS3ROdHlPS3VCQXd3RFFZSktvWklodmNOQVFFTEJRQXdGVEVUTUJFR0ExVUUKQXhNS2EzVmlaWEp1WlhSbGN6QWVGdzB5TXpFeU16RXdNalEzTWpCYUZ3MHpNekV5TWpnd01qVXlNakJhTUJVeApFekFSQmdOVkJBTVRDbXQxWW1WeWJtVjBaWE13Z2dFaU1BMEdDU3FHU0liM0RRRUJBUVVBQTRJQkR3QXdnZ0VLCkFvSUJBUURZZkRKYXpXRkg0UHhodWVsYjIya0lDaEliM3lkdGwwU0N6L3BSTG5KMXBzd0tyQnNsMFBRektId1IKN2c2c1dTYUlxTVg5Z0htU1lNemxXRzZtSlBvUW5CQkVqNjVVSEtBNEo3ZjEwN0lSLzhKZkJvV0lDbzhUbDJIQQozNmhqQ2l5cUt3bVgwUnhrVVprN2RyS2RaRVN3a1lqenFIMk8xbGNreUlWQVk0WEEvSE9vK05Pck1FanVxWWVQCmhNYURrZzlVMkdjdFN2NTVXUCtITTRnQlZya25kVWhUM0FUa0ZoUTR3ZUx2WkI0UFNCTXlIWkxYZHZ1c0VDbHEKSzJiNkxtWUgxcmVmK0hlZnVQN1VCUGxmVzkydnZsWExWQWVZOTJTMTNMdXAzLy9CdStkL2dDQnM0NW5pWVM2dQpoNzBJUWtNNlR1QjN3UWlpOXR0VHUrQ0NGMmtwQWdNQkFBR2pXVEJYTUE0R0ExVWREd0VCL3dRRUF3SUNwREFQCkJnTlZIUk1CQWY4RUJUQURBUUgvTUIwR0ExVWREZ1FXQkJRajlvbWsydlpCOFRKVm1OZEdQVnVndmYzSE9UQVYKQmdOVkhSRUVEakFNZ2dwcmRXSmxjbTVsZEdWek1BMEdDU3FHU0liM0RRRUJDd1VBQTRJQkFRQWRLcmhaMmZMcwpLV1Q5UVlUSFQ3UkxpTEpuL1lZMEc0VUdFWVRCSXBmakZTa3NmcWsyeGcvNTFST3hoNmZhWGF6eks2ak1FRkFGCmxmRFk5eEl6SUV5RHVwWXluTTdEQ1RmaDFDSmx3b1lpazJWRzg4eGpRVGJTVml5L05qeWZkbG81WEtSYUNGOW0KbkRJZWVkWk1Sd2JCSkg1WHBjN0wvQ0dOaTR5cVJmbHAvdWF4UXJrQUN3Tlo0TXRpNWJKcTZYUDk3eC8xWHBoeQp4UytrYVp0REZNV2t2dHpZNVhqekZZNkx0akd1cHVvQmMxeTBKMS9OSGE5NkRNTHJaNS9nSnJlbmV1VE9wTGZmCm10ZURjL0F5bjJNVW5aaFRpWnVVampNd01jMUdWRVUveFVicGdSUFh5a2hJTHUzYldwd2g0UE5YVXdFcE1zV3AKelNBVE1oalpDQ2liCi0tLS0tRU5EIENFUlRJRklDQVRFLS0tLS0K
    server: https://192.168.10.160:6443
  name: cluster2
contexts:
- context:
    cluster: cluster1
    user: cluster1-admin
  name: cluster1
- context:
    cluster: cluster2
    user: cluster2-admin
  name: cluster2
current-context: cluster1
kind: Config
preferences: {}
users:
- name: cluster1-admin
  user:
    client-certificate-data: LS0tLS1CRUdJTiBDRVJUSUZJQ0FURS0tLS0tCk1JSURJVENDQWdtZ0F3SUJBZ0lJZGpZTTZTbkY1ZUl3RFFZSktvWklodmNOQVFFTEJRQXdGVEVUTUJFR0ExVUUKQXhNS2EzVmlaWEp1WlhSbGN6QWVGdzB5TXpFeU16RXdNalEzTURoYUZ3MHlOREV5TXpBd01qVXlNRGxhTURReApGekFWQmdOVkJBb1REbk41YzNSbGJUcHRZWE4wWlhKek1Sa3dGd1lEVlFRREV4QnJkV0psY201bGRHVnpMV0ZrCmJXbHVNSUlCSWpBTkJna3Foa2lHOXcwQkFRRUZBQU9DQVE4QU1JSUJDZ0tDQVFFQTJrUEtVaFlzNm5ZTTBjM0EKT1pmTHBuTUxQWnpHK3hScmJLS0kyR1ZMMm5CVzUxRW9FT1M3VTRISmdUcWJrRWt4MElRYmFZM0tnVlZJYWppQwpHaWxTRFRPRm5yWFJ3ZzYyUWRnZDBPOU85MTA2dXNMdVFQdHo3a2VFdVBpZEZTalJRY0FtRWxTSFE4TFlrMlB3CkxYdkVLclU4c1F3Tk9QM3VrR3AwVkZVaFB0bWkrbE9RYkhrYmw3YzY3UFpaS3h3TTZ2c284aGIwaGszSG5XcmMKV3N4cmNlMWN4NmNKdDAvTU5jL1g4MGhNd1FXakZpQWI3dHpacEJuY1lJcUNmN3VBK0xzVEJPMTgwb3BERjVhNgp1L2tWOW4zUFpZSi9PS0ZGUTFBTmVjODhNQTYrenhRYUtBRmFVMXFYMVB5YVkxcUZtUlhYeXh4TmhCMFlTQXl4CnJVOGRjd0lEQVFBQm8xWXdWREFPQmdOVkhROEJBZjhFQkFNQ0JhQXdFd1lEVlIwbEJBd3dDZ1lJS3dZQkJRVUgKQXdJd0RBWURWUjBUQVFIL0JBSXdBREFmQmdOVkhTTUVHREFXZ0JSZ3hEeDRnVzF2RDFKQnE2YkFoT3lmSGJMNgpkakFOQmdrcWhraUc5dzBCQVFzRkFBT0NBUUVBZ2tHMmVTWFA5aFNHL0czMzdoNTZXNzU3UXJaRDVHQStzNnQ3Ck9ZTDZrSDkvWUhEWGdITjJjUjNoRFBJNkZGTDM3bk5UQmZYc21EQmZwNEFUVnE0ZlkwRzVYZlczQWZodFhyaFkKZDVMZ1dnWVE3K0JsYWpaNUFlRUVIMGxIUlFwT2RtQndteVl5aWZLekprVWhBWHhOdHBOMUtVUVBhZnRFNER1QwovVnEzbEhlZHU5Zm1wQnVKWE1iNG9tblFqUXRJcy9ROEpDVk5zelBNdDVvQ2tVQ0ZCUHZqNUNEQ0dOQ2xSbm85CmRPYWFYbnAvaGJmOXoxZ1I5RXZQdGp5VE1nNGhucUM5blVPQ245ck9uQnd3eWtUS040ZWtjMXUrSGJaK2Q5dzUKOXpPK3NjWm1pOW5JekZDSW9wQ3VTZitlQWdmeWhjVzY5M0d3a3BhSytyRlN3UC9wL2c9PQotLS0tLUVORCBDRVJUSUZJQ0FURS0tLS0tCg==
    client-key-data: LS0tLS1CRUdJTiBSU0EgUFJJVkFURSBLRVktLS0tLQpNSUlFb3dJQkFBS0NBUUVBMmtQS1VoWXM2bllNMGMzQU9aZkxwbk1MUFp6Ryt4UnJiS0tJMkdWTDJuQlc1MUVvCkVPUzdVNEhKZ1RxYmtFa3gwSVFiYVkzS2dWVklhamlDR2lsU0RUT0ZuclhSd2c2MlFkZ2QwTzlPOTEwNnVzTHUKUVB0ejdrZUV1UGlkRlNqUlFjQW1FbFNIUThMWWsyUHdMWHZFS3JVOHNRd05PUDN1a0dwMFZGVWhQdG1pK2xPUQpiSGtibDdjNjdQWlpLeHdNNnZzbzhoYjBoazNIbldyY1dzeHJjZTFjeDZjSnQwL01OYy9YODBoTXdRV2pGaUFiCjd0elpwQm5jWUlxQ2Y3dUErTHNUQk8xODBvcERGNWE2dS9rVjluM1BaWUovT0tGRlExQU5lYzg4TUE2K3p4UWEKS0FGYVUxcVgxUHlhWTFxRm1SWFh5eHhOaEIwWVNBeXhyVThkY3dJREFRQUJBb0lCQUhmSnZNQlFhMVpDYzhheApwVTMyZ1U1WTFWSjdPTG1UKzJFajB2YndvVERCZHZCOUdnQXJpS1BNRjB0Vlh3dFJJSVhQK3p0ekZqRGxIVmt1CnFqaXhkTmJKOEF1cXZmUkRIc1FFV0ZqUy9nUEVwdmJaQk9tbEYzc3V4U2kvU1hiVGNBVWw3NzhmcFIwTFV0R1IKaDc5dXJickN2UXh1RU5PMmliZTR0UitUbVN0a1FtY0tZb3FJbVZWY0dJS1kvZjRsbkR6cmoxeDdERHc3ZUxJdwpTaloyTFh2bnpxdnp4Syt3SXBDdnhUWHJzRW85VWttMmtTalFLUzdHcFoyREp5NXVKbDhDQW41SkdBR3BrTWpmCjBGcEJ5WXo0cGtDdXBtZ0V2OUliRzlVT3VQSFJ4ZEIwbi8vRTlSYUxHT3E3SDFIeHkxSGJyeUNGQTdFUUVnVkoKVElVYVBBRUNnWUVBMjhnWFByVWpzUFhjbjFUL285a20xb3RHN0JTQjBpVGFvVzdYNk1xZGZEMncrSlRneWlObwp2WHlmdU9tRFhvd0IwdkM4K3dKSTFlYmZQZko3OERPUGFkNUpkOGNUeS9qTWVFWTAxem0yclJmK0FJbUNDTTJnCndRcnk1dmhEUWFBN0I5VFF1cGdHSGc1cTlQMzZWUW1XUzloUEJzY0ZDNUUrK1hyNy9iZTdKQWNDZ1lFQS9qdTEKMzdBeG9ZbFUwS3VuY2IwMHkvNHJDajc5S0YxTG1SbzlWd3VnR2g4aGNNL28raFpDZkg4MCtkK0RoUTM0clhvTQoyRVlUNHZNWVQxNUhla0gvd2RRQnhEeG12ZnZrMWRqSHZxZDdqTC8yeWVWck93b2dIbm80MW5LcTJxditJeVdUCnA1M1czNXFTWDM3em4zTW5VZDZRSmNUYnlHV0VYSmxsd2ZwUUdEVUNnWUFPcUlxOFdQSjNjLzV4OWdaUzFFSGQKMzA0c29yV0I0WWxmYVBnbmc1UDdYRlg0VGwycnZhN1hySDh1b3d4cSt1V0lQeHdybFp4ci84ajE1YjFVYU92dwp3SzJmdW54Y2gweUQzUkxiSS9OR0dpcUx1S0FlbkRCVGo3cGhvejlCR2tHMXBRRUM0TzdQaEdDbjFHU2sxVTNiCjR5SnFMazNzMXBRZnFZOHkvZFVTY3dLQmdRQ1BLcnp1N04vbUlkb2JjSzdveEMzNU9uYXVYRzVmenJvRnk5c0QKSzg3TEp3REQ4TEU0TkZUWW15SVFIS2lKd3lacE9yUUZEdUdnQ2xtRVNJbGo5Y3E3TWxLVVdaZGFJWUhxVXh1WQo1K1FSalFERERXam5aSHBWNzJvV2laaGhjRDI3T1N2L1ZrbHN2alR6aGlCWGlKZDU2U1d2dno0dGljMlIvK2huCjVqZzRpUUtCZ0JTYlVzbllBcjBYdUZzK0ZVMEFFNGtmSkY3Ukc3RldlQlVWK2lvcEVteStoSUd0ck1UZ0ZVZXYKTWdQQnlWOUpIRE1TaGxyeUVYVHB3MGt0MENFSlIxR0JFaE1jdUxHUUtHVUkzL2gvTnNTeml5cG8wQW5lcHJVeQpKa01HVk9NYUl1Y1MvdU5jS1hiVVVGQmNlTmlzRXdkMzRjRUVnWjcwNStZaEJFMGtGelIyCi0tLS0tRU5EIFJTQSBQUklWQVRFIEtFWS0tLS0tCg==
- name: cluster2-admin
  user:
    client-certificate-data: LS0tLS1CRUdJTiBDRVJUSUZJQ0FURS0tLS0tCk1JSURJVENDQWdtZ0F3SUJBZ0lJSDRJRFFDVVQrSU13RFFZSktvWklodmNOQVFFTEJRQXdGVEVUTUJFR0ExVUUKQXhNS2EzVmlaWEp1WlhSbGN6QWVGdzB5TXpFeU16RXdNalEzTWpCYUZ3MHlOREV5TXpBd01qVXlNakphTURReApGekFWQmdOVkJBb1REbk41YzNSbGJUcHRZWE4wWlhKek1Sa3dGd1lEVlFRREV4QnJkV0psY201bGRHVnpMV0ZrCmJXbHVNSUlCSWpBTkJna3Foa2lHOXcwQkFRRUZBQU9DQVE4QU1JSUJDZ0tDQVFFQXZDcGZiMmJLUE0yR3k0VkkKM0pmNU90czhFcE9MTnZoYTdOeFJPaG50NVlhVGduSTV0YUE3VFdyaGJxY1lyNzhnUHpMbUU1V2hpM1FjQWp5cQpzMlNBRlorY3paa3IzREVUdGZTS2plMnRYZFlrKzViUGhIZHU2czRwS2Z4bHRwcFRDWHZIMW9zVEVGL0FISzFYCmFuRjhFYk94djRVdUN1NXpGcm56V1FhUll3YXppYlhtR1hmTWdERzhTSVFoazFHKzBJRm5wSEJ0TFdUMGh3SXUKQlVjMXd0OVhhb2J0YVJaV25lK3FmTEhjYW9kbTl5dlRuVmpQK0pnblNZdm5IcDI3bkthMHIzRWpnY3VDTmtWMgpNVlVaS2NBUTRzVXlid2VSKzM0OVpoVFpIMlhVTVhSYUdEU3BrWDhJZEF4UFkvTnA0YnFISzZnN3FETTROWE1ZCi8vN3p4d0lEQVFBQm8xWXdWREFPQmdOVkhROEJBZjhFQkFNQ0JhQXdFd1lEVlIwbEJBd3dDZ1lJS3dZQkJRVUgKQXdJd0RBWURWUjBUQVFIL0JBSXdBREFmQmdOVkhTTUVHREFXZ0JRajlvbWsydlpCOFRKVm1OZEdQVnVndmYzSApPVEFOQmdrcWhraUc5dzBCQVFzRkFBT0NBUUVBc2JUUkJ4NnBzMHlTTG9NRnBOZlQrb3ZzanMzM1hOU2grSkdqCndzRkVqbXRxcklmQWhnb09rNXZ1Qko5WnJ5aXcveVlTZUhQNGsvOVNqY0kxWU14Nkk0QXFCeDFHUzd2OFR4Vk4KeXB2MTJBV3RnblNpR1ZoOFBDOFlTUHZQVDhhWDJiK2Mwa3cwWDQ3REpYUFZLbVNjV1ZJeFlaY1Y1b3h6MTVpdQo0S1JFSTdBSzllZ1NIZFpIOHpqblVmTFJpMDIvRTJiZ0kyTU9pSnc2WDByRDVsb3pWL0NOSmV6M0xUd1RuUVlCCjBOM1c0Z2FWcGI1ekdzVG44QzlqQmJzeUdLangrR29BcDE1TDFKaGVaSUVHYjRITjlZMi9iK0trWC9vMnlXd1EKbHVHMSthbVBZalU2cmt6RGJta2dkSDlZUDFhQndFVjg0T0QvU1EyOVBMM2RweFltaHc9PQotLS0tLUVORCBDRVJUSUZJQ0FURS0tLS0tCg==
    client-key-data: LS0tLS1CRUdJTiBSU0EgUFJJVkFURSBLRVktLS0tLQpNSUlFb3dJQkFBS0NBUUVBdkNwZmIyYktQTTJHeTRWSTNKZjVPdHM4RXBPTE52aGE3TnhST2hudDVZYVRnbkk1CnRhQTdUV3JoYnFjWXI3OGdQekxtRTVXaGkzUWNBanlxczJTQUZaK2N6WmtyM0RFVHRmU0tqZTJ0WGRZays1YlAKaEhkdTZzNHBLZnhsdHBwVENYdkgxb3NURUYvQUhLMVhhbkY4RWJPeHY0VXVDdTV6RnJueldRYVJZd2F6aWJYbQpHWGZNZ0RHOFNJUWhrMUcrMElGbnBIQnRMV1QwaHdJdUJVYzF3dDlYYW9idGFSWlduZStxZkxIY2FvZG05eXZUCm5WalArSmduU1l2bkhwMjduS2EwcjNFamdjdUNOa1YyTVZVWktjQVE0c1V5YndlUiszNDlaaFRaSDJYVU1YUmEKR0RTcGtYOElkQXhQWS9OcDRicUhLNmc3cURNNE5YTVkvLzd6eHdJREFRQUJBb0lCQUZzdjdhLy9FR01HOXh3SwpLNVU3MFB4RTRvZmVHTWs2OGxWM0w2WUlpdEdBdGx1eEgyWjFrRWVrVkR0Ym53c01oSVFjRm9QSEw5SjFJbDJ6CktNWm5IZXRjdnBDa2VpenJXN0lDSUdOSG00eXVDcDRpSjg3NlVqWllVbnFXWm5SbnRYWVRGblZTVUpyT3pEc1oKaGhOL2k3RElkSXRyN3pROCttazVGRVZBZVpTVEJaTEhoV3hCeW1TWkZ5WkZlMlh6RVpRbnZuVjZNckxldjhGTQpHS2pDSGZNOGJhbTV5dGovTklLOVFOVkpmelczQ0l2enVuSE5RQzVoSzM5TWZ6WlIwK1pJK0NDZnVKa3VoZjEzCnhTNmpmcjZ4blZGaVhHbnFDdEZZQUlHeW1LelJWS3E0SHJ6R0h6OGJDU3pJS3lUbmd1NHNzTVc4WlpFdE9ER3IKVE1tbi9BRUNnWUVBek5BSHhSOURLejdXUnpZakhNNytBc0ZFVXRENWhJN0xSU1lQQmhmdGF6akVwZzlPU0dqNQp3YXA4VU82dW40c1dBV0ZwdUFDMUExT204bElQd1Y2U1VpVTZuSTZIQTFJYWFNMlJMYit3V3lpSFUyTkkwMzZmCitKVHVQNDdVN3BZUW1QL1gzM0RubGhmOXBhanBGZ3JhUW42T3pwa3MvUEFqTEk0Q3VVaTJZMmNDZ1lFQTZ6RkIKbWVzTzZ2a2JoaG5CM0F6UnJNaDlTVFdKN2c5T1dOZGdEWlFsdzJjekQzUHNRbEZvc1U3ZnlGRXZrUGRBWnp6TgpCTDEyNXg0cEdWMHMrVHZZUWpIdkkwVjZYYUhGT1kzZFp2VWV4QzEwV3ZGZDBzZ2RaNmdPRzB2UG9ZdXo0WmZvCmZscW54YXBORm1IQ3NVK3BpTFk2ajRxQ0hqMGlhWTBaK20vTUVLRUNnWUFkWHIrZWZ1c3M2bWZqOGxsNnFodzIKM093bFRCNWI2Zll3UmxMbE5zMHZFUWJ5SVVQQ2tuc3VVSHBmU0xyMTJnWWYwSTVPZXB0NmpLWm1IV3B3K2xUVgpQczEyNGVGdWtubURDZWVGdmZWV1BTdWF3NlFQNEJxa2xRYk5Tbmd5ZG9hT3lqRjBzMFlpZWZJL3JVY3ZpQUxnCmdqR01ZdDdXcnNEOGhLalRWU0FDaFFLQmdEay9OQWlTL242VFErL1FOUytxcng2dmJrOXppSzg1YW9pVlkvdnEKSTRiOGg2RXJSa2FlS2kxK1ZWb2M2TWNRWjh5NUwrNEhiL214amE5dXpwT2J6WGZQVDdYMkkyTEhEWXFFelc5UwpHcnNGbFZ6TmcxamEvTTFPU3FDNlF6Ky9FWG5Iei85eGNZVGJmd2dEbzdBbEE4OFREQTRFV01lamVjelhXNHRwCnl2SUJBb0dCQUwvTml6RWl6UHR2YjBOaFJOTmJuUFpqUzdsa2k5cDd2ZUcrNTNWKytZVTc0Q0V3UVMvTjJxSU4KNDZiK3FkMnVmRU5kUEdDSTBENCtTQzZrOVlLUFpRK2MyQXF3VVBackZpTGI5Y2VGai9hQlFOa2hqaXlUbWtQQQpZZDIwQldGZytPVkZ0a0NLTFEyajhjZVp0TGs5RENySmE1VjFUZFNoL1gweUJycnZVTjBZCi0tLS0tRU5EIFJTQSBQUklWQVRFIEtFWS0tLS0tCg==
# kubectl get nodes --context cluster1
NAME STATUS ROLES AGE VERSION
k8s-master01-c1 NotReady control-plane 28h v1.28.5
k8s-worker01-c1 NotReady <none> 28h v1.28.5
k8s-worker02-c1 NotReady <none> 28h v1.28.5# kubectl get nodes --context cluster2
NAME STATUS ROLES AGE VERSION
k8s-master01-c2 NotReady control-plane 28h v1.28.5
k8s-worker01-c2 NotReady <none> 28h v1.28.5
k8s-worker02-c2 NotReady <none> 28h v1.28.5四、Cilium客户端安装
2套K8S集群均需要安装
# curl -L --remote-name-all https://github.com/cilium/cilium-cli/releases/latest/download/cilium-linux-amd64.tar.gz{,.sha256sum}# tar xf cilium-linux-amd64.tar.gz# mv cilium /usr/bin/# cilium status输出内容:
/¯¯\
/¯¯\__/¯¯\ Cilium: 1 errors
\__/¯¯\__/ Operator: disabled
/¯¯\__/¯¯\ Envoy DaemonSet: disabled (using embedded mode)
\__/¯¯\__/ Hubble Relay: disabled
\__/ ClusterMesh: disabled
Containers: cilium
cilium-operator
Cluster Pods: 0/0 managed by Cilium
Helm chart version:
Errors: cilium cilium daemonsets.apps "cilium" not found五、Cilium部署
2套K8S集群部署
5.1 helm安装
# wget https://get.helm.sh/helm-v3.13.3-linux-amd64.tar.gz# tar xf helm-v3.13.3-linux-amd64.tar.gz# mv linux-amd64/helm /usr/bin/helm# helm version5.2 cilium安装
# helm repo add cilium https://helm.cilium.io/# helm repo update# helm search repo cilium# helm install --kube-context cluster1 cilium cilium/cilium --version 1.14.5 --namespace kube-system --set ipam.mode=kubernetes --set cluster.id=1 --set cluster.name=cluster1# helm install --kube-context cluster2 cilium cilium/cilium --version 1.14.5 --namespace kube-system --set ipam.mode=kubernetes --set cluster.id=2 --set cluster.name=cluster2# cilium status
/¯¯\
/¯¯\__/¯¯\ Cilium: OK
\__/¯¯\__/ Operator: OK
/¯¯\__/¯¯\ Envoy DaemonSet: disabled (using embedded mode)
\__/¯¯\__/ Hubble Relay: disabled
\__/ ClusterMesh: disabled
Deployment cilium-operator Desired: 2, Ready: 2/2, Available: 2/2
DaemonSet cilium Desired: 3, Ready: 3/3, Available: 3/3
Containers: cilium Running: 3
cilium-operator Running: 2
Cluster Pods: 2/2 managed by Cilium
Helm chart version: 1.14.5
Image versions cilium quay.io/cilium/cilium:v1.14.5@sha256:d3b287029755b6a47dee01420e2ea469469f1b174a2089c10af7e5e9289ef05b: 3
cilium-operator quay.io/cilium/operator-generic:v1.14.5@sha256:303f9076bdc73b3fc32aaedee64a14f6f44c8bb08ee9e3956d443021103ebe7a: 2六、负载均衡器metallb部署
6.1 cluster1安装
6.1.1 metallb部署
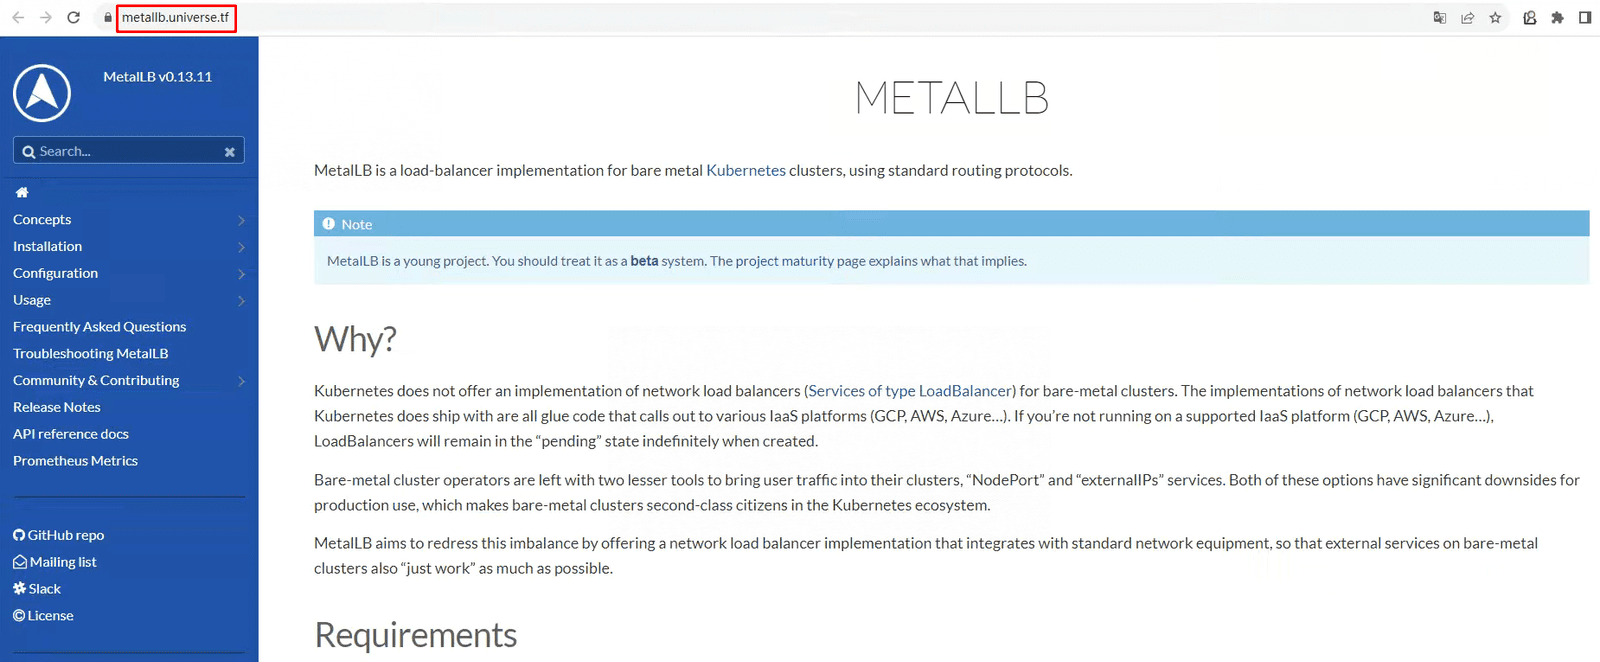
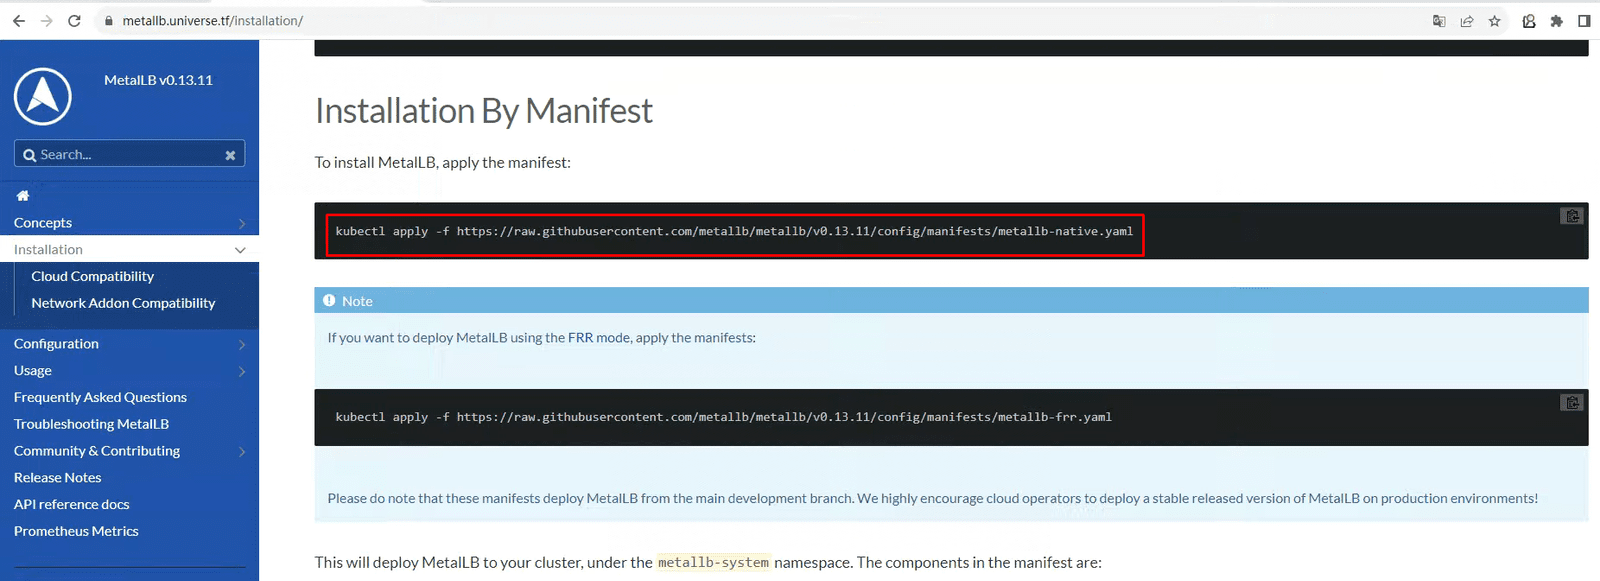
# kubectl apply -f https://raw.githubusercontent.com/metallb/metallb/v0.13.11/config/manifests/metallb-native.yaml6.1.2 IP地址池准备
# vim ippool.yaml
# cat ippool.yaml
apiVersion: metallb.io/v1beta1
kind: IPAddressPool
metadata:
  name: first-pool
  namespace: metallb-system
spec:
  addresses:
  - 192.168.10.220-192.168.10.230
# kubectl apply -f ippool.yaml6.1.3 开启二层通告
# vim l2.yaml
# cat l2.yaml
apiVersion: metallb.io/v1beta1
kind: L2Advertisement
metadata:
  name: example
  namespace: metallb-system
# kubectl apply -f l2.yaml6.2 cluster2安装
6.2.1 metallb部署
# kubectl apply -f https://raw.githubusercontent.com/metallb/metallb/v0.13.11/config/manifests/metallb-native.yaml6.2.2 IP地址池准备
# vim ippool.yaml
# cat ippool.yaml
apiVersion: metallb.io/v1beta1
kind: IPAddressPool
metadata:
  name: first-pool
  namespace: metallb-system
spec:
  addresses:
  - 192.168.10.231-192.168.10.240
# kubectl apply -f ippool.yaml6.2.3 开启二层通告
# vim l2.yaml
# cat l2.yaml
apiVersion: metallb.io/v1beta1
kind: L2Advertisement
metadata:
  name: example
  namespace: metallb-system
# kubectl apply -f l2.yaml七、开启 Cilium Cluster Mesh
# cilium clustermesh enable --context cluster1 --service-type LoadBalancer# cilium clustermesh enable --context cluster2 --service-type LoadBalancer# cilium status --context cluster2
/¯¯\
/¯¯\__/¯¯\ Cilium: OK
\__/¯¯\__/ Operator: OK
/¯¯\__/¯¯\ Envoy DaemonSet: disabled (using embedded mode)
\__/¯¯\__/ Hubble Relay: disabled
\__/ ClusterMesh: OK
Deployment clustermesh-apiserver Desired: 1, Ready: 1/1, Available: 1/1
DaemonSet cilium Desired: 3, Ready: 3/3, Available: 3/3
Deployment cilium-operator Desired: 2, Ready: 2/2, Available: 2/2
Containers: cilium Running: 3
clustermesh-apiserver Running: 1
cilium-operator Running: 2
Cluster Pods: 4/4 managed by Cilium
Helm chart version: 1.14.5
Image versions cilium quay.io/cilium/cilium:v1.14.5@sha256:d3b287029755b6a47dee01420e2ea469469f1b174a2089c10af7e5e9289ef05b: 3
clustermesh-apiserver quay.io/coreos/etcd:v3.5.4@sha256:795d8660c48c439a7c3764c2330ed9222ab5db5bb524d8d0607cac76f7ba82a3: 1
clustermesh-apiserver quay.io/cilium/clustermesh-apiserver:v1.14.5@sha256:7eaa35cf5452c43b1f7d0cde0d707823ae7e49965bcb54c053e31ea4e04c3d96: 1
cilium-operator quay.io/cilium/operator-generic:v1.14.5@sha256:303f9076bdc73b3fc32aaedee64a14f6f44c8bb08ee9e3956d443021103ebe7a: 2# cilium status --context cluster2
/¯¯\
/¯¯\__/¯¯\ Cilium: OK
\__/¯¯\__/ Operator: OK
/¯¯\__/¯¯\ Envoy DaemonSet: disabled (using embedded mode)
\__/¯¯\__/ Hubble Relay: disabled
\__/ ClusterMesh: OK
Deployment clustermesh-apiserver Desired: 1, Ready: 1/1, Available: 1/1
Deployment cilium-operator Desired: 2, Ready: 2/2, Available: 2/2
DaemonSet cilium Desired: 3, Ready: 3/3, Available: 3/3
Containers: cilium-operator Running: 2
clustermesh-apiserver Running: 1
cilium Running: 3
Cluster Pods: 4/4 managed by Cilium
Helm chart version: 1.14.5
Image versions cilium quay.io/cilium/cilium:v1.14.5@sha256:d3b287029755b6a47dee01420e2ea469469f1b174a2089c10af7e5e9289ef05b: 3
cilium-operator quay.io/cilium/operator-generic:v1.14.5@sha256:303f9076bdc73b3fc32aaedee64a14f6f44c8bb08ee9e3956d443021103ebe7a: 2
clustermesh-apiserver quay.io/coreos/etcd:v3.5.4@sha256:795d8660c48c439a7c3764c2330ed9222ab5db5bb524d8d0607cac76f7ba82a3: 1
clustermesh-apiserver quay.io/cilium/clustermesh-apiserver:v1.14.5@sha256:7eaa35cf5452c43b1f7d0cde0d707823ae7e49965bcb54c053e31ea4e04c3d96: 1八、创建Cilium Cluster Mesh集群
仅需要在一个集群上执行即可 。
# cilium clustermesh connect --context cluster1 --destination-context cluster2输出内容:
✅ Detected Helm release with Cilium version 1.14.5
✨ Extracting access information of cluster cluster2...
🔑 Extracting secrets from cluster cluster2...
ℹ️ Found ClusterMesh service IPs: [192.168.10.231]
✨ Extracting access information of cluster cluster1...
🔑 Extracting secrets from cluster cluster1...
ℹ️ Found ClusterMesh service IPs: [192.168.10.220]
⚠️ Cilium CA certificates do not match between clusters. Multicluster features will be limited!
ℹ️ Configuring Cilium in cluster 'cluster1' to connect to cluster 'cluster2'
ℹ️ Configuring Cilium in cluster 'cluster2' to connect to cluster 'cluster1'
✅ Connected cluster cluster1 and cluster2!# cilium clustermesh status --context cluster1输出内容:
✅ Service "clustermesh-apiserver" of type "LoadBalancer" found
✅ Cluster access information is available:
- 192.168.10.220:2379
✅ Deployment clustermesh-apiserver is ready
✅ All 3 nodes are connected to all clusters [min:1 / avg:1.0 / max:1]
🔌 Cluster Connections:
- cluster2: 3/3 configured, 3/3 connected
🔀 Global services: [ min:0 / avg:0.0 / max:0 ]# cilium clustermesh status --context cluster2输出内容:
✅ Service "clustermesh-apiserver" of type "LoadBalancer" found
✅ Cluster access information is available:
- 192.168.10.231:2379
✅ Deployment clustermesh-apiserver is ready
✅ All 3 nodes are connected to all clusters [min:1 / avg:1.0 / max:1]
🔌 Cluster Connections:
- cluster1: 3/3 configured, 3/3 connected
🔀 Global services: [ min:0 / avg:0.0 / max:0 ]九、多K8S集群负载均衡案例
9.1 全局负载均衡
案例链接:https://github.com/cilium/cilium/tree/main/examples/kubernetes/clustermesh/global-service-example
在集群中部署两个应用,其中 x-wing 是客户端,rebel-base 是服务端,要求对 rebel-base 服务实现全局负载均衡。需要保证每个集群中的 rebel-base 服务名称相同并且在相同的命名空间中,然后添加 service.cilium.io/global: "true" 声明为全局服务,这样 Cilium 便会自动对两个集群中的 Pod 执行负载均衡。
# vim cluster1.yaml
# cat cluster1.yaml
---
apiVersion: v1
kind: Service
metadata:
  name: rebel-base
  annotations:
    service.cilium.io/global: "true"
spec:
  type: ClusterIP
  ports:
  - port: 80
  selector:
    name: rebel-base
---
apiVersion: apps/v1
kind: Deployment
metadata:
  name: rebel-base
spec:
  selector:
    matchLabels:
      name: rebel-base
  replicas: 2
  template:
    metadata:
      labels:
        name: rebel-base
    spec:
      containers:
      - name: rebel-base
        image: docker.io/nginx:1.15.8
        volumeMounts:
          - name: html
            mountPath: /usr/share/nginx/html/
        livenessProbe:
          httpGet:
            path: /
            port: 80
          periodSeconds: 1
        readinessProbe:
          httpGet:
            path: /
            port: 80
      volumes:
        - name: html
          configMap:
            name: rebel-base-response
            items:
              - key: message
                path: index.html
---
apiVersion: v1
kind: ConfigMap
metadata:
  name: rebel-base-response
data:
  message: "{\"Galaxy\": \"Alderaan\", \"Cluster\": \"Cluster-1\"}\n"
---
apiVersion: apps/v1
kind: Deployment
metadata:
  name: x-wing
spec:
  selector:
    matchLabels:
      name: x-wing
  replicas: 2
  template:
    metadata:
      labels:
        name: x-wing
    spec:
      containers:
      - name: x-wing-container
        image: quay.io/cilium/json-mock:v1.3.3@sha256:f26044a2b8085fcaa8146b6b8bb73556134d7ec3d5782c6a04a058c945924ca0
        livenessProbe:
          exec:
            command:
            - curl
            - -sS
            - -o
            - /dev/null
            - localhost
        readinessProbe:
          exec:
            command:
            - curl
            - -sS
            - -o
            - /dev/null
            - localhost
# vim cluster2.yaml
# cat cluster2.yaml
---
apiVersion: v1
kind: Service
metadata:
name: rebel-base
annotations:
service.cilium.io/global: "true"
spec:
type: ClusterIP
ports:
- port: 80
selector:
name: rebel-base
---
apiVersion: apps/v1
kind: Deployment
metadata:
name: rebel-base
spec:
selector:
matchLabels:
name: rebel-base
replicas: 2
template:
metadata:
labels:
name: rebel-base
spec:
containers:
- name: rebel-base
image: docker.io/nginx:1.15.8
volumeMounts:
- name: html
mountPath: /usr/share/nginx/html/
livenessProbe:
httpGet:
path: /
port: 80
periodSeconds: 1
readinessProbe:
httpGet:
path: /
port: 80
volumes:
- name: html
configMap:
name: rebel-base-response
items:
- key: message
path: index.html
---
apiVersion: v1
kind: ConfigMap
metadata:
name: rebel-base-response
data:
message: "{\"Galaxy\": \"Alderaan\", \"Cluster\": \"Cluster-2\"}\n"
---
apiVersion: apps/v1
kind: Deployment
metadata:
name: x-wing
spec:
selector:
matchLabels:
name: x-wing
replicas: 2
template:
metadata:
labels:
name: x-wing
spec:
containers:
- name: x-wing-container
image: quay.io/cilium/json-mock:v1.3.3@sha256:f26044a2b8085fcaa8146b6b8bb73556134d7ec3d5782c6a04a058c945924ca0
livenessProbe:
exec:
command:
- curl
- -sS
- -o
- /dev/null
- localhost
readinessProbe:
exec:
command:
- curl
- -sS
- -o
- /dev/null
- localhost# kubectl apply -f cluster1.yaml --context cluster1# kubectl apply -f cluster2.yaml --context cluster2# kubectl get pods --context cluster1
# kubectl get svc --context cluster1
# kubectl get pods --context cluster2
# kubectl get svc --context cluster2# for i in {1..10}; do kubectl exec --context cluster1 -ti deployment/x-wing -- curl rebel-base; done输出内容:
{"Galaxy": "Alderaan", "Cluster": "Cluster-1"}
{"Galaxy": "Alderaan", "Cluster": "Cluster-1"}
{"Galaxy": "Alderaan", "Cluster": "Cluster-2"}
{"Galaxy": "Alderaan", "Cluster": "Cluster-2"}
{"Galaxy": "Alderaan", "Cluster": "Cluster-2"}
{"Galaxy": "Alderaan", "Cluster": "Cluster-2"}
{"Galaxy": "Alderaan", "Cluster": "Cluster-2"}
{"Galaxy": "Alderaan", "Cluster": "Cluster-2"}
{"Galaxy": "Alderaan", "Cluster": "Cluster-1"}
{"Galaxy": "Alderaan", "Cluster": "Cluster-1"}# for i in {1..10}; do kubectl exec --context cluster2 -ti deployment/x-wing -- curl rebel-base; done输出内容:
{"Galaxy": "Alderaan", "Cluster": "Cluster-1"}
{"Galaxy": "Alderaan", "Cluster": "Cluster-1"}
{"Galaxy": "Alderaan", "Cluster": "Cluster-2"}
{"Galaxy": "Alderaan", "Cluster": "Cluster-1"}
{"Galaxy": "Alderaan", "Cluster": "Cluster-2"}
{"Galaxy": "Alderaan", "Cluster": "Cluster-1"}
{"Galaxy": "Alderaan", "Cluster": "Cluster-2"}
{"Galaxy": "Alderaan", "Cluster": "Cluster-2"}
{"Galaxy": "Alderaan", "Cluster": "Cluster-2"}
{"Galaxy": "Alderaan", "Cluster": "Cluster-2"}# kubectl run a1 -it --rm --image=yauritux/busybox-curl:latest /bin/sh
If you don't see a command prompt, try pressing enter.
/home # curl http://rebel-base
{"Galaxy": "Alderaan", "Cluster": "Cluster-1"}
/home # curl http://rebel-base
{"Galaxy": "Alderaan", "Cluster": "Cluster-2"}9.2 禁用全局服务共享
默认情况下,全局服务将在多个集群中的后端进行负载均衡。如果想要禁止本集群的服务被共享给其他集群,可以设置 io.cilium/shared-service: "false" 注解来实现。
# kubectl annotate service rebel-base io.cilium/shared-service="false" --overwrite --context cluster1# for i in {1..10}; do kubectl exec --context cluster1 -ti deployment/x-wing -- curl rebel-base; done输出内容:
{"Galaxy": "Alderaan", "Cluster": "Cluster-2"}
{"Galaxy": "Alderaan", "Cluster": "Cluster-2"}
{"Galaxy": "Alderaan", "Cluster": "Cluster-1"}
{"Galaxy": "Alderaan", "Cluster": "Cluster-2"}
{"Galaxy": "Alderaan", "Cluster": "Cluster-2"}
{"Galaxy": "Alderaan", "Cluster": "Cluster-2"}
{"Galaxy": "Alderaan", "Cluster": "Cluster-1"}
{"Galaxy": "Alderaan", "Cluster": "Cluster-1"}
{"Galaxy": "Alderaan", "Cluster": "Cluster-2"}
{"Galaxy": "Alderaan", "Cluster": "Cluster-1"}# for i in {1..10}; do kubectl exec --context cluster2 -ti deployment/x-wing -- curl rebel-base; done输出内容:
{"Galaxy": "Alderaan", "Cluster": "Cluster-2"}
{"Galaxy": "Alderaan", "Cluster": "Cluster-2"}
{"Galaxy": "Alderaan", "Cluster": "Cluster-2"}
{"Galaxy": "Alderaan", "Cluster": "Cluster-2"}
{"Galaxy": "Alderaan", "Cluster": "Cluster-2"}
{"Galaxy": "Alderaan", "Cluster": "Cluster-2"}
{"Galaxy": "Alderaan", "Cluster": "Cluster-2"}
{"Galaxy": "Alderaan", "Cluster": "Cluster-2"}
{"Galaxy": "Alderaan", "Cluster": "Cluster-2"}
{"Galaxy": "Alderaan", "Cluster": "Cluster-2"}# kubectl annotate service rebel-base io.cilium/shared-service- --context cluster1# for i in {1..10}; do kubectl exec --context cluster2 -ti deployment/x-wing -- curl rebel-base; done输出内容:
{"Galaxy": "Alderaan", "Cluster": "Cluster-2"}
{"Galaxy": "Alderaan", "Cluster": "Cluster-2"}
{"Galaxy": "Alderaan", "Cluster": "Cluster-1"}
{"Galaxy": "Alderaan", "Cluster": "Cluster-2"}
{"Galaxy": "Alderaan", "Cluster": "Cluster-2"}
{"Galaxy": "Alderaan", "Cluster": "Cluster-2"}
{"Galaxy": "Alderaan", "Cluster": "Cluster-2"}
{"Galaxy": "Alderaan", "Cluster": "Cluster-1"}
{"Galaxy": "Alderaan", "Cluster": "Cluster-1"}
{"Galaxy": "Alderaan", "Cluster": "Cluster-1"}十、网络策略
创建 CiliumNetworkPolicy 策略只允许 cluster1 集群中带有 x-wing 标签的 Pod 访问 cluster2 集群中带有 rebel-base 标签的 Pod。集群名字是在 **5 .2 Cilium 安装小节中通过 --cluster-name 参数指定的,也可以在 **cilium-config Configmap 中找到。除了应用服务之间的流量,还需注意放行 DNS 的流量,否则无法直接通过 Service 名字进行访问。
# vim networkpolicy.yaml
# cat networkpolicy.yaml
apiVersion: cilium.io/v2
kind: CiliumNetworkPolicy
metadata:
  name: "allow-dns"
spec:
  endpointSelector: {}
  egress:
    - toEndpoints:
        - matchLabels:
            io.kubernetes.pod.namespace: kube-system
            k8s-app: kube-dns
      toPorts:
        - ports:
            - port: "53"
              protocol: UDP
          rules:
            dns:
              - matchPattern: "*"
---
apiVersion: "cilium.io/v2"
kind: CiliumNetworkPolicy
metadata:
  name: "allow-cross-cluster"
spec:
  description: "Allow x-wing in cluster1 to contact rebel-base in cluster2"
  endpointSelector:
    matchLabels:
      name: x-wing
      io.cilium.k8s.policy.cluster: cluster1
  egress:
  - toEndpoints:
    - matchLabels:
        name: rebel-base
        io.cilium.k8s.policy.cluster: cluster2
Kubernetes 的网络策略不会自动发布到所有集群,你需要在每个集群上下发 NetworkPolicy 或 CiliumNetworkPolicy。
# kubectl apply -f networkpolicy.yaml --context cluster1# kubectl apply -f networkpolicy.yaml --context cluster2在 cluster1集群上访问 rebel-base 服务,可以看到只有分发到 cluster2集群上的请求才可以成功得到响应。
# kubectl exec --context cluster1 -it deployment/x-wing -- curl rebel-base输出内容:
{"Galaxy": "Alderaan", "Cluster": "Cluster-2"}